


Ammonia Test (NH3/NH4)
User manual
Understanding and controlling ammonia levels
Ammonia (chemically abbreviated as NH3) is a waste product of fish, which they excrete through their gills and their urine. Ammonia is very poisonous for all water life and thus it is very important to keep the ammonia level zero.
Fortunately, bacteria in the water break down ammonia into nitrite and subsequently the non-toxic nitrate; these are the so-called nitrifying bacteria of the families of Nitrosomonas and Nitrobacter. Obviously, these bacteria are essential for a healthy aquarium and pond. The best way to harbour these bacteria is in a biological filter. A new ‘clean’ filter needs time to have a sufficient number of bacteria to grow inside it. You can give this growth a boost by adding the right type of bacteria from the moment the biological filter is started. For all types of water, Colombo has the right product with the right bacteria.
An optimal ammonia content in all types of water is simply 0 mg/l. When ammonia is 0.5 mg/l or higher, it means that aren’t enough bacteria present and thus it is wise to add a suitable Colombo bacteria culture. Add Colombo AquaCare to your tank or Colombo BactoClear to your pond to bind and detoxify the ammonia. At an ammonia level of 1.0 mg/l, ammonia can become toxic, and thus it is wise to first refresh 25% of the water. At ammonia levels of 2.0 mg/l and higher, you should directly refresh 50% or more until the ammonia level is <0.5 mg/l.
General Guidelines
- Always take care that the test tube is clean before use.
- Clean the tube directly after use.
- Take the volume of the water sample as precisely as possible.
- Keep the drop bottle perfectly vertical during dropping.
- Take care that no air bubbles are included in the drops.
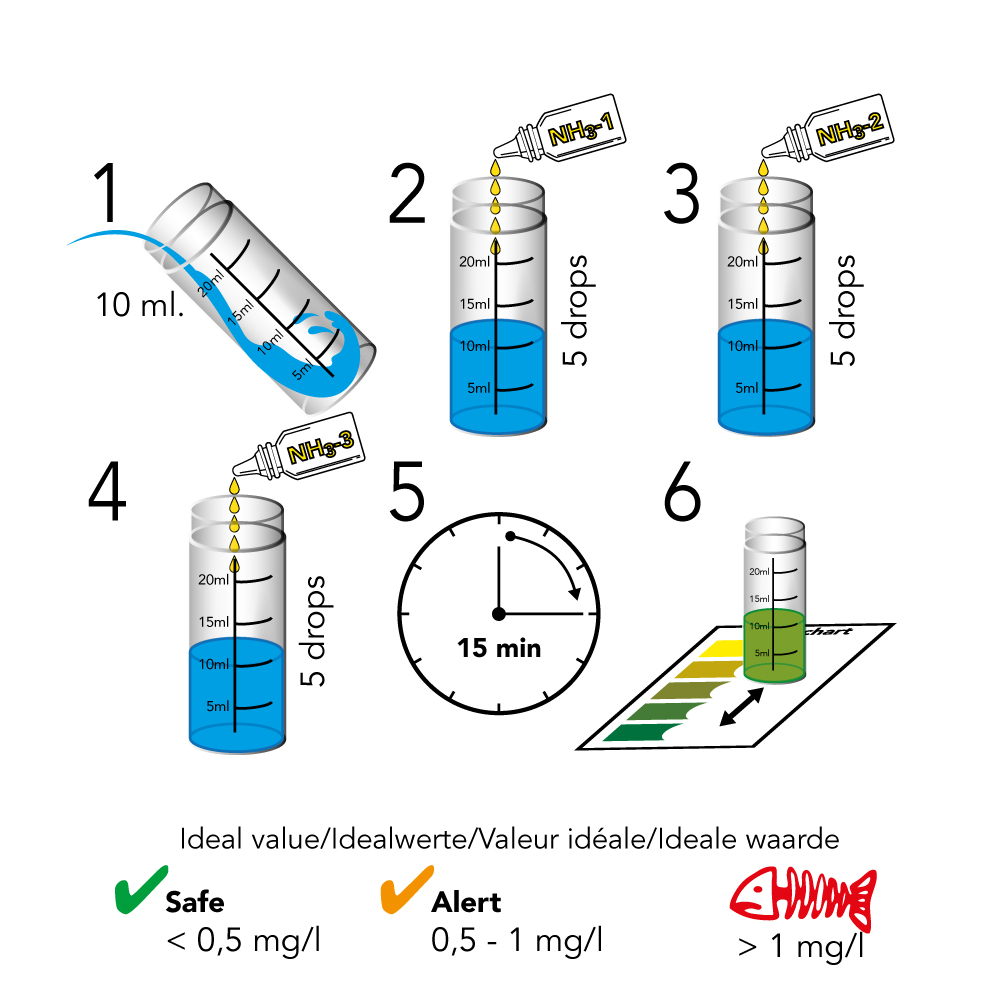
Test procedure:
- Take a water sample of 10 ml.
- Add 5 drops of NH3-1 test fluid and shake.
- Add 5 drops of NH3-2 test fluid and shake again.
- Add 5 drops of NH3-3 test fluid and shake again.
- Wait 15 minutes.
- Determine the NH3-value using the included colour chart.
Test procedure:
- Take a water sample of 10 ml.
- Add 5 drops of NH3-1 test fluid and shake.
- Add 5 drops of NH3-2 test fluid and shake again.
- Add 5 drops of NH3-3 test fluid and shake again.
- Wait 15 minutes.
- Determine the NH3-value using the included colour chart.
For judging the colour of the water sample after adding all the test fluids, proceed as follows: put the test tube on the included colour chart and look through the tube on to the chart from directly above it. Do not look in direct sun light, but at indirect light. Compare the colour of the water sample with the colours on the chart. The closest colour shows the corresponding value. Generally the colours of the sample and on the chart will not be exactly the same, as values in practice will always be between the standard values, and thus a mixture of both consecutive values. Therefore, one should estimate between which colours the sample really lies.
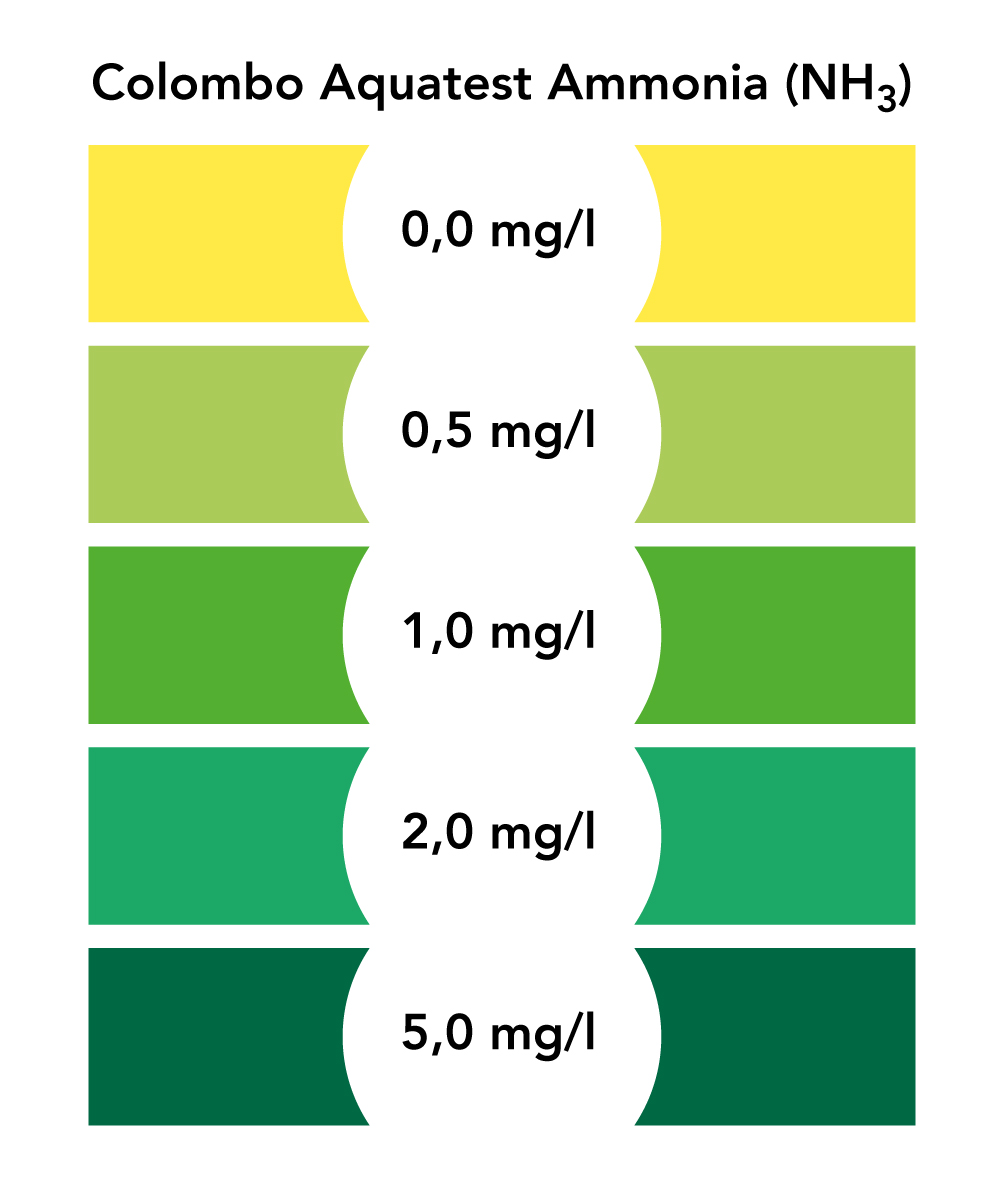
For judging the colour of the water sample after adding all the test fluids, proceed as follows: put the test tube on the included colour chart and look through the tube on to the chart from directly above it. Do not look in direct sun light, but at indirect light. Compare the colour of the water sample with the colours on the chart. The closest colour shows the corresponding value. Generally the colours of the sample and on the chart will not be exactly the same, as values in practice will always be between the standard values, and thus a mixture of both consecutive values. Therefore, one should estimate between which colours the sample really lies.