


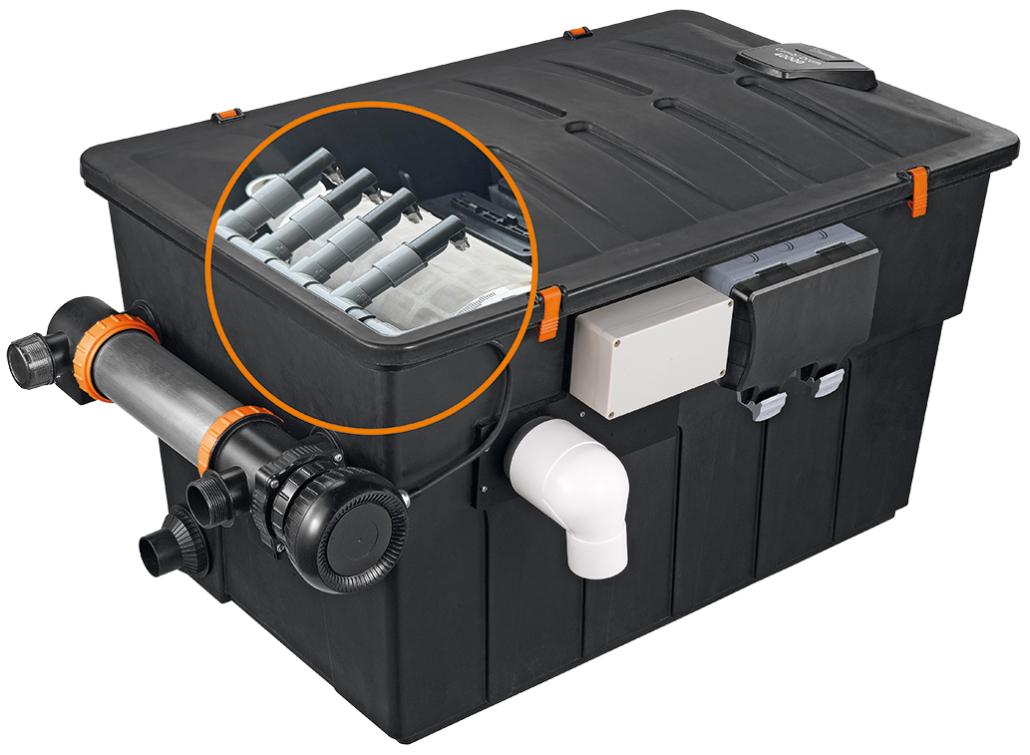
Combi Drum 40000
User manual
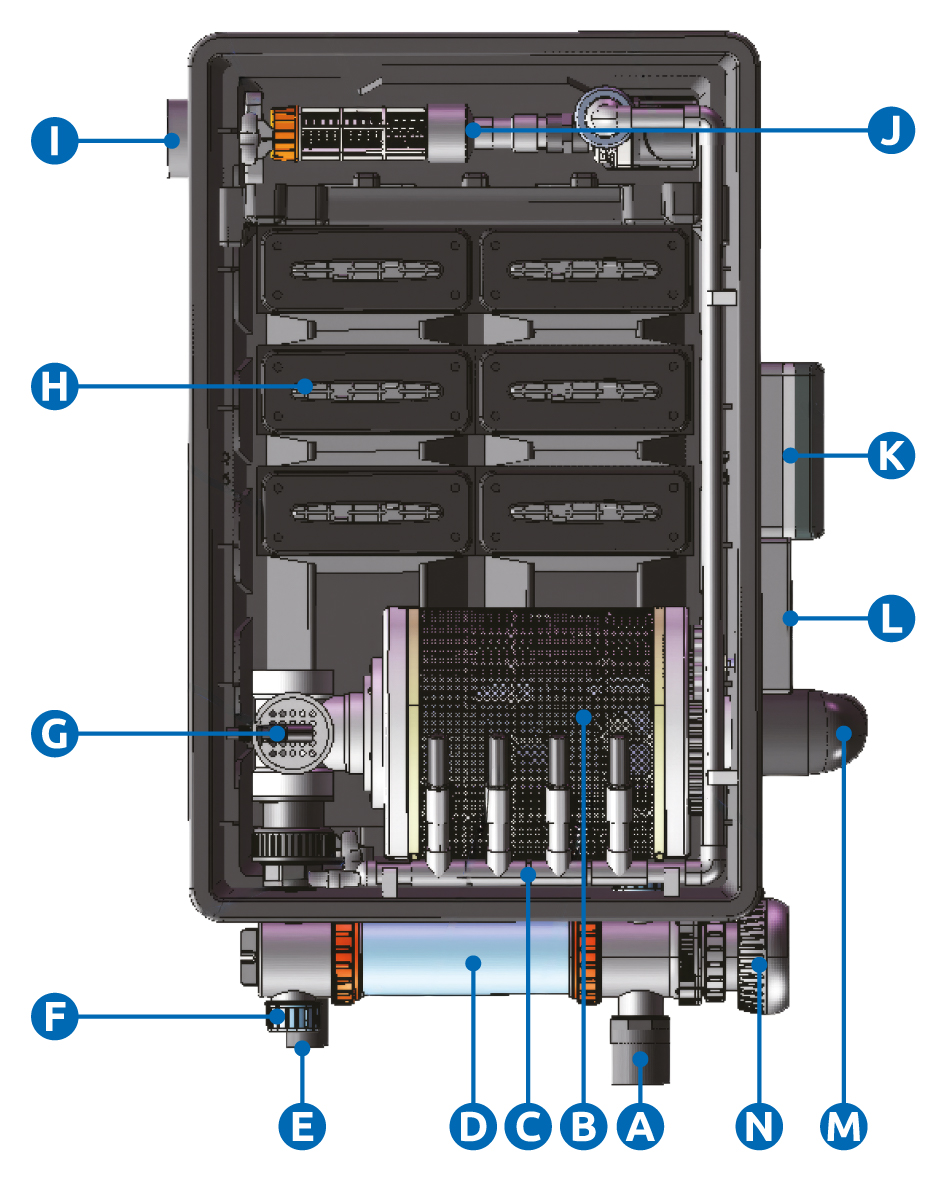
Product overview
A – Inlet (Ø 25/32/38 mm)
B – Drum/screen
C – Spray system
D – UVC housing
E – Sludge drain (Ø 50 mm)
F – UV control glass
G – Floater
H – Filter foam (6x)
I – Outlet (Ø 75 mm)
J – Rinse pump
K – Control box
L – Electro motor
M – Backwash drain (Ø 50/75 mm)
N – UVC Unit head (36 watt)
Function
The SuperFish Combi Drum 40000 filter is suitable for plant ponds up to 40,000 litres, fish ponds up to 20,000 litres and Koi ponds up to 10,000 litres.
The filter removes debris from the pond water through both mechanical and biological filtration, keeping the pond clean, healthy and clear. A pond pump first pumps the water through the connected UVC unit and into the filter. The water flows through the filter drum, where waste and small debris particles are captured by the screen (mechanical filtration). The water then flows through the filter foams in the second filter chamber, where beneficial bacteria convert harmful substances (ammonia and nitrite) into less harmful nitrate. This process is known as biological filtration. The filtered water then flows back into the pond through the outlet. The drum acts as a pre-filter. When the screen becomes saturated with debris, the spray system will clean the screen automatically (the drum will start turning) and flushes the debris into the backwash drain. The rinse pump uses filtered water from the rear filter chamber for this process. As a result, the filter requires minimal maintenance.
Installation
- Position the filter in a sheltered location, away from direct sunlight.

NOTICE! Ensure that the filter is level and positioned above the pond’s water level.
- Before installation, rinse the inside of the filter, the filter foams and all accessories with clean tap water.
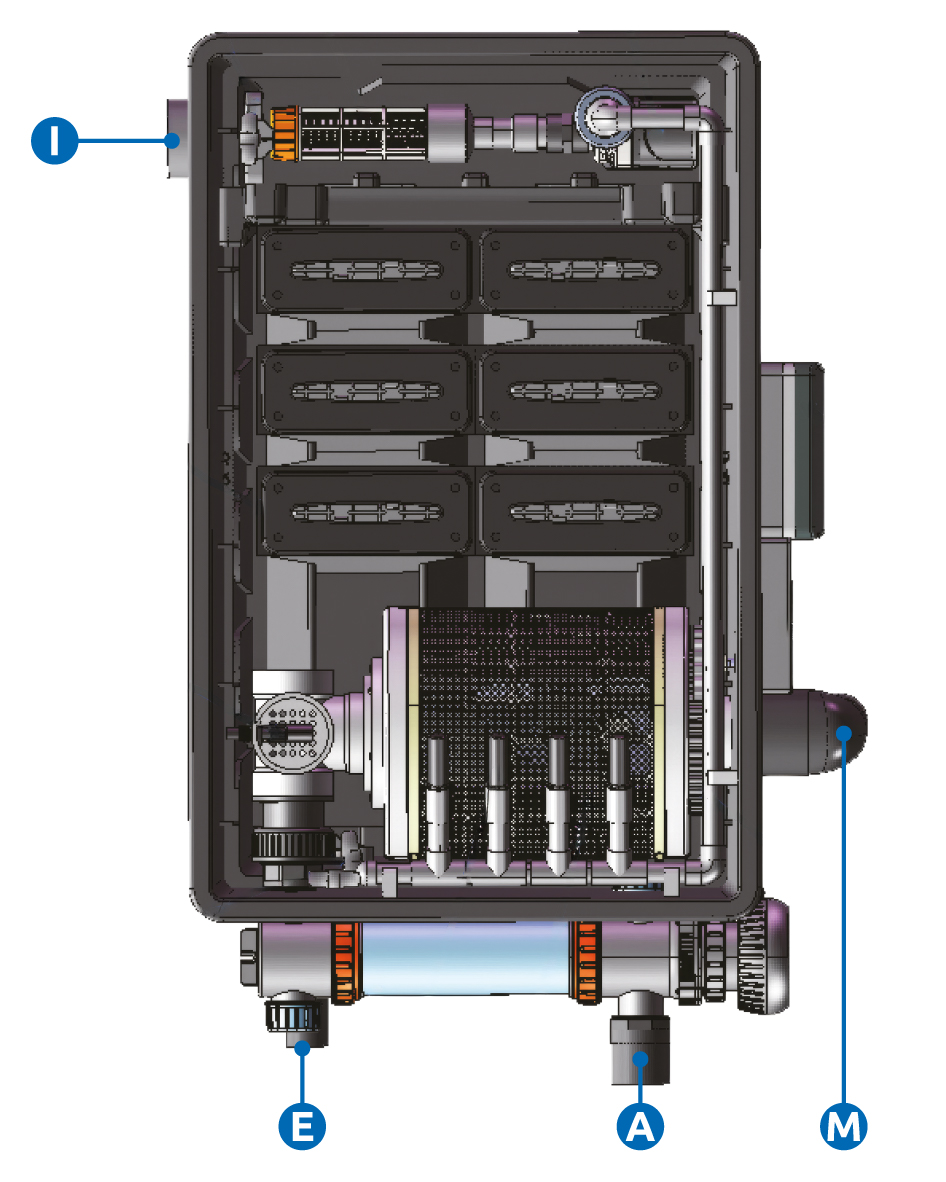
- Connect a pond pump (max. flow 11,000 l/h) to the Multi-Step inlet (A) on the UVC unit using a flexible pond hose (Ø 25/32/38 mm) and hose clamp.
If necessary, cut the Multi-Step hose connector to the required diameter first. Do not screw the hose connector on the UVC device before cutting to avoid damaging the UVC device. - Solvent-weld a Ø 75 mm PVC pipe to the filter outlet (I) leading back to the pond.
- Solvent-weld a PVC pipe (Ø 50/75 mm) to the backwash outlet (M) leading to the drain.
- Connect a drain pipe to the sludge outlet (E) using a flexible coupling also leading to the drain.
- Switch on the pump and check for any leaks.
- Position the filter in a sheltered location, away from direct sunlight.
NOTICE! Ensure that the filter is level and positioned above the pond’s water level.
- Before installation, rinse the inside of the filter, the filter foams and all accessories with clean tap water.
- Connect a pond pump (max. flow 11,000 l/h) to the Multi-Step inlet (A) on the UVC unit using a flexible pond hose (Ø 25/32/38 mm) and hose clamp.
If necessary, cut the Multi-Step hose connector to the required diameter first. Do not screw the hose connector on the UVC device before cutting to avoid damaging the UVC device. - Solvent-weld a Ø 75 mm PVC pipe to the filter outlet (I) leading back to the pond.
- Solvent-weld a PVC pipe (Ø 50/75 mm) to the backwash outlet (M) leading to the drain.
- Connect a drain pipe to the sludge outlet (E) using a flexible coupling also leading to the drain.
- Switch on the pump and check for any leaks.
- Plug the filter into the power socket.
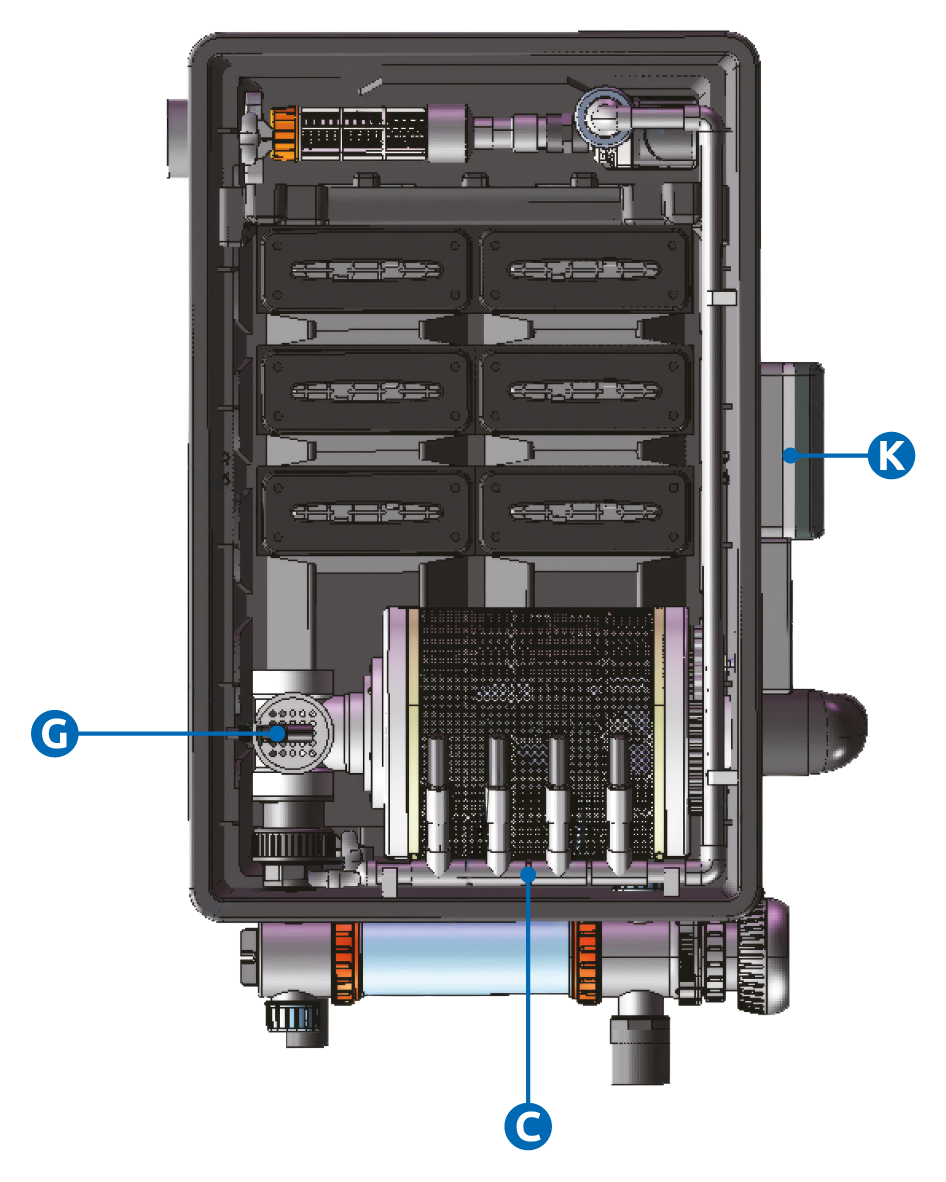
- To check that the spray system (C) is working, simply pull the floater (G) up briefly. The spray system will activate, the drum will start turning, and it will be rinsed clean.
- If there are no leaks and the filter is operating correctly, place the lid back on to the filter.
- Now the UVC unit can be switched on. The UVC switch is located on the control box (K).
- Plug the filter into the power socket.
- To check that the spray system (C) is working, simply pull the floater (G) up briefly. The spray system will activate, the drum will start turning, and it will be rinsed clean.
- If there are no leaks and the filter is operating correctly, place the lid back on to the filter.
- Now the UVC unit can be switched on. The UVC switch is located on the control box (K).
Control Box
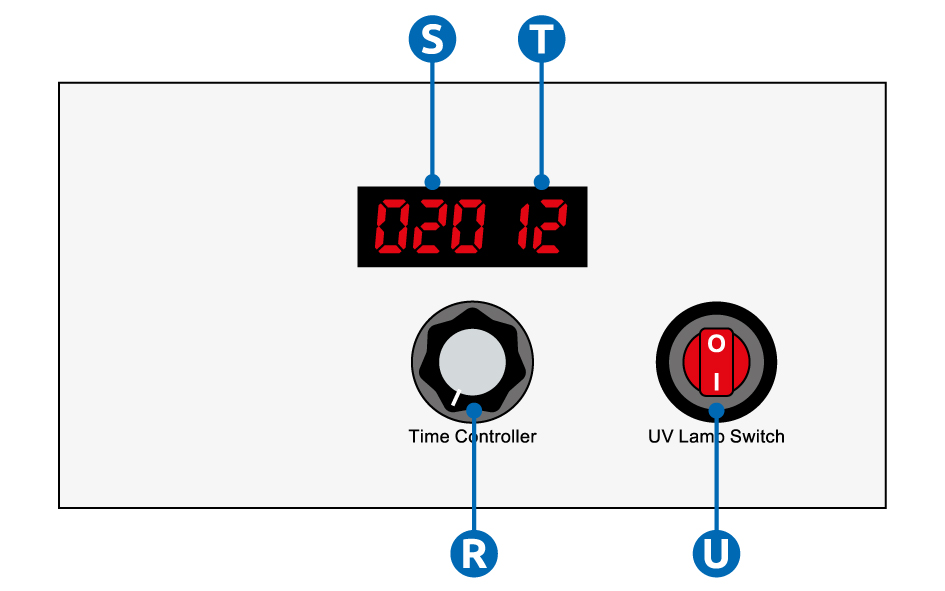
The spray system (C) is activated automatically when the screen becomes dirty. It also operates at preset intervals. By default, the screen is rinsed once every hour.
- Use the control box (K) to adjust the automatic spray system:
- Press the rotary control (R) once to set the screen-rinsing duration. The digits on the left-hand side of the display will start flashing. Turn the control to set the screen-rinsing duration from 20 to 300 seconds (S).
- After setting the desired duration for rinsing the screen, wait 3 seconds until the digits stop flashing. The duration time is set and is shown on the display
- Press the rotary control twice to set the interval time. Turn the control to set the interval between rinsing cycles from 1 to 12 hours (T), ranging from once every hour to twice a day.
- After setting the desired interval time for rinsing the screen, wait 3 seconds until the digits stop flashing.
- Switch on the UVC using the UV lamp switch (U) on the control box.
For safety reasons, the UVC lamp switches on after a three-second delay. - Check that the lamp is operating through the UV control glass (F).
Control Box
The spray system (C) is activated automatically when the screen becomes dirty. It also operates at preset intervals. By default, the screen is rinsed once every hour.
- Use the control box (K) to adjust the automatic spray system:
- Press the rotary control (R) once to set the screen-rinsing duration. The digits on the left-hand side of the display will start flashing. Turn the control to set the screen-rinsing duration from 20 to 300 seconds (S).
- After setting the desired duration for rinsing the screen, wait 3 seconds until the digits stop flashing. The duration time is set and is shown on the display
- Press the rotary control twice to set the interval time. Turn the control to set the interval between rinsing cycles from 1 to 12 hours (T), ranging from once every hour to twice a day.
- After setting the desired interval time for rinsing the screen, wait 3 seconds until the digits stop flashing.
- Switch on the UVC using the UV lamp switch (U) on the control box.
For safety reasons, the UVC lamp switches on after a three-second delay. - Check that the lamp is operating through the UV control glass (F).
Filter maintenance
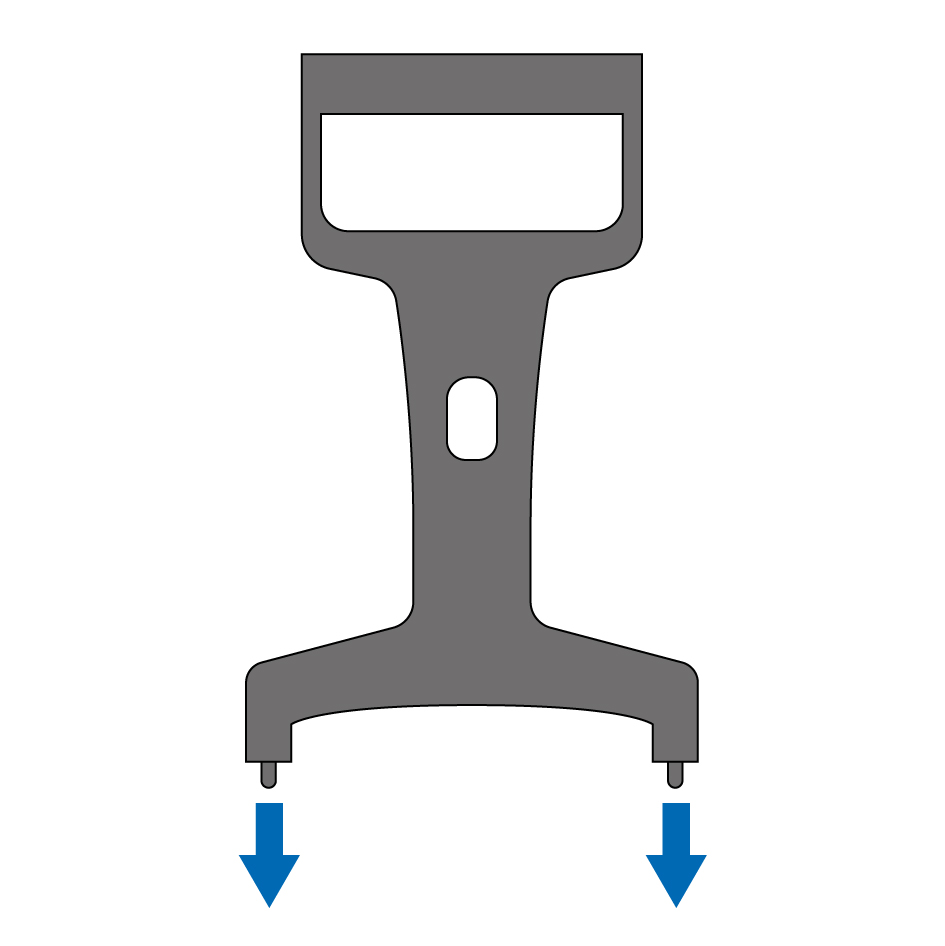
The filter requires little maintenance because the drum filter is self-cleaning. However, the filter foams must be cleaned once a week using the supplied cleaning tool.

First, switch off the UVC using the control box (K). Then switch off the filter and pump by unplugging them from the power outlet.
- Use the cleaning tool to push each filter foam (H) down several times, squeezing out any accumulated debris. Repeat this procedure for all six filter foams.
- Sludge and debris collect at the bottom of the filter.
Replace the filter foams (Art. 06030505 – Combi Drum Filter Foam, 2 pieces) once a year, do not replace all the filter foams at once, but two filter foams per month (total of 6 filter foams).
The filter requires little maintenance because the drum filter is self-cleaning. However, the filter foams must be cleaned once a week using the supplied cleaning tool.
First, switch off the UVC using the control box (K). Then switch off the filter and pump by unplugging them from the power outlet.
- Use the cleaning tool to push each filter foam (H) down several times, squeezing out any accumulated debris. Repeat this procedure for all six filter foams.
- Sludge and debris collect at the bottom of the filter.
Replace the filter foams (Art. 06030505 – Combi Drum Filter Foam, 2 pieces) once a year, do not replace all the filter foams at once, but two filter foams per month (total of 6 filter foams).
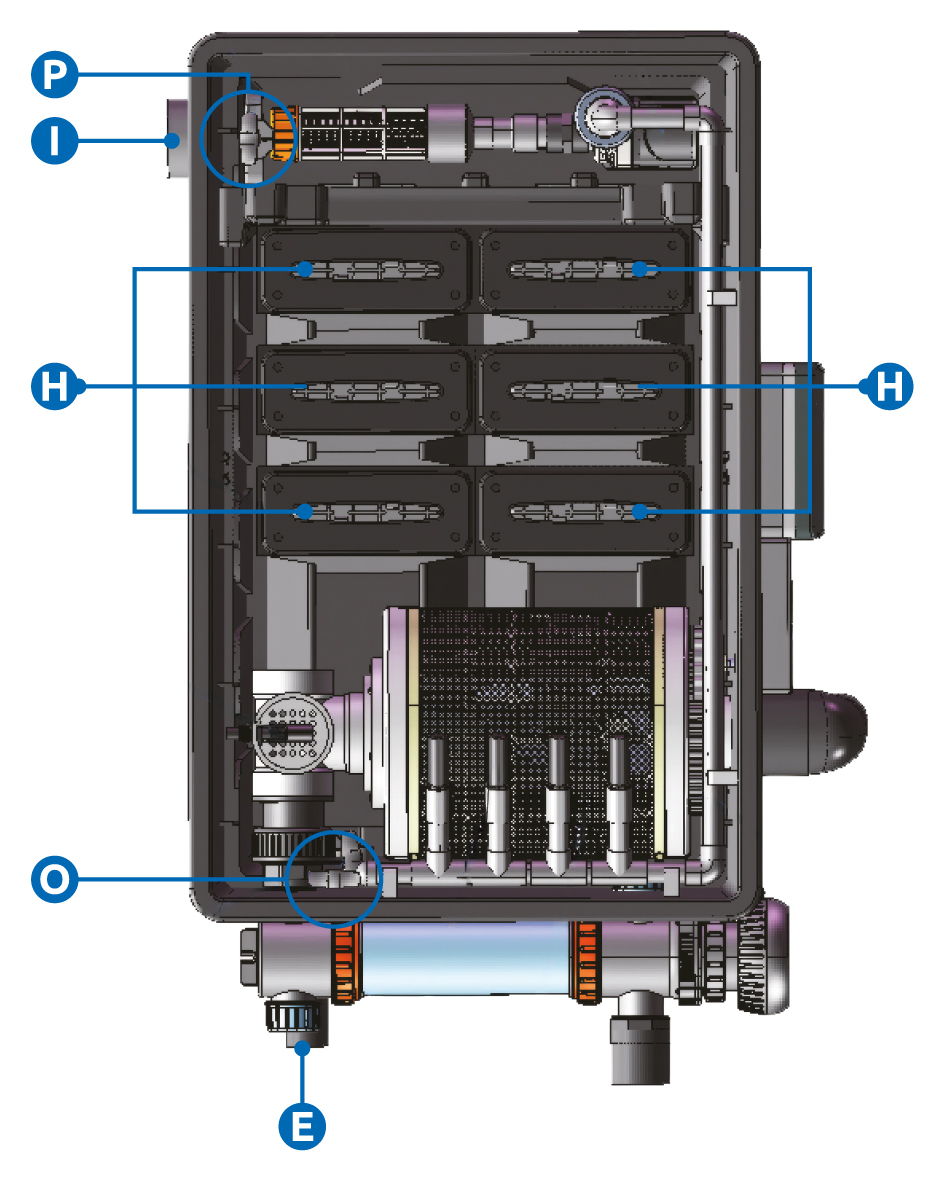
- The sludge outlet (E) is closed by a slide valve (O) located inside the filter. To drain the sludge, first close the slide valve (P) at the filter outlet (I). Then open the slide valve (O) at the sludge outlet and allow the sludge to drain from the filter.
- Once all the sludge has been drained, close the slide valve (O) at the sludge outlet and reopen the slide valve (P) at the filter outlet.
NOTICE! Ensure that the slide valve (O) at the sludge outlet is fully closed and the slide valve (P) at the filter outlet is fully open, before the pump is switched on, otherwise you will empty the pond.
- Plug in the pump and filter and switch on the UVC.
Do not switch on the UVC until the water circulation is fully restored.
- The sludge outlet (E) is closed by a slide valve (O) located inside the filter. To drain the sludge, first close the slide valve (P) at the filter outlet (I). Then open the slide valve (O) at the sludge outlet and allow the sludge to drain from the filter.
- Once all the sludge has been drained, close the slide valve (O) at the sludge outlet and reopen the slide valve (P) at the filter outlet.
NOTICE! Ensure that the slide valve (O) at the sludge outlet is fully closed and the slide valve (P) at the filter outlet is fully open, before the pump is switched on, otherwise you will empty the pond.
- Plug in the pump and filter and switch on the UVC.
Do not switch on the UVC until the water circulation is fully restored.
UVC maintenance
The UVC device should be cleaned twice a year. As soon as algae growth increases, check the UVC device and UV-lamp and clean the whole and/or exchange the UV lamp as needed.
- Check monthly if UV lamp is burning via the control glass (F).
Before carrying out maintenance, switch off the UVC using the control box (K). Then switch off the filter and pump by unplugging them from the power outlet.

The lamp is hot, wait 10 minutes after switch off before opening the UVC device.
- Ensure that the water is drained out of the UVC device first, before opening the device.
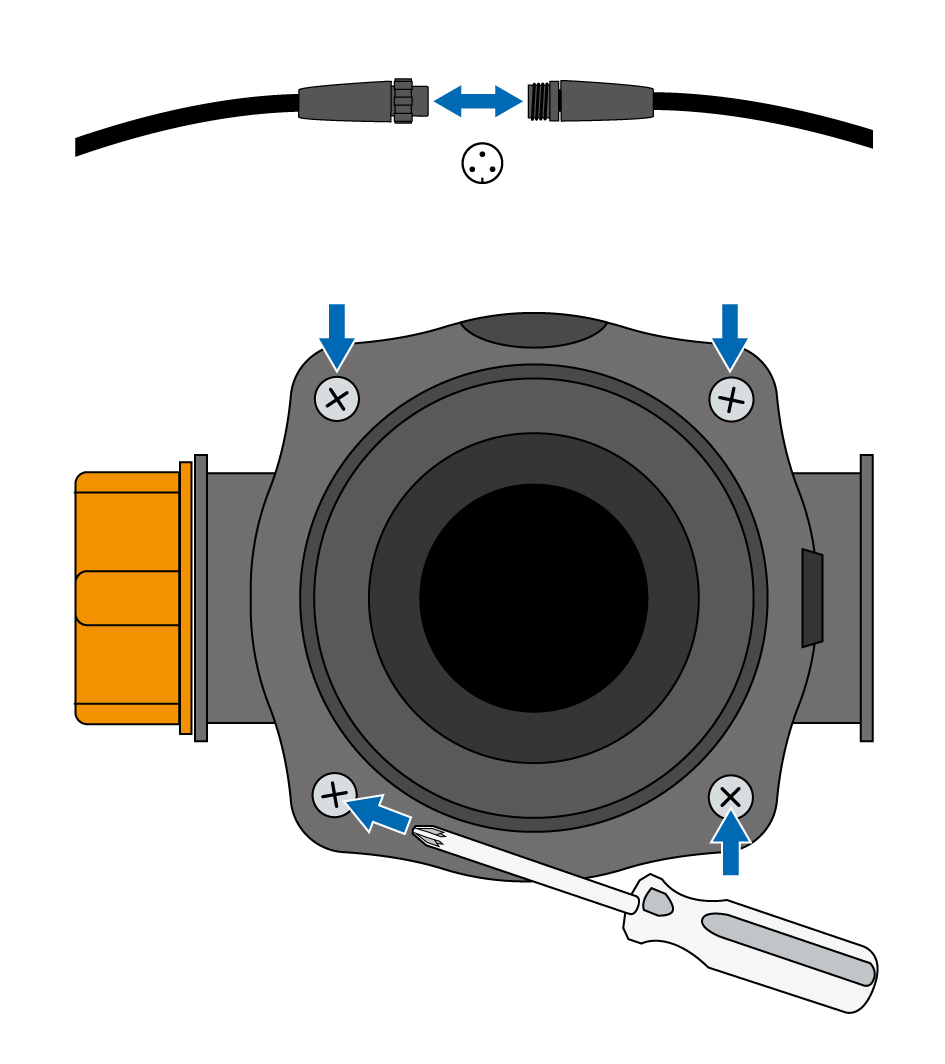
- Unscrew the coupling nut and disconnect the UVC cable from the control box.
- Slide the orange switch lock, located just behind the UVC unit head (N), towards you to unlock the electrical part/unit head from the UVC housing (D).
- Turn the unit head counter-clockwise against the stop and carefully pull it (together with the UV-lamp) out of the UVC housing.
- There is a rubber protective clip at the end of the UV lamp, make sure it does not get left behind in the quartz glass.
- Remove the four screws from the front of the UVC housing and carefully pull the quartz glass out of the housing.
- Clean the inside of the housing with a clean brush or cloth and rinse with clean tap water.
- Clean the quartz glass outer face with a soft cloth and SuperFish Pump & UVC Clean carefully. After cleaning, thoroughly rinse the quartz glass with clean tap water and check for damage.
Replace the quartz glass (Art. 06030525 – SF Combi Drum UV Quartz) if it shows any damage (to prevent glass breakage).
The UVC device should be cleaned twice a year. As soon as algae growth increases, check the UVC device and UV-lamp and clean the whole and/or exchange the UV lamp as needed.
- Check monthly if UV lamp is burning via the control glass (F).
Before carrying out maintenance, switch off the UVC using the control box (K). Then switch off the filter and pump by unplugging them from the power outlet.
The lamp is hot, wait 10 minutes after switch off before opening the UVC device.
- Ensure that the water is drained out of the UVC device first, before opening the device.
- Unscrew the coupling nut and disconnect the UVC cable from the control box.
- Slide the orange switch lock, located just behind the UVC unit head (N), towards you to unlock the electrical part/unit head from the UVC housing (D).
- Turn the unit head counter-clockwise against the stop and carefully pull it (together with the UV-lamp) out of the UVC housing.
- There is a rubber protective clip at the end of the UV lamp, make sure it does not get left behind in the quartz glass.
- Remove the four screws from the front of the UVC housing and carefully pull the quartz glass out of the housing.
- Clean the inside of the housing with a clean brush or cloth and rinse with clean tap water.
- Clean the quartz glass outer face with a soft cloth and SuperFish Pump & UVC Clean carefully. After cleaning, thoroughly rinse the quartz glass with clean tap water and check for damage.
Replace the quartz glass (Art. 06030525 – SF Combi Drum UV Quartz) if it shows any damage (to prevent glass breakage).
The UV-lamp should be replaced yearly. Although the lamp may still burn, it no longer emits enough UV radiation (maximum 8000 operating hours).
Replacement lamp for the UVC in the Combi Drum 40000: SF UV PL-lamp 36 W 2G11-415 mm (Art. 06011035)
- Remove the two small screws in the lamp socket to detach the old UV PL-lamp from the unit head.
- Remove the rubber protective clip from the end of the old lamp and fit it onto the new UV lamp.
- Place the new lamp into the socket of the unit head and hand tighten the two little screws to secure the lamp.
- Carefully slide the lamp back into the quartz tube inside the UVC housing and ensure that the unit head is in the correct position so that you can turn it clockwise and secure it with the orange switch lock.
- Connect the UVC cable connectors together, make sure they fit together in the correct position and hand tighten the coupling nut.
- Plug in the pump and filter and switch on the UVC. For safety reasons, the UVC lamp switches on after a three-second delay.
- Check that the lamp is operating through the UV control glass (F).
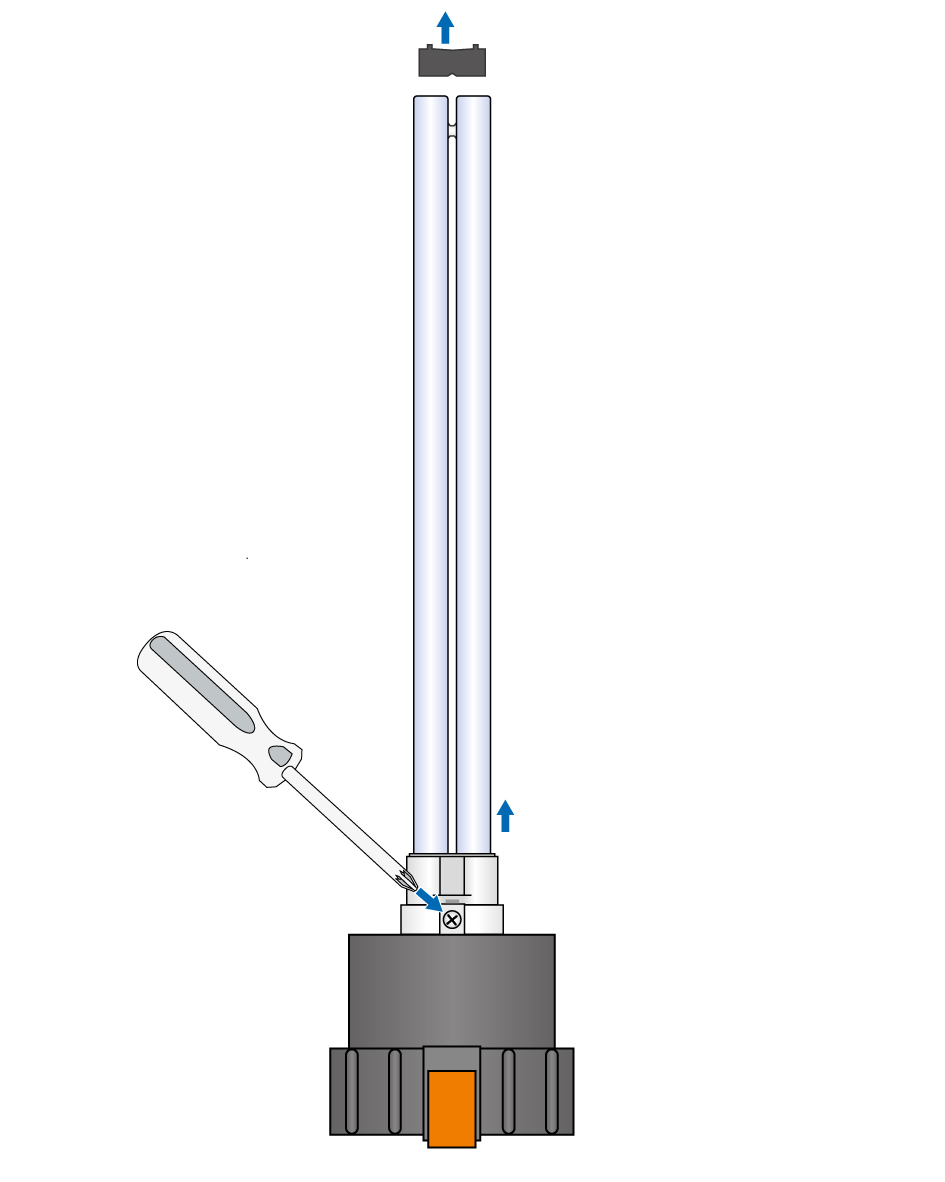
The UV-lamp should be replaced yearly. Although the lamp may still burn, it no longer emits enough UV radiation (maximum 8000 operating hours).
Replacement lamp for the UVC in the Combi Drum 40000: SF UV PL-lamp 36 W 2G11-415 mm (Art. 06011035)
- Remove the two small screws in the lamp socket to detach the old UV PL-lamp from the unit head.
- Remove the rubber protective clip from the end of the old lamp and fit it onto the new UV lamp.
- Place the new lamp into the socket of the unit head and hand tighten the two little screws to secure the lamp.
- Carefully slide the lamp back into the quartz tube inside the UVC housing and ensure that the unit head is in the correct position so that you can turn it clockwise and secure it with the orange switch lock.
- Connect the UVC cable connectors together, make sure they fit together in the correct position and hand tighten the coupling nut.
- Plug in the pump and filter and switch on the UVC. For safety reasons, the UVC lamp switches on after a three-second delay.
- Check that the lamp is operating through the UV control glass (F).
Replacing the screen panel
In case of wear or damage, the screen panel should be replaced as soon as possible to ensure optimum filter performance.
- Rinse the screen by pulling the floater (G) up briefly. The spray system will activate, the drum will start turning, and it will be rinsed clean.
First, switch off the UVC using the control box (K). Then switch off the filter and pump by unplugging them from the power outlet.
Watch the instruction video how to replace the screen panel.