


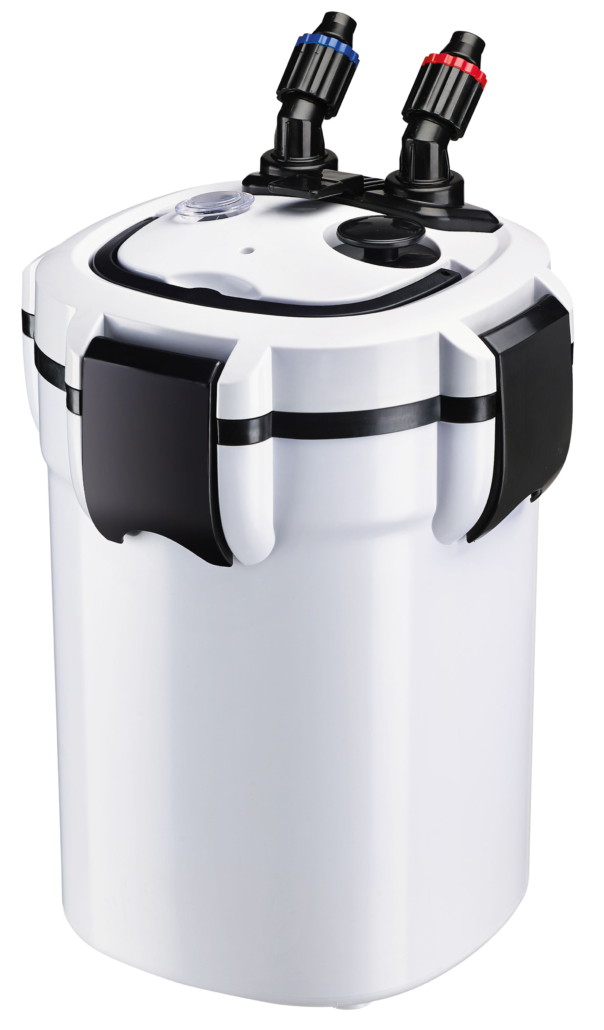
SuperFish X-Pro 2000 UV
User manual
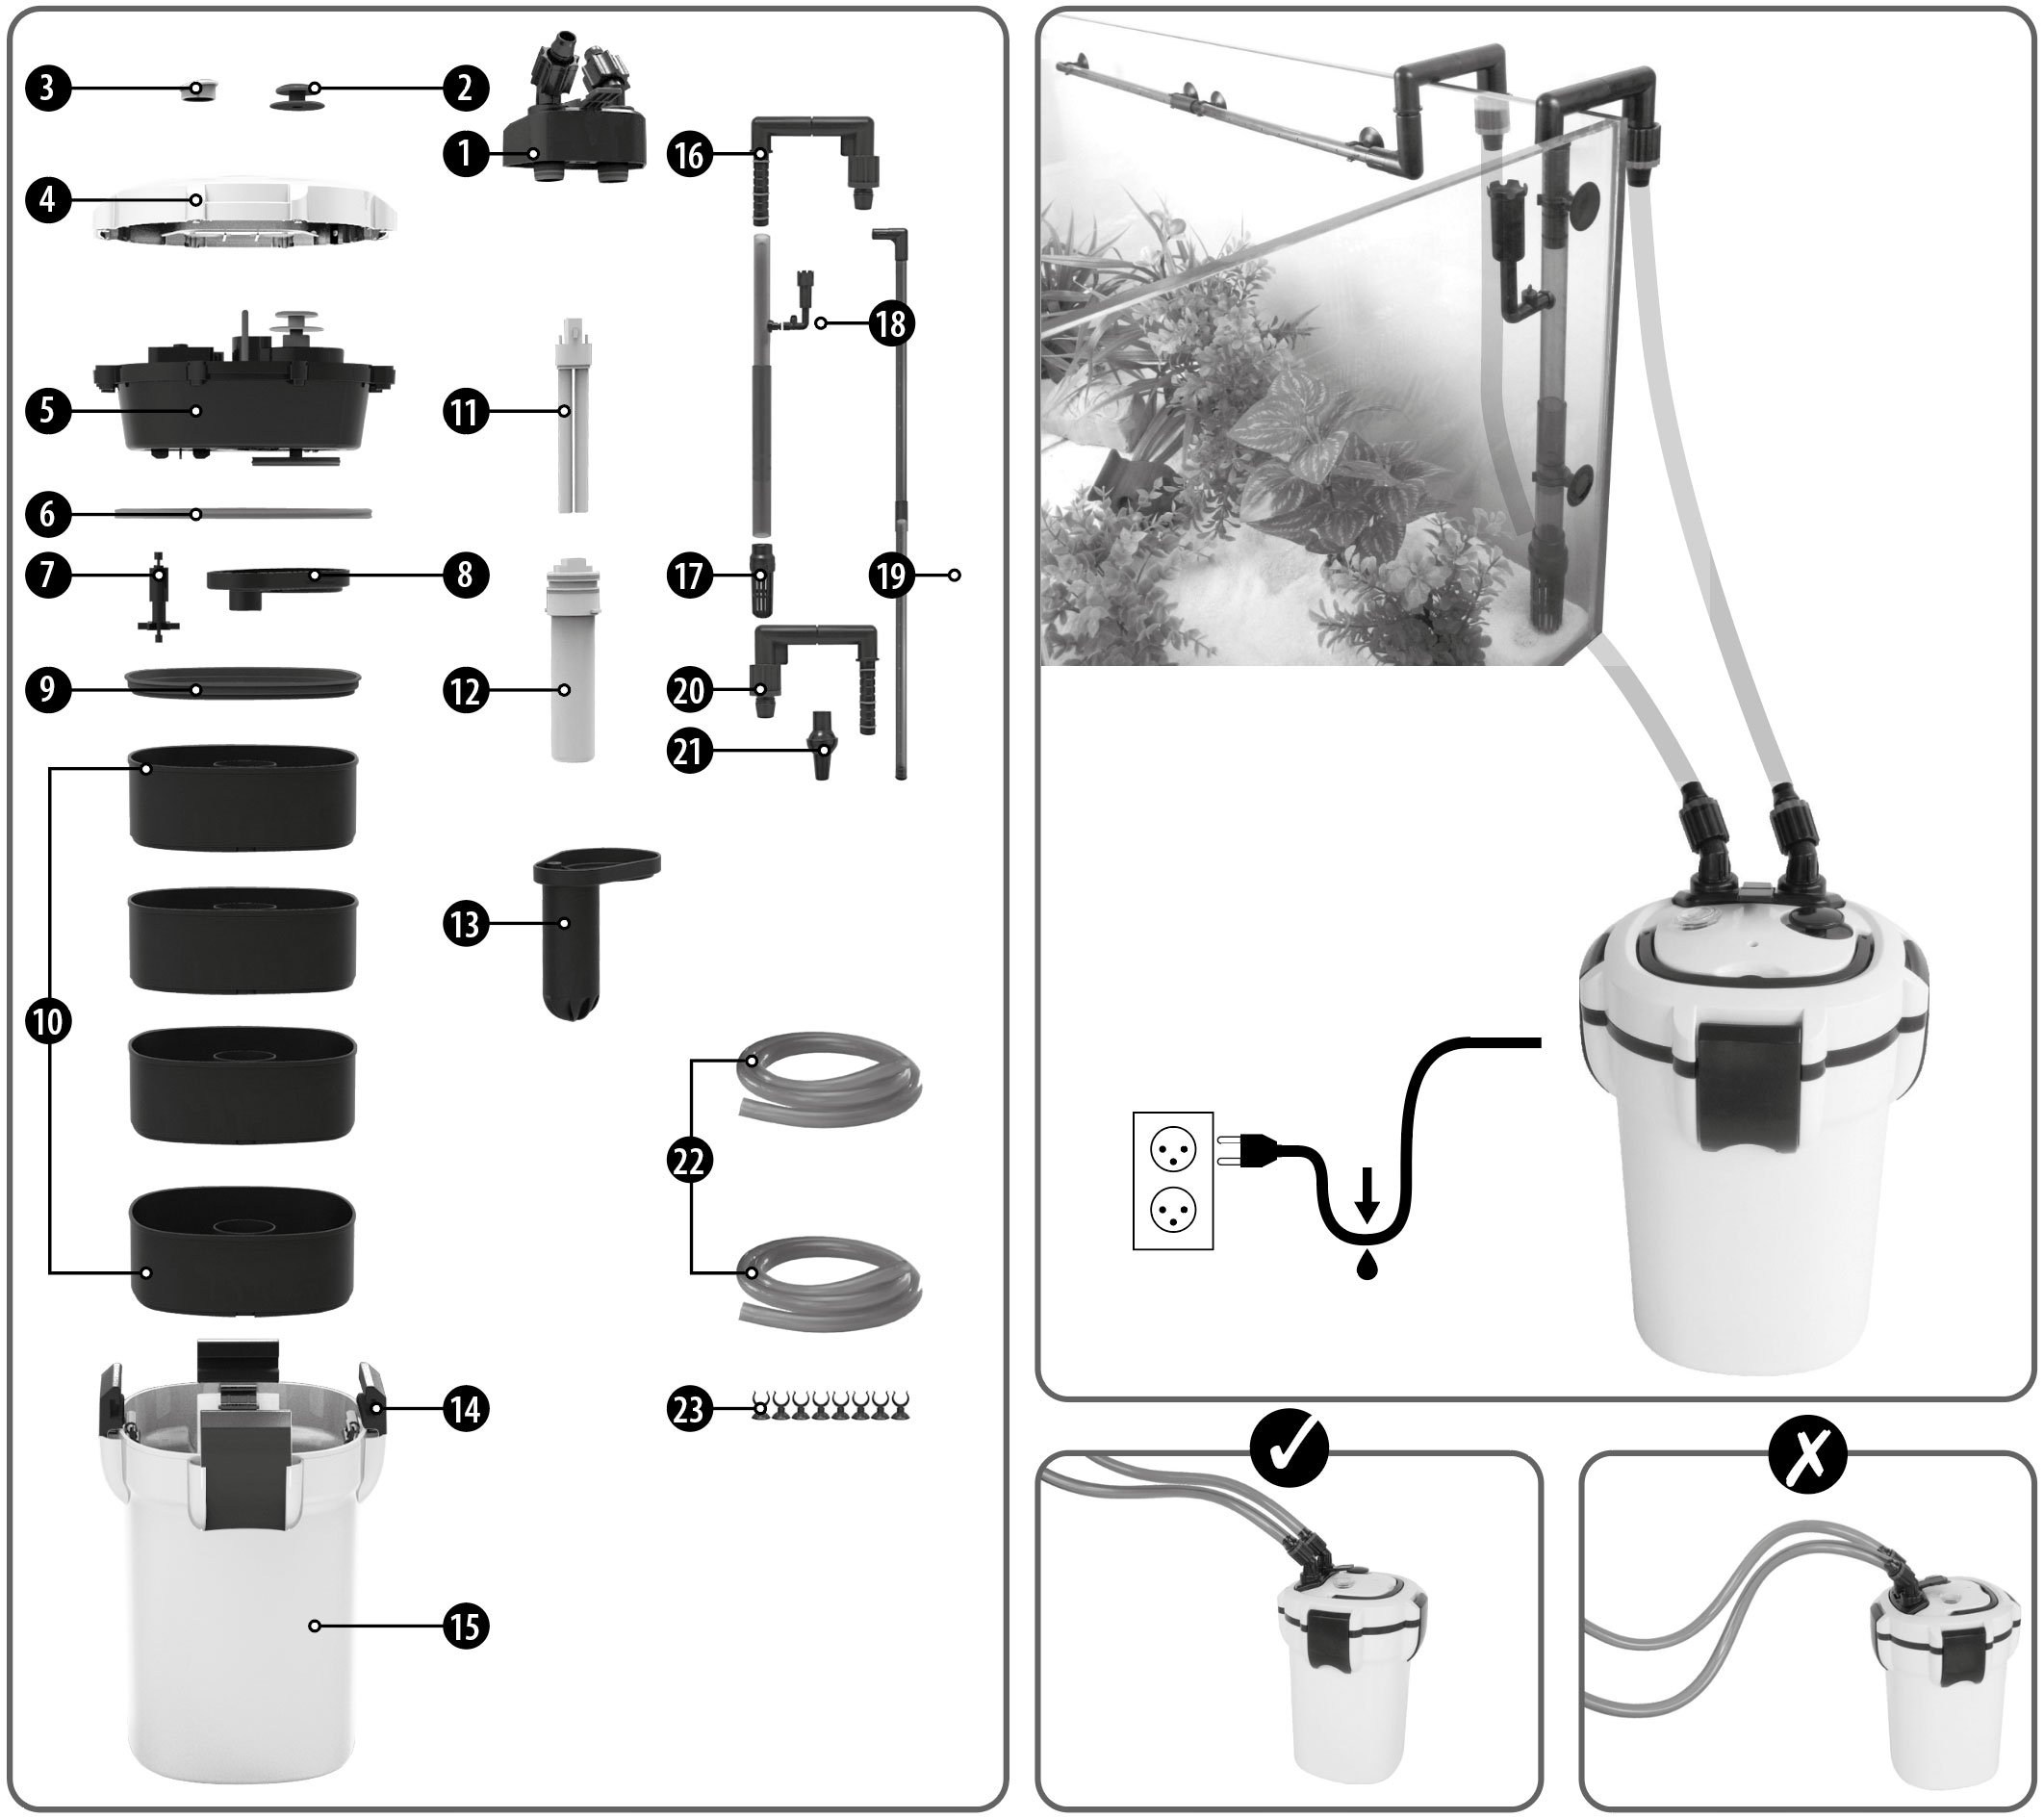
Parts
1. Shut-off valve
2. One pump prime button
3. UV On/Off switch cover
4. Canister lid
5. Pump section
6. Main rubber seal
7. Rotor
8. Rotor cover
9. Media tray lid
10. Media trays
11. UV lamp
12. UV Quartz tube
13. UV water flow housing
14. Clips
15. Canister body
16. Inlet U-bar (red)
17. Inlet tube
18. Surface skimmer*
19. Spray bar
20. Outlet U-bar (blue)
21. Jet return
22. Inlet/Outlet hoses
23. Suction cups with clips
Parts
1. Shut-off valve
2. One pump prime button
3. UV On/Off switch cover
4. Canister lid
5. Pump section
6. Main rubber seal
7. Rotor
8. Rotor cover
9. Media tray lid
10. Media trays
11. UV lamp
12. UV Quartz tube
13. UV water flow housing
14. Clips
15. Canister body
16. Inlet U-bar (red)
17. Inlet tube
18. Surface skimmer*
19. Spray bar
20. Outlet U-bar (blue)
21. Jet return
22. Inlet/Outlet hoses
23. Suction cups with clips
Installation
- Rinse filter and all parts with clean tap water to remove any dirt and residues.
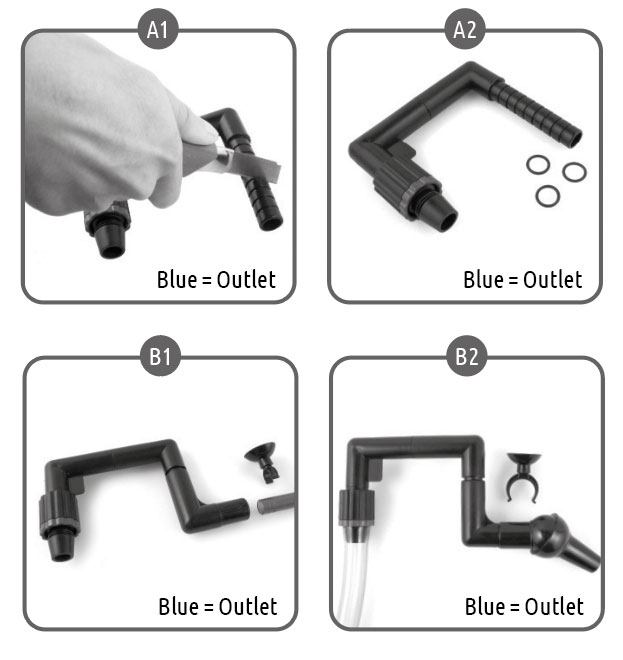
- Cut outlet U-bar (blue) to desired length (A1), be sure to leave space for three O-rings (A2). Install the three O-rings.*
- Install outlet U-bar, choose from two option for the water return; install either the spray bar (B1) or the jet spray (B2).
Installation
- Rinse filter and all parts with clean tap water to remove any dirt and residues.
- Cut outlet U-bar (blue) to desired length (A1), be sure to leave space for three O-rings (A2). Install the three O-rings.*
- Install outlet U-bar, choose from two option for the water return; install either the spray bar (B1) or the jet spray (B2).
- Secure the spray bar to your aquarium with the suction cups.
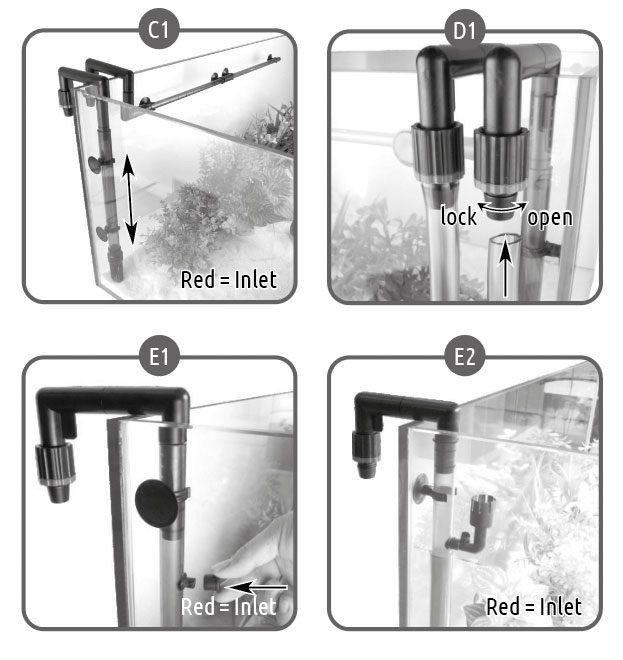
- Connect the (telescopic) inlet tube on to the inlet U-bar (C1). Adjust the Inlet tube to the desired height.
- Connect the hoses; first turn the nut on the connector to open, insert the hose and turn back to lock (D1), be sure to tighten the water hoses securely!
- Surface skimmer; if you do NOT wish to use the optional surface skimmer, plug the supplied cover over the skimmer attachment (E1). For maximum skimmer effect keep aquarium waterline at the same level as the surface skimmer collection cup (E2).
- Secure the spray bar to your aquarium with the suction cups.
- Connect the (telescopic) inlet tube on to the inlet U-bar (C1). Adjust the Inlet tube to the desired height.
- Connect the hoses; first turn the nut on the connector to open, insert the hose and turn back to lock (D1), be sure to tighten the water hoses securely!
- Surface skimmer; if you do NOT wish to use the optional surface skimmer, plug the supplied cover over the skimmer attachment (E1). For maximum skimmer effect keep aquarium waterline at the same level as the surface skimmer collection cup (E2).
- To open the filter, lift the handles out and up (F1) over the hinges and let the handles fall to the outward position (F2). Use the carrying handle to lift the filter head up (F3)*. Make sure that all four handles are in the outward position and free from the hinges.
- The X-Pro is supplied with filter media, however you can add or change media as you like. Replacement foam, carbon and other media is available from you Superfish dealer (G1).
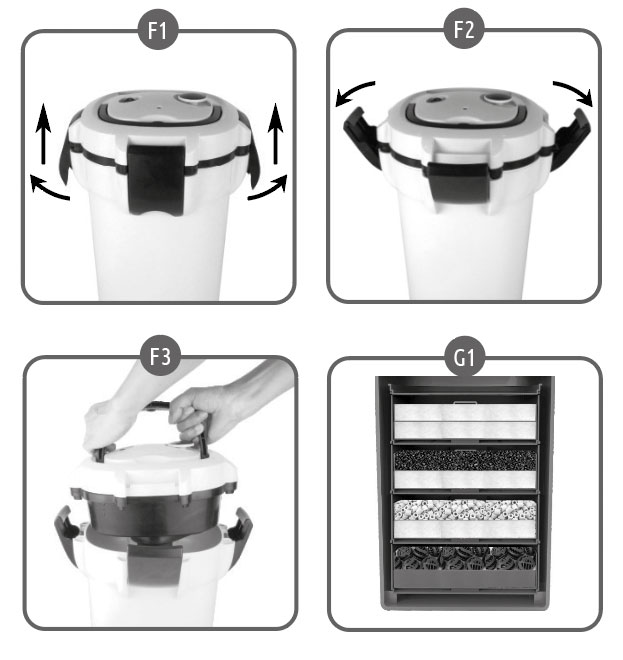
- To open the filter, lift the handles out and up (F1) over the hinges and let the handles fall to the outward position (F2). Use the carrying handle to lift the filter head up (F3)*. Make sure that all four handles are in the outward position and free from the hinges.
- The X-Pro is supplied with filter media, however you can add or change media as you like. Replacement foam, carbon and other media is available from you Superfish dealer (G1).
- The aquarium water travels through the filter media from the bottom moving to the top. Make sure that the media baskets and the media cover are in the right position with the opening under the water outlet of the pump. Then place the filter cover (H1).
- Close filter, make sure the rubber seal is in the right position, place handles on the hinges, press the bottom of the handles inward towards the body of the filter. Make sure all four handles are secure and locked.
- Install the Shut-Off valve, make sure that the lever is in the up position and that all O-rings are present and installed correctly (I1). Put the valve in place and press down firmly, now press the lever to the down position to secure and open the valve (I2).
- The Shut-off valve is labelled IN (red hose connector) and OUT (blue hose connector) for the corresponding water flow direction. Connect the hoses, first turn the nut on the connector to open, insert the hose and turn back to lock, be sure to tighten the water hoses securely (J1)!
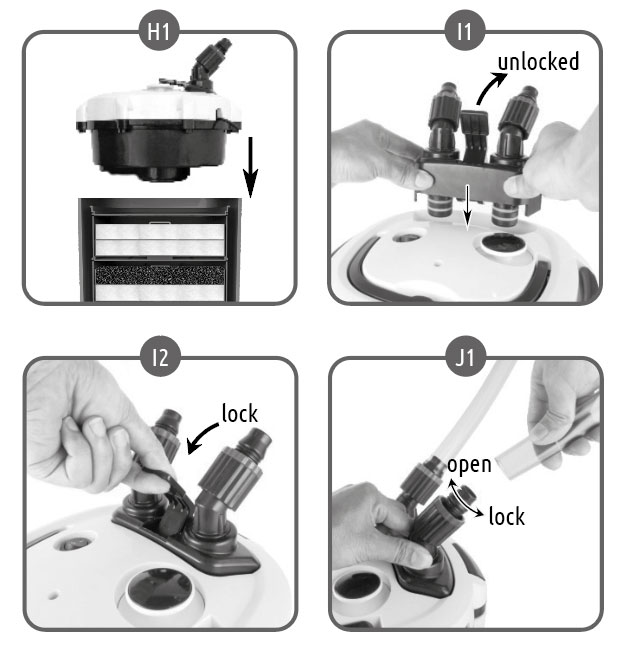
- The aquarium water travels through the filter media from the bottom moving to the top. Make sure that the media baskets and the media cover are in the right position with the opening under the water outlet of the pump. Then place the filter cover (H1).
- Close filter, make sure the rubber seal is in the right position, place handles on the hinges, press the bottom of the handles inward towards the body of the filter. Make sure all four handles are secure and locked.
- Install the Shut-Off valve, make sure that the lever is in the up position and that all O-rings are present and installed correctly (I1). Put the valve in place and press down firmly, now press the lever to the down position to secure and open the valve (I2).
- The Shut-off valve is labelled IN (red hose connector) and OUT (blue hose connector) for the corresponding water flow direction. Connect the hoses, first turn the nut on the connector to open, insert the hose and turn back to lock, be sure to tighten the water hoses securely (J1)!
- Now prime the filter. If you have installed the optional skimmer, make sure to lower the skimmer inlet below the water surface, before using the prime pump. This prevents air to come into the system. Make sure the prime button is in the down position. Pull out on the prime button until you reach the top position (K1). Firmly push down on the prime button to the down position (K2). The aquarium water will start to fill the filter. Now insert the plug into the socket so that the filter will work. If the aquarium water does not start flowing into the filter, check all the tube and hose connections to make sure that they are securely fastened.
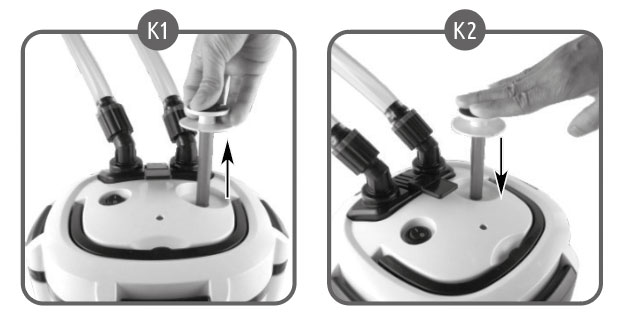
- Now prime the filter. If you have installed the optional skimmer, make sure to lower the skimmer inlet below the water surface, before using the prime pump. This prevents air to come into the system. Make sure the prime button is in the down position. Pull out on the prime button until you reach the top position (K1). Firmly push down on the prime button to the down position (K2). The aquarium water will start to fill the filter. Now insert the plug into the socket so that the filter will work. If the aquarium water does not start flowing into the filter, check all the tube and hose connections to make sure that they are securely fastened.
Maintenance
- Clean filter 1 x per month or as soon as there is a significant flow decrease indicating that the filter needs cleaning.
- Turn of the filter by unplugging it from the power socket.
- Close the Shut-off valve by pulling the lever to the upwards position.
- Now you can remove the filter and take it to kitchen or washing area for cleaning. When carrying the filter, always support it with your other hand underneath the canister.
- Never use chemicals for cleaning, make sure buckets, tools and sponges are free of chemicals.
- Open the filter and clean foam sponges, replace sponges every 2-3 months.
- Only rinse filter media when needed, because cleaning will destroy the bacteria life. Cleaning or changing media should be done in stages, every month 1 basket.
- Activated carbon has a limited lifetime as it absorbs chemicals and coloration and needs to be replaced every 1-3 months depending the level of pollution. Remove the Activated Carbon when administering medicines or chemicals, otherwise they will be absorbed by the carbon.
Inspect the rotor, turn the rotor cover counter-clockwise to remove it (L1), lift the rotor out of the house for cleaning (L2). If you hear excessive noise, the rotor is wearing and needs replacement. This is normal and is not covered by warranty. Spare rotors are available from your SuperFish dealer.
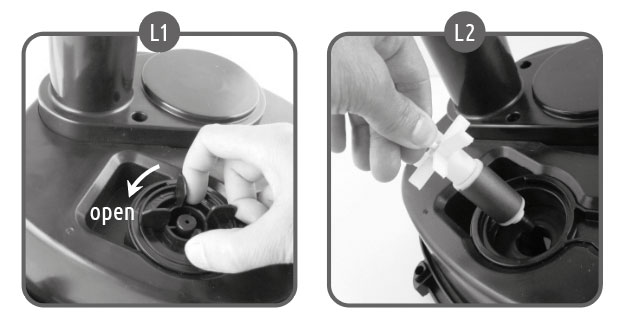
Inspect the rotor, turn the rotor cover counter-clockwise to remove it (L1), lift the rotor out of the house for cleaning (L2). If you hear excessive noise, the rotor is wearing and needs replacement. This is normal and is not covered by warranty. Spare rotors are available from your SuperFish dealer.
- When cleaning the filter inspect the rubber seal ring and clean it. Use a silicone based lubricant on rubber seal ring before re-installation. Make sure that the top rim of the canister is clean and free of any debris before re-installing the filter cover.
- When cleaning the filter inspect the UV quartz glass and clean as needed to ensure optimal UV radiation.
- You need to replace the UV bulb every 6000 hours, aprox. 250 days, see instructions on page 5
Replacing the UV Bulb
- Remove the waterFlow housing / UV guard by removing the mounting screws with a screwdriver.
- Carfully lift up the UV guard. Be carefull not to damage the UV Quartz tube.
- Gently turn the UV Quartz tube counter clockwise to loosen the quartz Tube then carfully pull the Tube up and over the UV bulb.
- Replace the UV bulb and repeat the process in reverse order to re-install UV bulb, Quartz tube and UV guard.
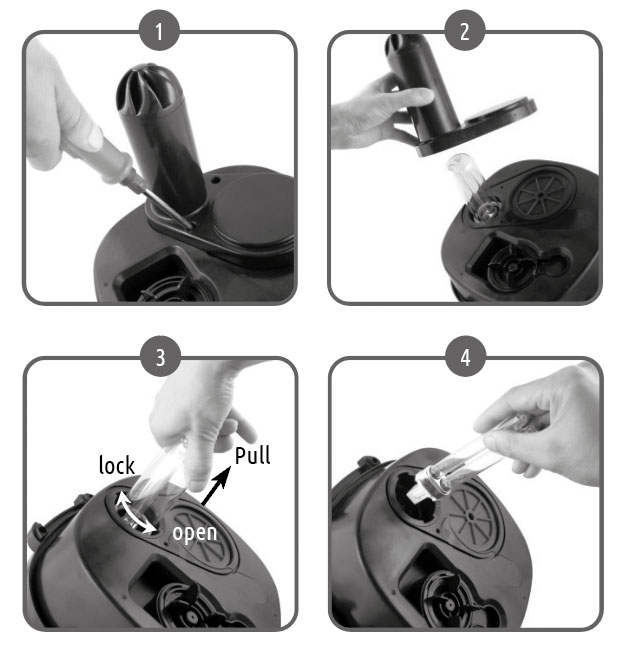
Replacing the UV Bulb
- Remove the waterFlow housing / UV guard by removing the mounting screws with a screwdriver.
- Carfully lift up the UV guard. Be carefull not to damage the UV Quartz tube.
- Gently turn the UV Quartz tube counter clockwise to loosen the quartz Tube then carfully pull the Tube up and over the UV bulb.
- Replace the UV bulb and repeat the process in reverse order to re-install UV bulb, Quartz tube and UV guard.
As a safety precaution, the X-Pro is equipped with anti tilt shut off feature which shuts off the UV bulb when the filter is tilted 30 degrees or more in any direction
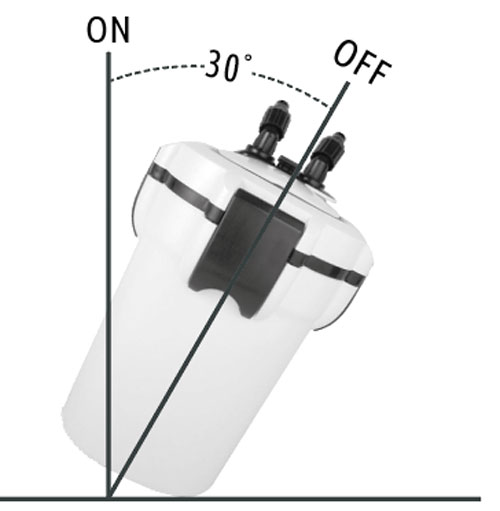
As a safety precaution, the X-Pro is equipped with anti tilt shut off feature which shuts off the UV bulb when the filter is tilted 30 degrees or more in any direction
Technical data
| X-Pro 2000 UV | |
|---|---|
| Flow | 2.000 L/h |
| Aquarium | 600 L |
| Filter volume | 17.3 L |
| Power | 43 Watt |