


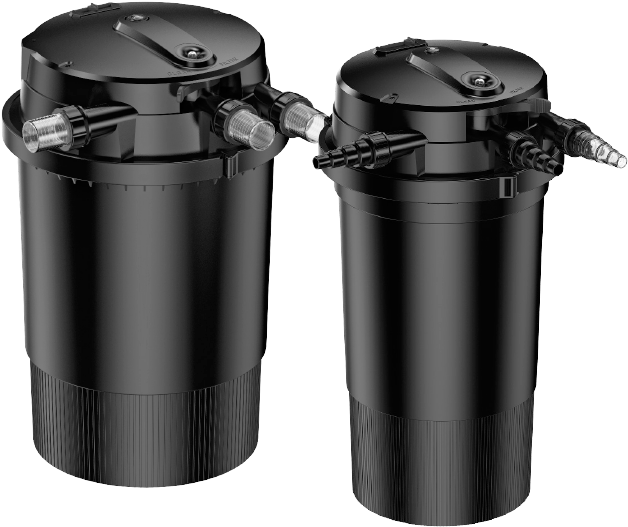
TopClear Pro 24000 - 36000
User manual
Function
Water is pumped into the filter under pressure using a pond pump, a vortex movement forces water through a filter foam pack (mechanical filtration). At the bottom of the filter there are Bio-Balls which provide biological filtration. Useful bacteria convert harmful substances (ammonia and nitrite) to non-pollutants (nitrate). The water then flows up past the UV lamp. The UV lamp produces ultraviolet light with a wavelength of exactly 254 nm, at which wave length the disinfecting capacity is optimal. The UV radiation combats floating algae without the use of chemicals and reduces harmful bacteria and germs. The UV-C radiation does not affect the pH value of the pond water and is safe for fish and plants. The UVC device ensures a clear pond within 14 days. The filtered water flows back into the pond via a hose. The pressure filter has all the connections on the lid and can easily bridge any height differences, allowing it to be placed below the pond water level. The pressure filter can be buried almost completely into the ground or concealed next to the pond.
Installation
Locate the filter at least 2 metres away from the pond but easily accessible for maintenance.
!
NOTICE! The filter can be partially buried next to the pond but ensure that the cover and connections remain accessible.
A
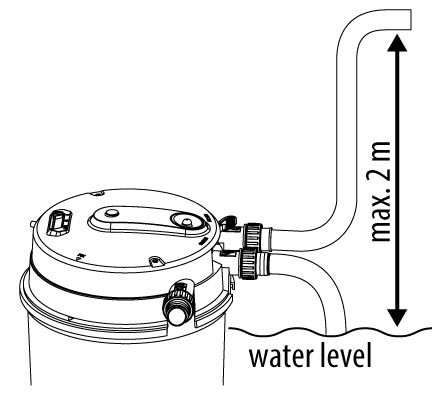
When siting the filter, allow for a maximum bridgeable height difference of 2 metres.
A
Installation
A
Locate the filter at least 2 metres away from the pond but easily accessible for maintenance.
!
NOTICE! The filter can be partially buried next to the pond but ensure that the cover and connections remain accessible.
A
When siting the filter, allow for a maximum bridgeable height difference of 2 metres.
B
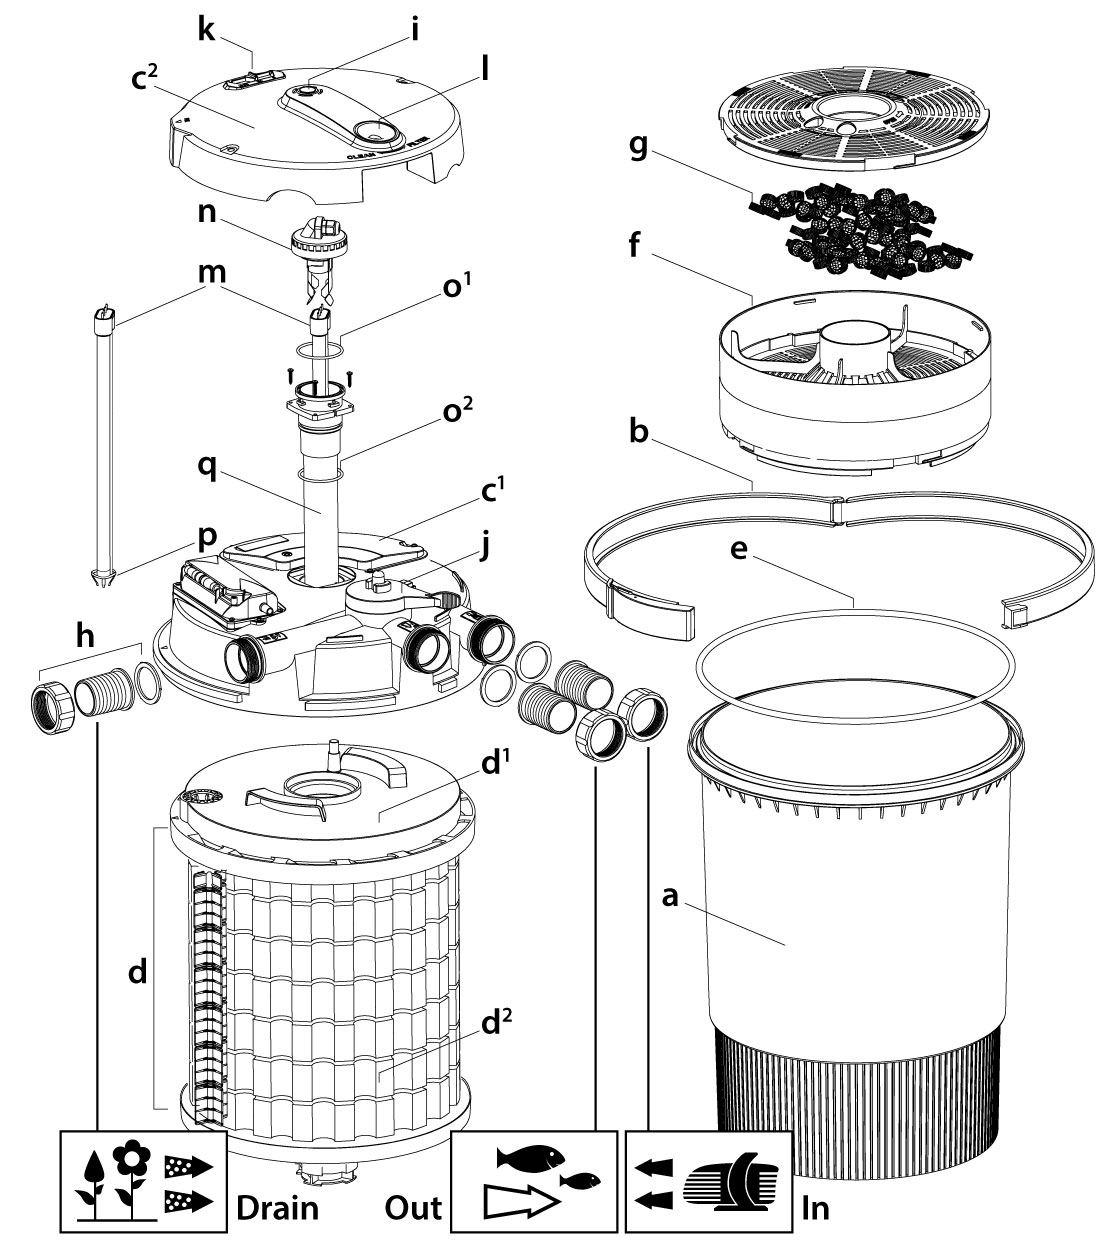
Release the outer retaining clamp (b) by undoing the double hinged lock, setting it aside.
Carefully remove the cover (c1+c2) including the integrated UVC device (quartz glass and UV lamp) from the filter housing (a) by pulling it upwards.
Remove the complete filter foam pack (d) and the filter bowl (f) with Bio-Balls (g) from the filter housing and rinse them with clean tap water.
Place the assembly back into the filter housing in the correct order, checking that the O-ring (e) is in the correct position in the rim of the filter housing.
B
B
B
Release the outer retaining clamp (b) by undoing the double hinged lock, setting it aside.
Carefully remove the cover (c1+c2) including the integrated UVC device (quartz glass and UV lamp) from the filter housing (a) by pulling it upwards.
Remove the complete filter foam pack (d) and the filter bowl (f) with Bio-Balls (g) from the filter housing and rinse them with clean tap water.
Place the assembly back into the filter housing in the correct order, checking that the O-ring (e) is in the correct position in the rim of the filter housing.
C
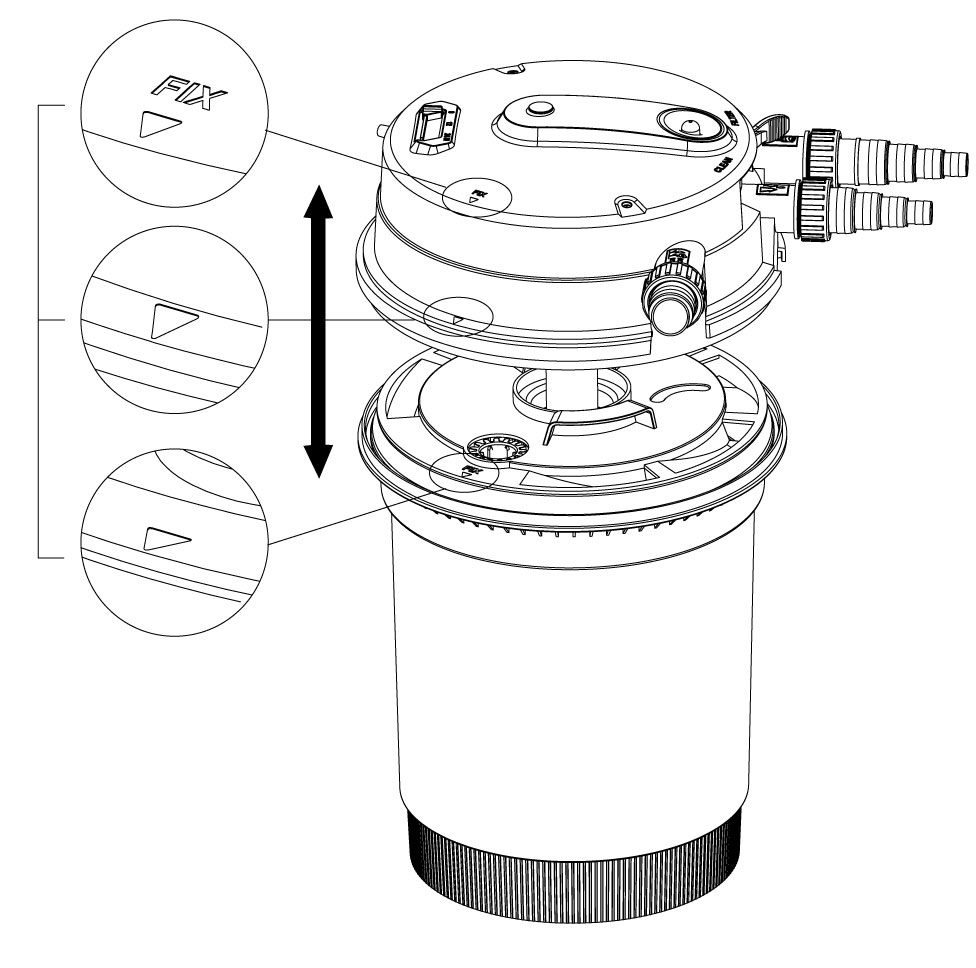
Carefully remove the cover (c1+c2) including the integrated UVC device (quartz glass and UV lamp) from the filter housing (a) by pulling it upwards. Remove the complete filter foam pack (d) and the filter bowl (f) with Bio-Balls (g) from the filter housing and rinse them with clean tap water. Place the assembly back into the filter housing in the correct order, checking that the O-ring (e) is in the correct position in the rim of the filter housing.
C
C
C
Carefully remove the cover (c1+c2) including the integrated UVC device (quartz glass and UV lamp) from the filter housing (a) by pulling it upwards. Remove the complete filter foam pack (d) and the filter bowl (f) with Bio-Balls (g) from the filter housing and rinse them with clean tap water. Place the assembly back into the filter housing in the correct order, checking that the O-ring (e) is in the correct position in the rim of the filter housing.
B
Fit three transparent hose connections (h) with gaskets to the inlet, outlet and waste water outlet in the lid. For the TopClear Pro 24000, you must first cut the Multi-step hose connections to the correct diameter. For the TopClear Pro 36000, you can choose between ø32 mm, ø38 mm or ø50 mm hose connections. Tighten the union nuts securely.
B
B
B
Fit three transparent hose connections (h) with gaskets to the inlet, outlet and waste water outlet in the lid. For the TopClear Pro 24000, you must first cut the Multi-step hose connections to the correct diameter. For the TopClear Pro 36000, you can choose between ø32 mm, ø38 mm or ø50 mm hose connections. Tighten the union nuts securely.
!
NOTICE! The hose connections on the inlet and outlet must be the same diameter. Connect the pump to the inlet of the filter using pond hose and hose clamps. The pump should (preferably) be placed in the deepest point of the pond and able to provide a sufficient head of water.
!
NOTICE! Be sure to keep the maximum pump capacity (TopClear Pro 24000: 10.000 l/h and TopClear Pro 10000: 15.000 l/h) to avoid any damage to the filter and/or any leakage due to excessive pressure.
Connect a pond hose with hose clamp to the outlet, so that the water flows back into the pond.
Also connect a pond hose with hose clamp to the waste water drain.
Ensure that the blue lever (j) is on FILTER.
Switch on the pump and check for any leaks.
!
NOTICE! Never block or restrict the outlet of the filter. The pressure in the filter may become too high, causing the filter to leak or break. Check the working of the UVC via the UV indicator (i) in the cover.
UVC timer switch
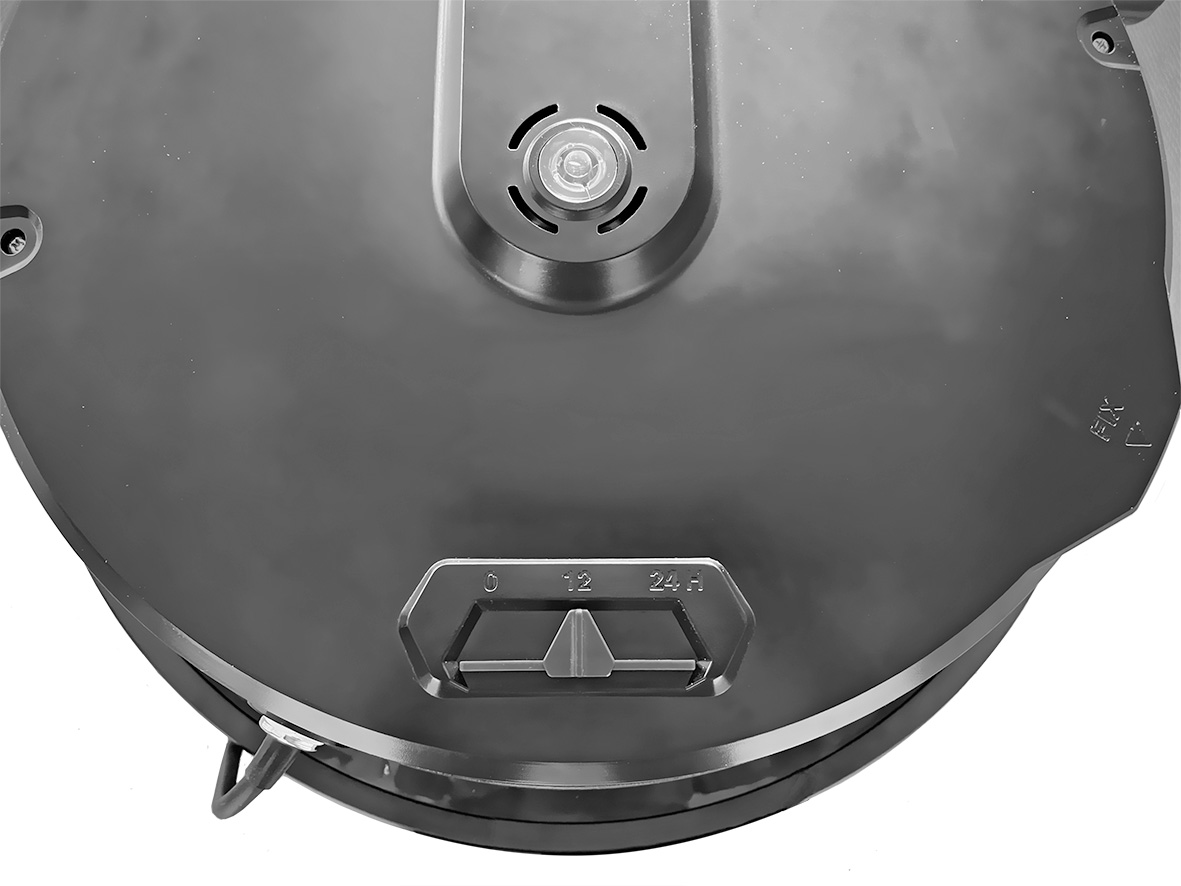
The UVC timer switch (k) [24 hours/12 hours/0 hours] allows you to choose between constant operation of the UVC in summer, 12 hours of operation (per day) in spring and autumn, and you can switch off the UVC. This saves energy at times when the UVC is not needed and extends the service life of the UV lamp. The 12- hour on/12-hour off interval starts when you select this mode
UVC timer switch
The UVC timer switch (k) [24 hours/12 hours/0 hours] allows you to choose between constant operation of the UVC in summer, 12 hours of operation (per day) in spring and autumn, and you can switch off the UVC. This saves energy at times when the UVC is not needed and extends the service life of the UV lamp. The 12- hour on/12-hour off interval starts when you select this mode
Filter cleaning system with backwash function
You should clean the filter foam regularly, as dirt accumulates in the filter foam. When first installed, or if your pond is heavily soiled, it may be necessary to clean the filter foam daily. To do this, activate the automatic filter cleaning system, the filter foam pack rotates and is wrung out, the waste water drains away via the drain. There is no need to open the filter for this and an audible signal sounds when cleaning is complete.
!
Clean the filter foam as soon as the dirt indicator (l) shows, or clean it once a week.
Make sure a pond hose is connected to the waste water drain so the water can drain into the sewer or use it for watering the garden.
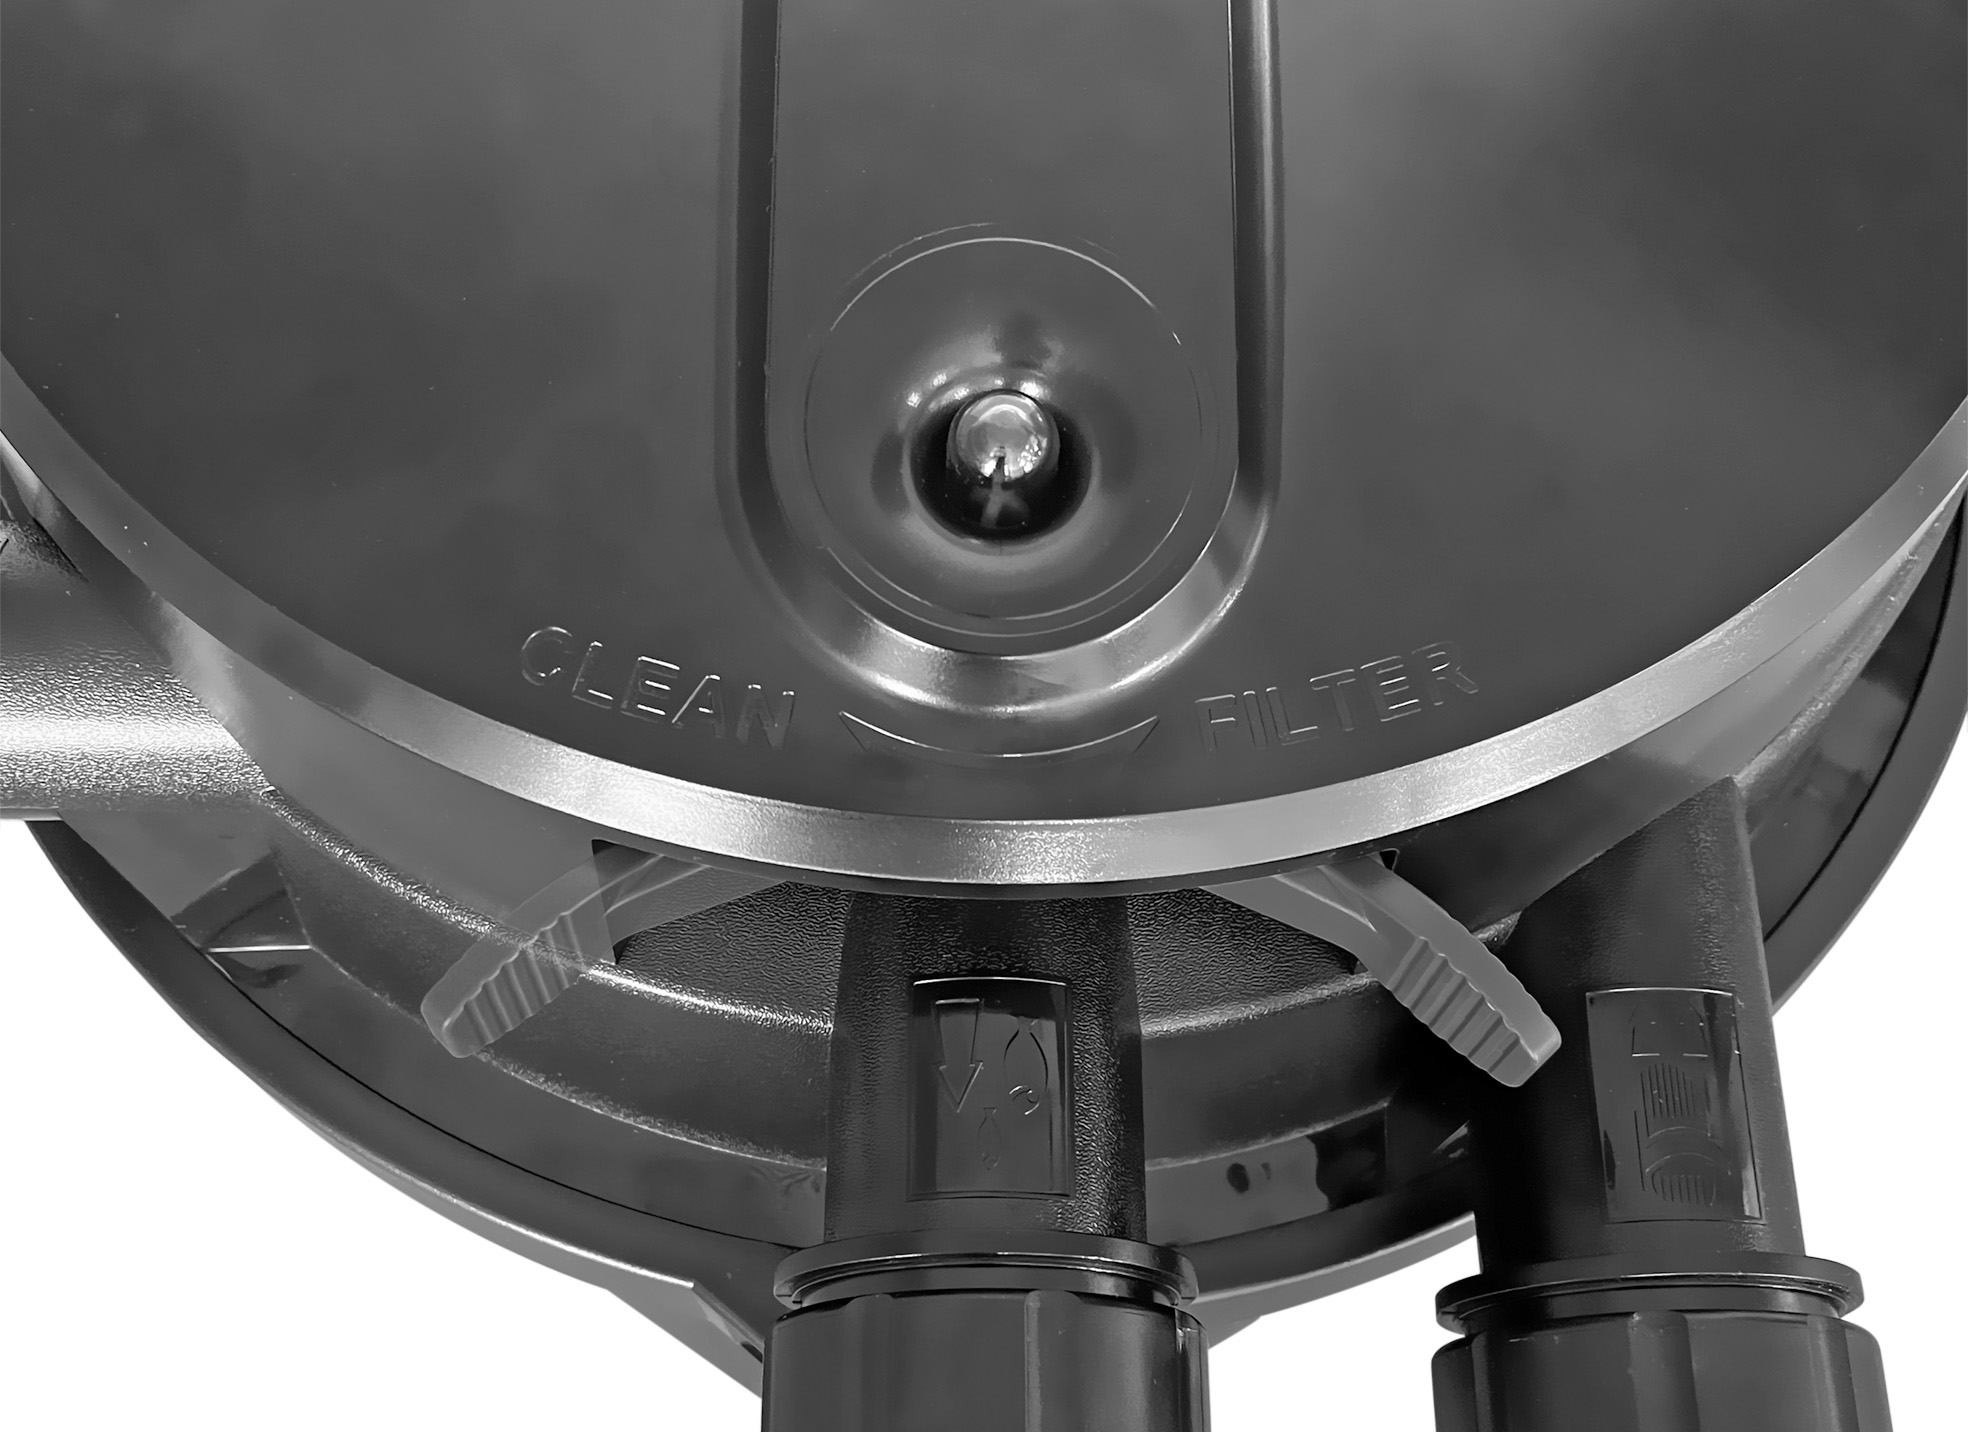
Set the blue lever (j) to CLEAN, after which the UVC will switch itself off, the filter foam pack will rotate and the water will be diverted via the waste water drain.
As soon as the audible signal sounds or the rinse water is clear again, move the blue lever back to FILTER. The filter foam pack stops rotating, the UVC switches back on and the filter operates normally again.
Check that the water flows into the pond through the outlet and the flow rate is sufficient.
Filter cleaning system with backwash function
You should clean the filter foam regularly, as dirt accumulates in the filter foam. When first installed, or if your pond is heavily soiled, it may be necessary to clean the filter foam daily. To do this, activate the automatic filter cleaning system, the filter foam pack rotates and is wrung out, the waste water drains away via the drain. There is no need to open the filter for this and an audible signal sounds when cleaning is complete.
!
Clean the filter foam as soon as the dirt indicator (l) shows, or clean it once a week.
Make sure a pond hose is connected to the waste water drain so the water can drain into the sewer or use it for watering the garden.
Set the blue lever (j) to CLEAN, after which the UVC will switch itself off, the filter foam pack will rotate and the water will be diverted via the waste water drain.
As soon as the audible signal sounds or the rinse water is clear again, move the blue lever back to FILTER. The filter foam pack stops rotating, the UVC switches back on and the filter operates normally again.
Check that the water flows into the pond through the outlet and the flow rate is sufficient.
Maintenance of the filter
D
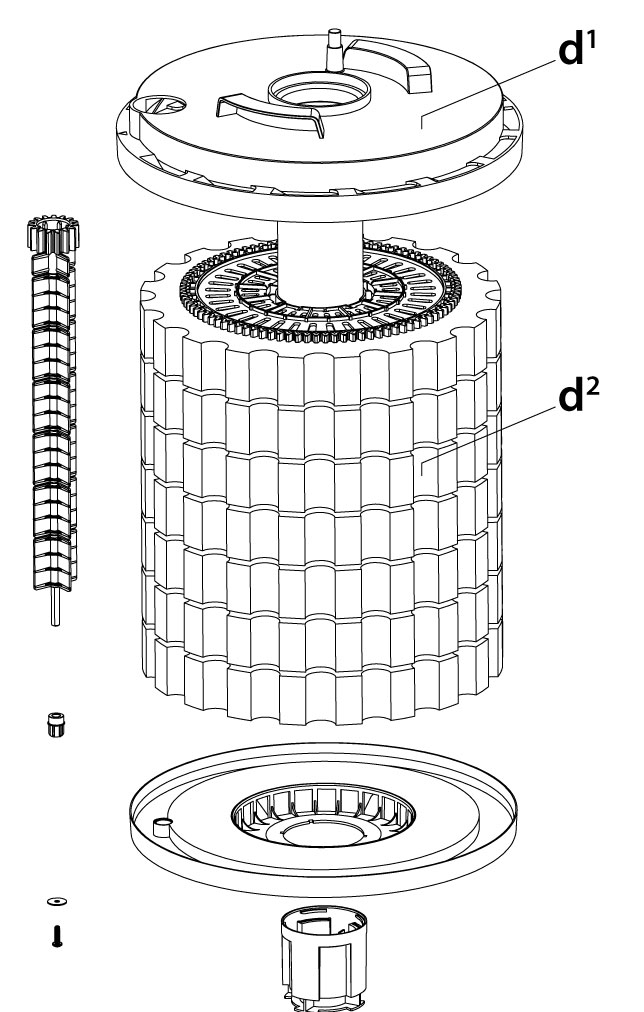
If the flow rate remains insufficient after automatically cleaning the filter foam, you should clean or replace the filter foam manually. To do this, dismantle the filter foam pack (d).

First, unplug the filter and the pump.
Remove the outer clamp (b) and carefully remove the cover (c) with the UVC from the filter housing (a).
Remove the filter foam pack from the filter housing.
Rinse the filter foam clean in a bucket of pond water and wring it out well.

NEVER use detergents to clean the filter, this will harm your fish, plants and the beneficial bacteria in your filter.
Replace the filter foam pack (TopClear Pro 24000: Art. 06030165 and TopClear Pro 36000: Art. 06030125) once a year. The filter foam pack consists of 4 yellow (fine) and 3 blue (coarse) layers of filter foam.
D
Maintenance of the filter
D
D
If the flow rate remains insufficient after automatically cleaning the filter foam, you should clean or replace the filter foam manually. To do this, dismantle the filter foam pack (d).
First, unplug the filter and the pump.
Remove the outer clamp (b) and carefully remove the cover (c) with the UVC from the filter housing (a).
Remove the filter foam pack from the filter housing.
Rinse the filter foam clean in a bucket of pond water and wring it out well.
NEVER use detergents to clean the filter, this will harm your fish, plants and the beneficial bacteria in your filter.
Replace the filter foam pack (TopClear Pro 24000: Art. 06030165 and TopClear Pro 36000: Art. 06030125) once a year. The filter foam pack consists of 4 yellow (fine) and 3 blue (coarse) layers of filter foam.
E
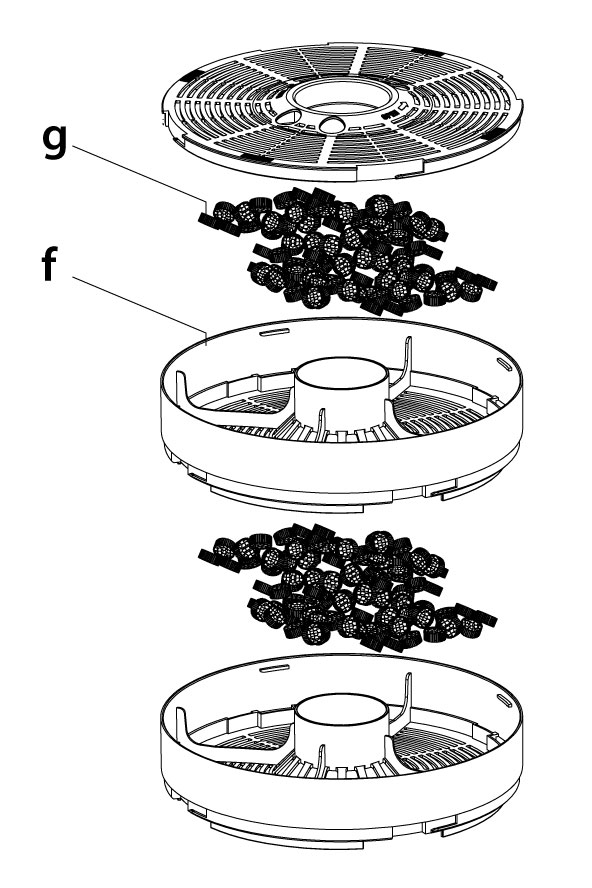
Clean the Bio-Balls once or twice a year by rinsing them with pond water. Do not use tap water for this purpose. The trays (f) containing the Bio-Balls can be easily opened by turning turning the black slatted cover anticlockwise and lifting it off. In the same way, you can also take off the upper tray.
Place the whole assembly back into the filter housing in the correct order, check that the O-ring (e) is in the correct position in the rim of the filter housing. Replace the cover with the UVC in the correct position and close the outer clamp.
Turn the pump and filter back on by plugging in the plugs.
E
E
E
Clean the Bio-Balls once or twice a year by rinsing them with pond water. Do not use tap water for this purpose. The trays (f) containing the Bio-Balls can be easily opened by turning turning the black slatted cover anticlockwise and lifting it off. In the same way, you can also take off the upper tray.
Place the whole assembly back into the filter housing in the correct order, check that the O-ring (e) is in the correct position in the rim of the filter housing. Replace the cover with the UVC in the correct position and close the outer clamp.
Turn the pump and filter back on by plugging in the plugs.
Maintenance of the UVC
Check monthly if UV lamp is burning via the UV indicator (i).
Remove the plugs of the filter and the pump from the socket before carrying out maintenance!
The outside of the quartz glass (q) should be cleaned twice a year.
Remove the outer clamp (b) and carefully remove the cover (c) with the UVC from the filter housing (a).
Carefully clean the quartz glass outer face with a soft cloth and SuperFish Pump & UVC Clean. After cleaning, thoroughly rinse the quartz glass with clean tap water and check for damage. Replace the quartz glass if it shows any damage (to prevent glass breakage). Quartz Glass Replacement Kit (TopClear Pro 24000: Art. 06030180 and TopClear Pro 36000: Art. 06030135).
As soon as algae growth increases, check the UVC device and UV-lamp and exchange the UV lamp (m) as needed.
The UV-lamp should be replaced annually, as the lamp may still show active but no longer emits enough UV radiation (maximum 8000 operating hours). Replacement lamp for TopClear Pro 24000 UVC: SF UV PL-lamp 24 W 2G11-320 mm (Art. 06011030) and TopClear Pro 36000 UVC: SF UV PLlamp 55 W 2G11-535 mm (Art. 06011040).

The lamp is hot, wait 10 minutes after switch off before opening the UVC device.
F
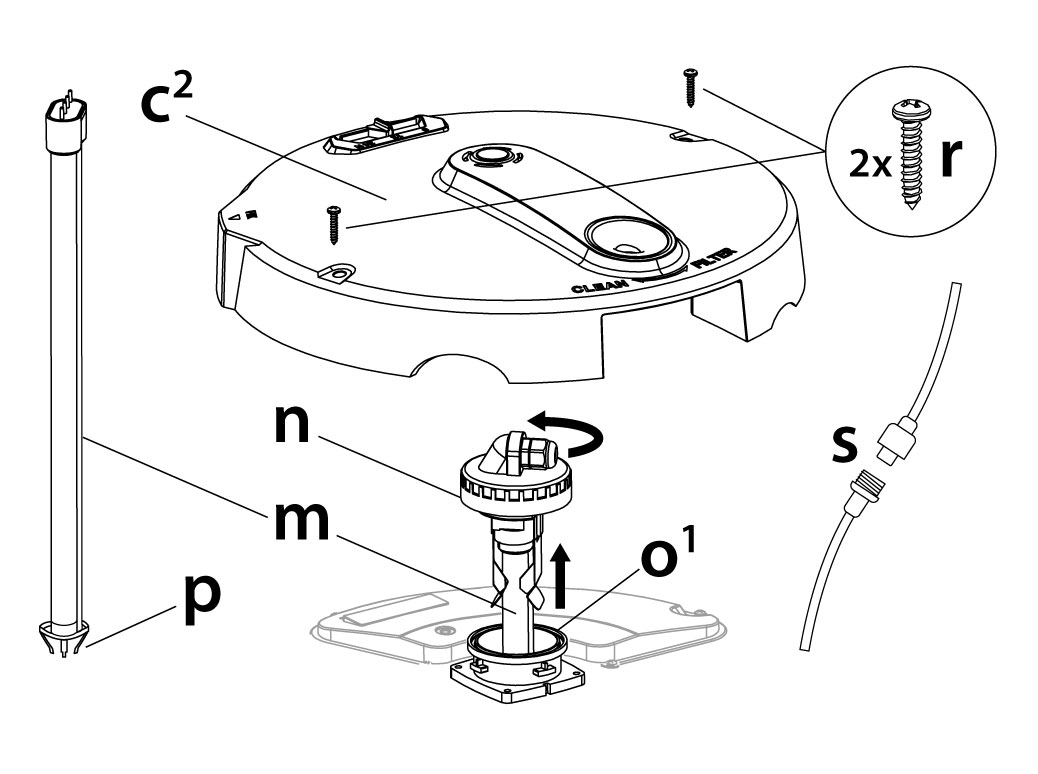
Loosen the two metal screws (r) in the cover and remove the cover plate (c2).
Loosen the cable connection (s) of the UVC, unscrew the union nut and pull the plug out of the mating plug.
Turn the lamp holder (n) anti-clockwise and gently pull the lamp holder with the UV lamp upwards out of the quartz glass.
Remove the old UV-lamp (m) with the lamp clip (p) from the fitting of the lamp holder.
Insert the new UV-lamp in the fitting and put the clip on the UV-lamp.
Carefully slide the UV lamp back into the quartz glass, check the position of the O-ring (o1) and tighten the lamp holder in a clockwise direction.
F
F
F
Loosen the two metal screws (r) in the cover and remove the cover plate (c2).
Loosen the cable connection (s) of the UVC, unscrew the union nut and pull the plug out of the mating plug.
Turn the lamp holder (n) anti-clockwise and gently pull the lamp holder with the UV lamp upwards out of the quartz glass.
Remove the old UV-lamp (m) with the lamp clip (p) from the fitting of the lamp holder.
Insert the new UV-lamp in the fitting and put the clip on the UV-lamp.
Carefully slide the UV lamp back into the quartz glass, check the position of the O-ring (o1) and tighten the lamp holder in a clockwise direction.
G
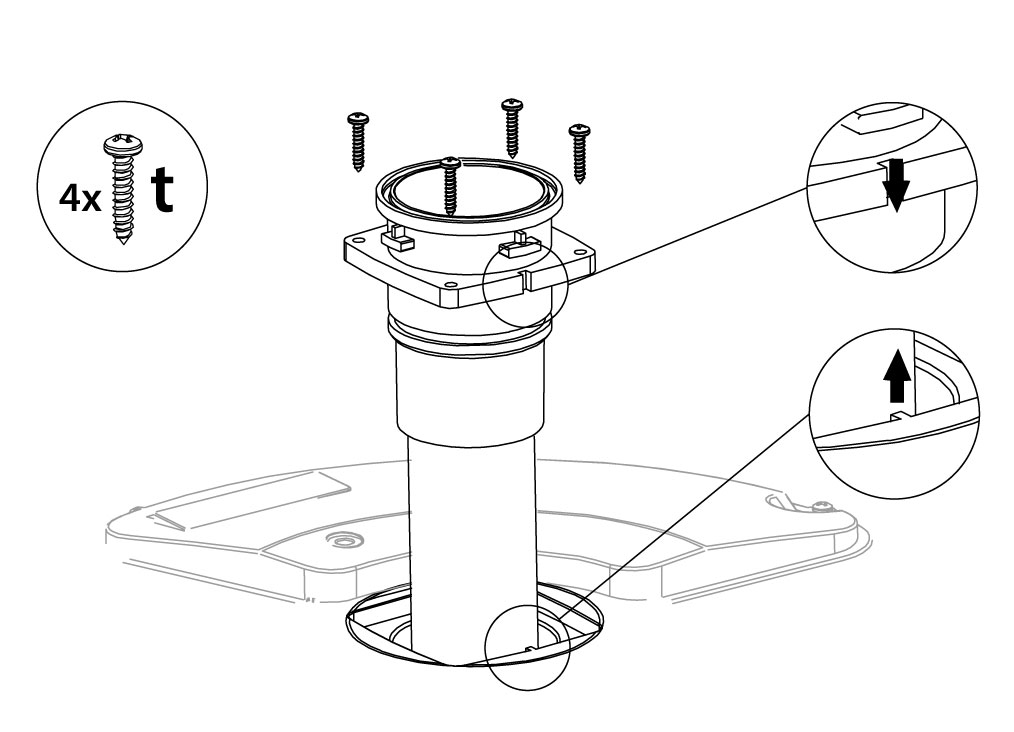
To replace the quartz glass (q), first remove the lamp holder with the UV lamp.
Loosen the four screws (t) from the top of the quartz glass and remove the old quartz glass.
Insert the new quartz glass with both O-rings (o1+o2).
!
NOTICE! The quartz glass can only be inserted in one way. There is a recess in the plastic part of the quartz glass and a cam in the opening for the quartz glass (on the side of the blue lever).
Make sure the cam falls into the recess and tighten the screws (crosswise) firmly so that the quartz glass seals everything and makes it watertight.
Check the operation of the UVC via the UV control window after you have reinstalled the UV lamp, cable connection, cover, etc. and switched-on the filter and pump.
G
G
G
To replace the quartz glass (q), first remove the lamp holder with the UV lamp.
Loosen the four screws (t) from the top of the quartz glass and remove the old quartz glass.
Insert the new quartz glass with both O-rings (o1+o2).
!
NOTICE! The quartz glass can only be inserted in one way. There is a recess in the plastic part of the quartz glass and a cam in the opening for the quartz glass (on the side of the blue lever).
Make sure the cam falls into the recess and tighten the screws (crosswise) firmly so that the quartz glass seals everything and makes it watertight.
Check the operation of the UVC via the UV control window after you have reinstalled the UV lamp, cable connection, cover, etc. and switched-on the filter and pump.