


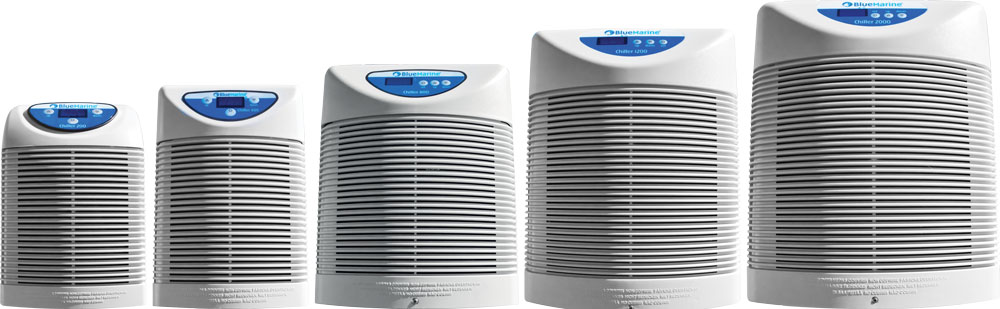
Chiller 200 - 400 - 800 - 1200 - 2000
User manual
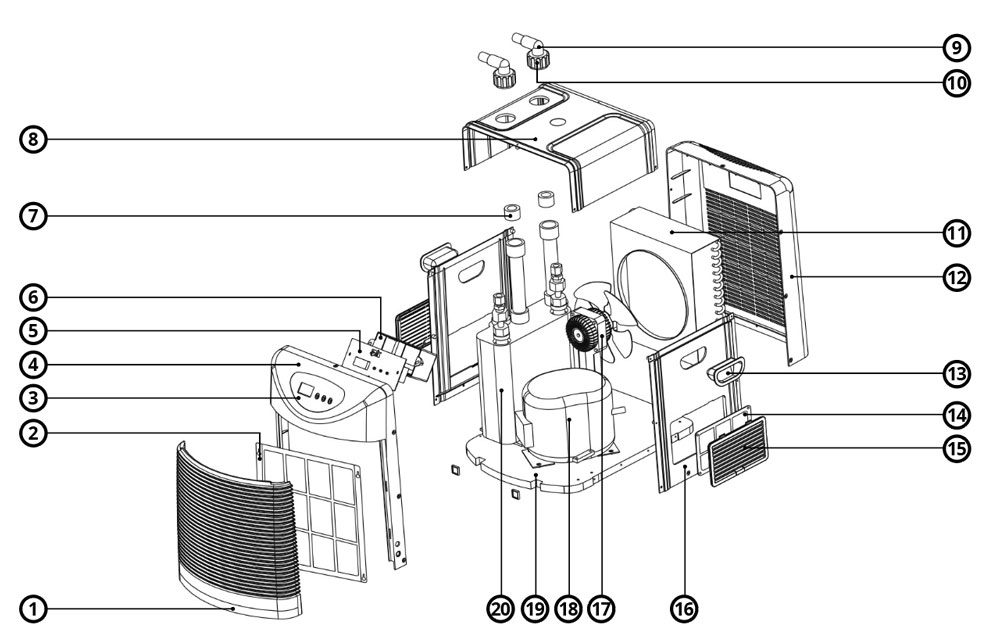
Parts list
1
Front panel grille
2
Filter (front panel)
3
Control display
4
Front panel
5
Circuit board
6
Rear panel of circuit board
7
Seal
8
Top panel
9
Hose connector
10
Mounting bolt
11
Condenser
12
Rear panel
13
Handle
14
Side panel filter
15
Side panel grille
16
Side panel
17
Fan motor
18
Compressor
19
Base plate
20
Condensate collection tank
Parts list
1
Front panel grille
2
Filter (front panel)
3
Control display
4
Front panel
5
Circuit board
6
Rear panel of circuit board
7
Seal
8
Top panel
9
Hose connector
10
Mounting bolt
11
Condenser
12
Rear panel
13
Handle
14
Side panel filter
15
Side panel grille
16
Side panel
17
Fan motor
18
Compressor
19
Base plate
20
Condensate collection tank
| Model | Blue Marine Chiller 200 |
|---|---|
| Rated Voltage | 220-240V |
| Rated Frequency | 50Hz |
| Working Current | 0,6A |
| Power | 150W (1/20PK) |
| Watertemperature Before Refrigeration | 28˚c (Ambient Temperature 30˚c) |
| Refrigeration Time | 20 hours |
| Watertemperature After Refrigeration | 16˚c (water volume 100L) |
| Watertemperature After Refrigeration | 22˚c (water volume 200L) |
| Refrigerant | R134a |
| Refrigerant Weight | 110g |
| Rate of Flow | 200-1000L/h |
| Weight | 9,2kg |
| Size | 338 x 218 x 325mm |
| The refrigeration performance test is done at room temperature of 30˚c, and water temperature of 28˚c, the set temperature is 16 ˚c and the water refrigerated is 100 and 200L. When water volume is reduced, the water temperature will get lower. |
| Model | Blue Marine Chiller 400 |
|---|---|
| Rated Voltage | 220-240V |
| Rated Frequency | 50Hz |
| Working Current | 1,1A |
| Power | 170W (1/10HP) |
| Watertemperature Before Refrigeration | 28˚c (Ambient Temperature 30˚c) |
| Refrigeration Time | 20 hours |
| Watertemperature After Refrigeration | 16˚c (water volume 150L) |
| Watertemperature After Refrigeration | 22˚c (water volume 300L) |
| Refrigerant | R134a |
| Refrigerant Weight | 180-200g |
| Rate of Flow | 250-1200L/h |
| Weight | 15kg |
| Size | 420 x 248 x 365mm |
| The refrigeration performance test is done at room temperature of 30˚c, and water temperature of 28˚c, the set temperature is 16 ˚c and the water refrigerated is 150 and 300L. When water volume is reduced, the water temperature will get lower. |
| Model | Blue Marine Chiller 800 |
|---|---|
| Rated Voltage | 220-240V |
| Rated Frequency | 50Hz |
| Working Current | 1,8A |
| Power | 260W (1/4HP) |
| Watertemperature Before Refrigeration | 28˚c (Ambient Temperature 30˚c) |
| Refrigeration Time | 20 hours |
| Watertemperature After Refrigeration | 18˚c (water volume 300L) |
| Watertemperature After Refrigeration | 23˚c (water volume 600L) |
| Refrigerant | R134a |
| Refrigerant Weight | 110g |
| Rate of Flow | 1000-2500L/h |
| Weight | 18.6kg |
| Size | 448 x 330 x 440mm |
| The refrigeration performance test is done at room temperature of 30˚c, and water temperature of 28˚c, the set temperature is 16 ˚c and the water refrigerated is 300 and 600L. When water volume is reduced, the water temperature will get lower. |
| Model | Blue Marine Chiller 1200 |
|---|---|
| Rated Voltage | 220-240V |
| Rated Frequency | 50Hz |
| Working Current | 2,4A |
| Power | 420W (1/2PK) |
| Watertemperature Before Refrigeration | 28˚c (Ambient Temperature 30˚c) |
| Refrigeration Time | 20 hours |
| Watertemperature After Refrigeration | 18˚c (water volume 500L) |
| Watertemperature After Refrigeration | 23˚c (water volume 1000L) |
| Refrigerant | R134a |
| Refrigerant Weight | 260g |
| Rate of Flow | 1200-3000L/h |
| Weight | 22kg |
| Size | 475 x 360 x 490mm |
| The refrigeration performance test is done at room temperature of 30˚c, and water temperature of 28˚c, the set temperature is 16 ˚c and the water refrigerated is 500 and 1000L. When water volume is reduced, the water temperature will get lower. |
| Model | Blue Marine Chiller 2000 |
|---|---|
| Rated Voltage | 220-240V |
| Rated Frequency | 50Hz |
| Working Current | 3,2A |
| Power | 550W (1PK) |
| Watertemperature Before Refrigeration | 28˚c (Ambient Temperature 30˚c) |
| Refrigeration Time | 20 hours |
| Watertemperature After Refrigeration | 14˚c (water volume 1000L) |
| Watertemperature After Refrigeration | 21˚c (water volume 2000L) |
| Refrigerant | R134a |
| Refrigerant Weight | 26420-450g0g |
| Rate of Flow | 1500-4000L/h |
| Weight | 31.3kg |
| Size | 520 x 400 x 480mm |
| The refrigeration performance test is done at room temperature of 30˚c, and water temperature of 28˚c, the set temperature is 16 ˚c and the water refrigerated is 1000 and 2000L. When water volume is reduced, the water temperature will get lower. |
Expressions (Terms and symbols)

This symbol advises you of an item wich should be noted (including danger and warning).

This term indicates the possibility that continuing to work while ignoring this attention, or working incorrectly without full understanding, may cause personal injury or equipment damage.

This symbol advises you of an action which must be taken (is mandatory) in order to avoid danger.

This symbol advises you of an action which must not be taken (is mandatory) in order to avoid danger.
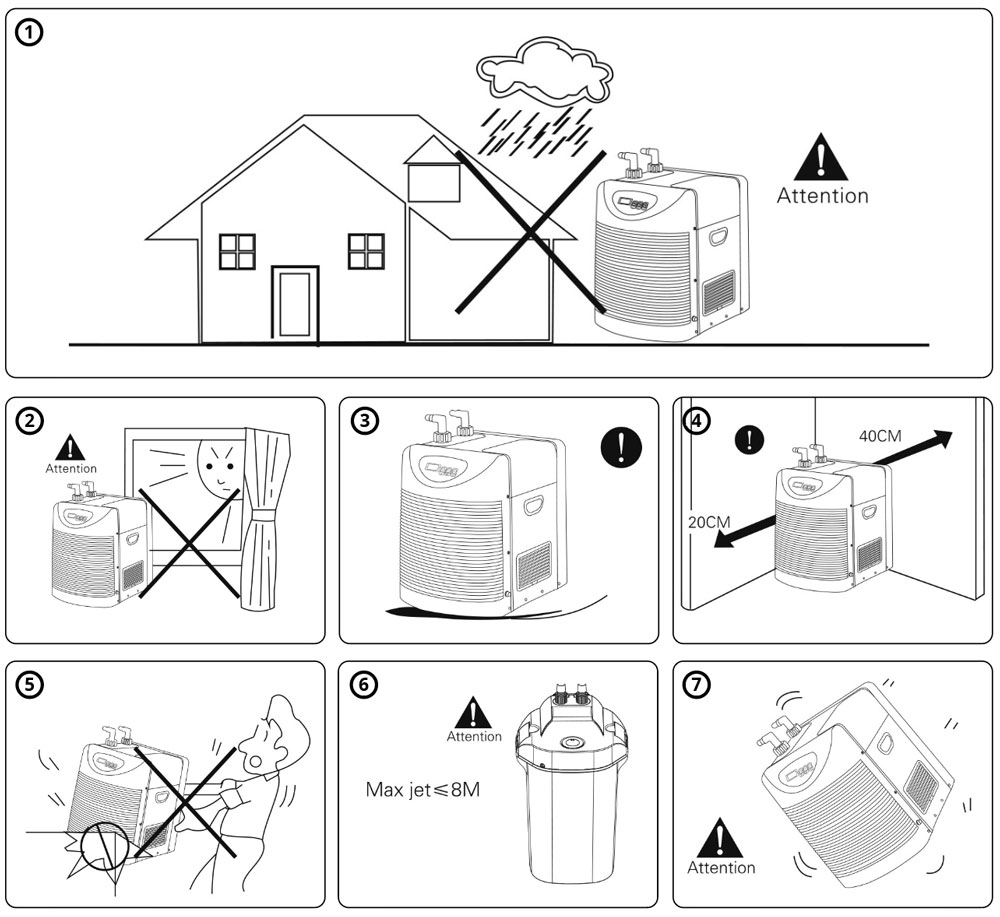
Positioning of the chiller
1
Position the chiller on a dry, well ventilated location. Keep chiller far away from inflammable products, heat sources, avoid direct sunlight, moist and dust
2
Position the device horizontal on a stable surface.
3
Maintain a distance of at least 30 cm from wall or other obstacles to ensure a free flow of air to cool the unit.
4
Do not cover the unit when it is in operation.
5
Avoid shocks and vibrations.
6
Do not keep the unit upside down or under an angle, this can cause damage to the unit. If you need to tilt the unit, for example to drain the unit, make sure the unit is switched off and the plug is disconnected. Drain the unit and put it upright immediately after you are done. Wait at least 20 minutes before putting the chiller back in operation.
Positioning of the chiller
1
Position the chiller on a dry, well ventilated location. Keep chiller far away from inflammable products, heat sources, avoid direct sunlight, moist and dust
2
Position the device horizontal on a stable surface.
3
Maintain a distance of at least 30 cm from wall or other obstacles to ensure a free flow of air to cool the unit.
4
Do not cover the unit when it is in operation.
5
Avoid shocks and vibrations.
6
Do not keep the unit upside down or under an angle, this can cause damage to the unit. If you need to tilt the unit, for example to drain the unit, make sure the unit is switched off and the plug is disconnected. Drain the unit and put it upright immediately after you are done. Wait at least 20 minutes before putting the chiller back in operation.
Installation
1
The chiller is not equipped with an internal pump and hence should be connected to an external pump or filter (not included). Check the table with specifications for the pump capacity needed for your type of chiller. The head of the pump should not exceed 8 meters. The use of an unsuited pump can cause leakage or damage to the chiller.
2
The chiller can be placed out of sight, for example in a cabinet under the aquarium. However the cabinet must have ventilation openings, which ensure a free airflow to and from the unit for cooling purposes.
3
The chiller must be feed with clean water. The best practice is to connect the chiller to the return of the filter so that the chiller is fed with purified, clean water. Polluted water can contaminate the evaporator; in this case the cooling efficiency is adversely affected.
4
Check all connections on leakages and ensure a sufficient flow of water through the chiller before setting the chiller in operation.
Operating the unit:
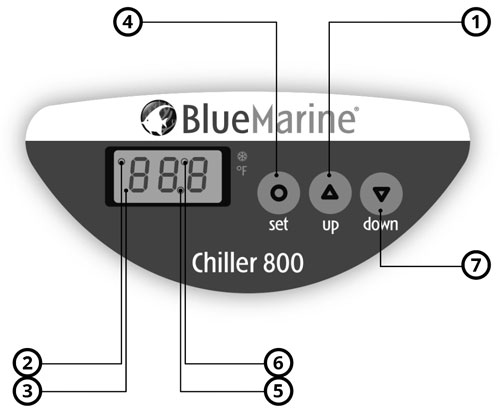
The display for the temperature (3) can alternately display the water temperature and the set temperature. Push the SET button on the control panel briefly. Indicator (2) blinks when the set temperature is displayed and is off when the water temperature is displayed.
Set the temperature:
Push the SET button for 3 seconds to switch to the program mode. The temperature last set is displayed. Change the temperature with the arrow buttons to the desired value. You can set a temperature 3˚ and 32˚C. You can store the settings by pushing the SET button for 3 seconds or to wait for 8 seconds. After saving the settings the displays shows the actual water temperature.
Adjust temperature deviation:
If the actual water temperature deviates from the reading on the chiller this can be corrected as follows: Push both arrow buttons for 6 seconds simultaneously until the display starts to blink. Then push the arrow down button or arrow up button to correct the deviation. The temperature can be adjusted with -1,5˚C to +1,5˚C maximum.
Automatic overcharge shutdown:
The chiller is equipped with an automatic overcharge shutdown safety feature. The chiller needs 3 minutes before it can be restarted after an automatic shutdown. The restart procedure will take about 1 minute.
Automatic operation of the compressor:
As soon as the water temperature is 1˚C above the temperature set and the compressor is not running for 3minutes at the same time, the compressor will restart automatically. The compressor will stop automatically as soon as the set value is reached. The indicator (6) in the top of the display illuminates when the compressor is running and goes out when the compressor stops. The same indicator blinks during the 3 minutes cool-down time after an automatic shutdown due to overcharge.
P1 or P2 is displayed:
When a problem with the temperature sensor occurs and the chiller has been shut down by the automatic overcharge safety feature, P1 or P2 is displayed.
1
Increasing temperature
2
Temperature indicator
3
Temperature display
4
Set Temperature
5
Point indicator
6
Working state indicator
7
Decreasing temperature
P1 or P2 is displayed:
When a problem with the temperature sensor occurs and the chiller has been shut down by the automatic overcharge safety feature, P1 or P2 is displayed.
1
Increasing temperature
2
Temperature indicator
3
Temperature display
4
Set Temperature
5
Point indicator
6
Working state indicator
7
Decreasing temperature
Cleaning and maintenance:
To secure an optimal flow of water through the chiller the external pump or filter unit must be cleaned and maintained in accordance with the manufacturers instructions.
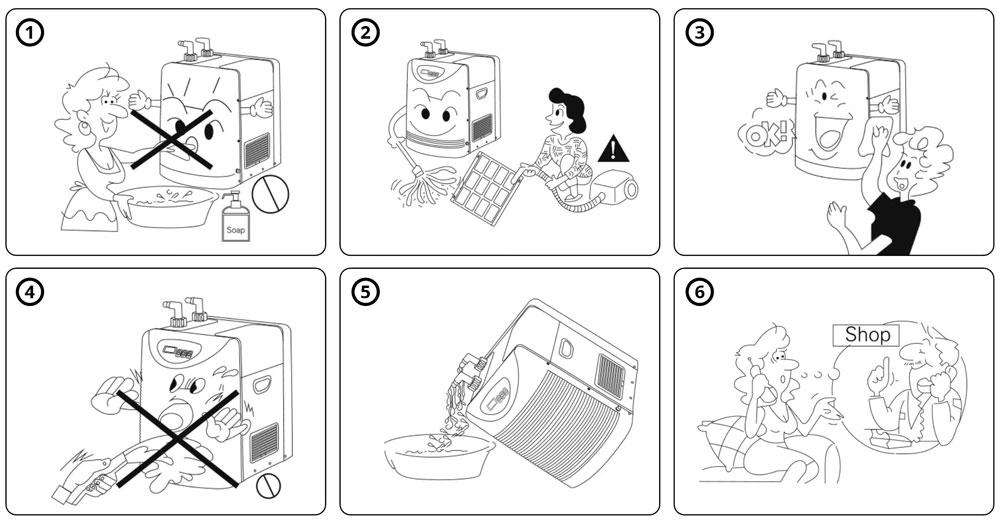
Cleaning and maintenance:
To secure an optimal flow of water through the chiller the external pump or filter unit must be cleaned and maintained in accordance with the manufacturers instructions.
Chiller maintenance:
Switch the chiller off and disconnect the plug from the wall socket.
Remove dust from the ventilation opening on the front and from the air inlet and exhaust. Use a bruch or vaccoum cleaner, do not use foreign objects or wires to clean the grids.
Cleaning the air fillters:
Remove the screws from the grid on the front (turn screws anti clockwise).
Hold the grid with both hands and remove it carefully.
Remove the screws from the air filters (turn screws anti clockwise).
Remove the air filter.
Remove dust with a brush or a vacuum cleaner.
Reinstall components in reversed order.
You can clean the unit with a soft cloth. Do not use aggressive cleaning agents.
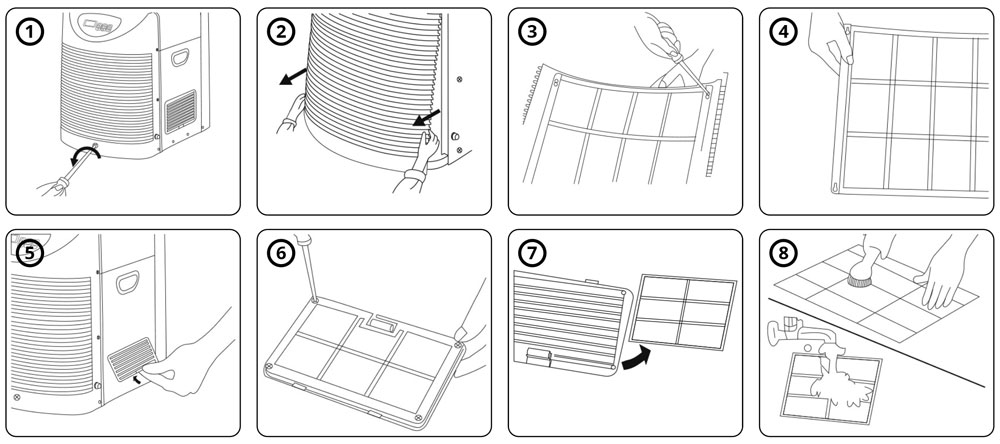
Chiller maintenance:
Switch the chiller off and disconnect the plug from the wall socket.
Remove dust from the ventilation opening on the front and from the air inlet and exhaust. Use a bruch or vaccoum cleaner, do not use foreign objects or wires to clean the grids.
Cleaning the air fillters:
Remove the screws from the grid on the front (turn screws anti clockwise).
Hold the grid with both hands and remove it carefully.
Remove the screws from the air filters (turn screws anti clockwise).
Remove the air filter.
Remove dust with a brush or a vacuum cleaner.
Reinstall components in reversed order.
You can clean the unit with a soft cloth. Do not use aggressive cleaning agents.