


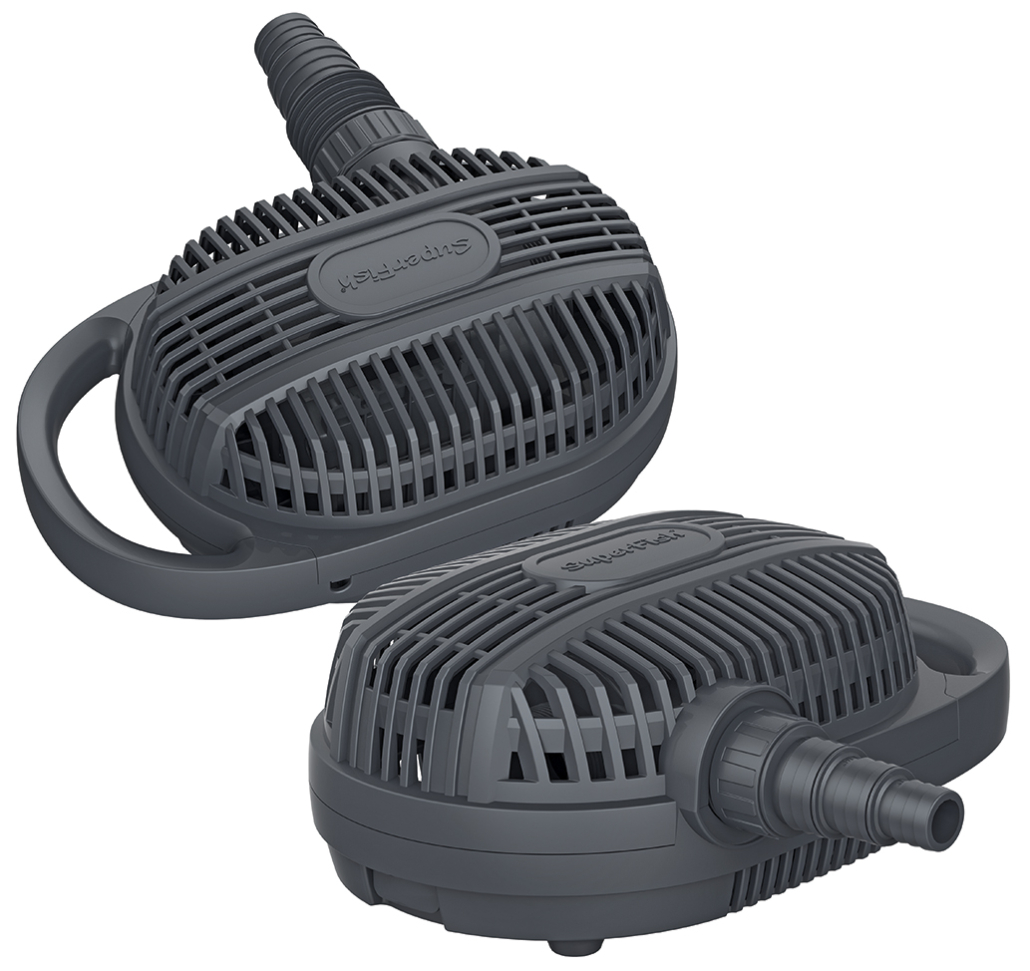
PondECO Next 3500-5000-8000-10000-12000-15000-20000-26000
User manual
Function
The PondECO Next is an electronic pond pump for use with filters, skimmers, waterfalls and water ornaments.
Run Dry Protection
The pump is equipped with a dry-running safety device, which is especially important when used inline. It is important that water can always be pumped around. If there is no water flow for 10 seconds, the pump will automatically stop and then restart after 10 seconds. If there is still no water flow, the pump will stop and restart again. This cycle is repeated 5 times, after which the pump stops completely.

You can restart the pump when the water supply is restored. First, pull the plug out of the socket before performing any maintenance.
To reset the Run Dry Protection, the pump must be disconnected from the mains for at least 1 minute.
Plug the pump back into the socket and it will start up and begin circulating water.
Thermal Overload Protection

The pump has a thermal overload protection in case the motor overheats, the pump switches off automatically. After a cooling down time of 15 to 20 minutes, the pump automatically switches on again.
In order to prevent damage to the pump, it is essential to investigate the cause of the overheating and resolve the issue. Damage caused by overheating is not covered by the warranty.
Installation in the pond
- The PondECO Next pump is suitable for pond hoses with diameters of 25/32/40 mm or 32/40/50 mm ((depending on the model).
- Cut the Multi-step hose connector to the desired diameter and fasten it on the pump.
- Connect the pond hose to the hose connector using a hose clamp (not included).
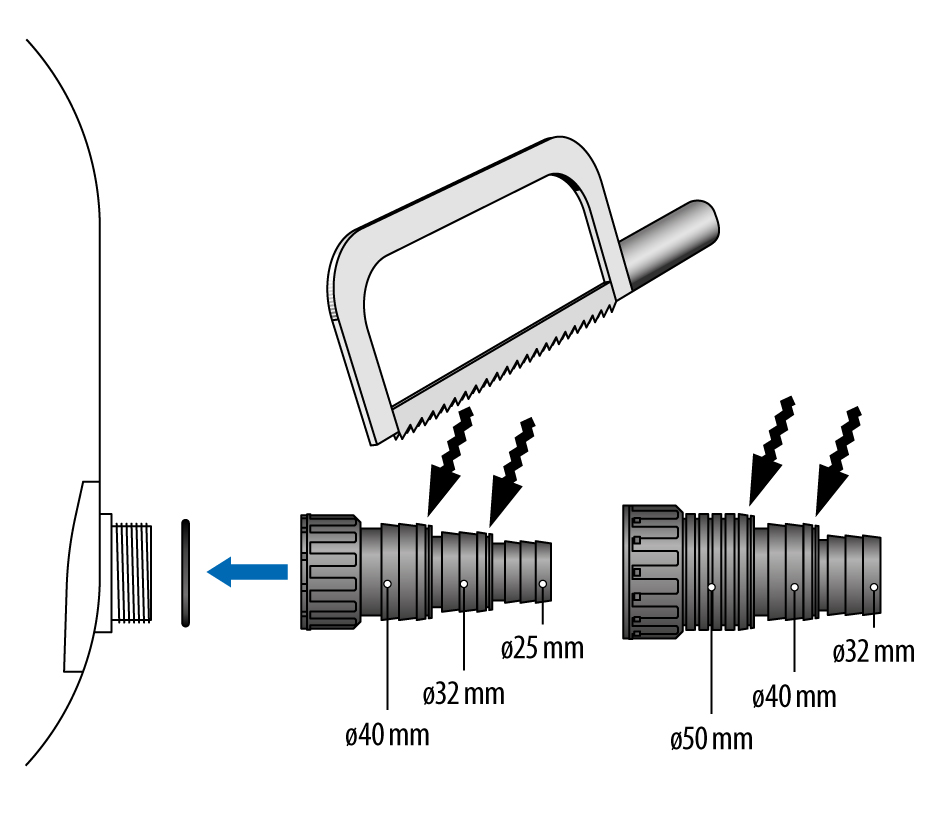
- The PondECO Next pump is suitable for pond hoses with diameters of 25/32/40 mm or 32/40/50 mm ((depending on the model).
- Cut the Multi-step hose connector to the desired diameter and fasten it on the pump.
- Connect the pond hose to the hose connector using a hose clamp (not included).
- Install the pump underwater, preferably in the deepest part of the pond (max. 2 metre depth) and at least 20 cm below the water surface.
- Make sure that the pump stands horizontally and firmly on a flat surface so that it cannot fall over.

Plug the pump into the socket and make sure there is a drip loop in the cord.
Make sure that no one can trip over the cord and that the cord cannot be damaged.
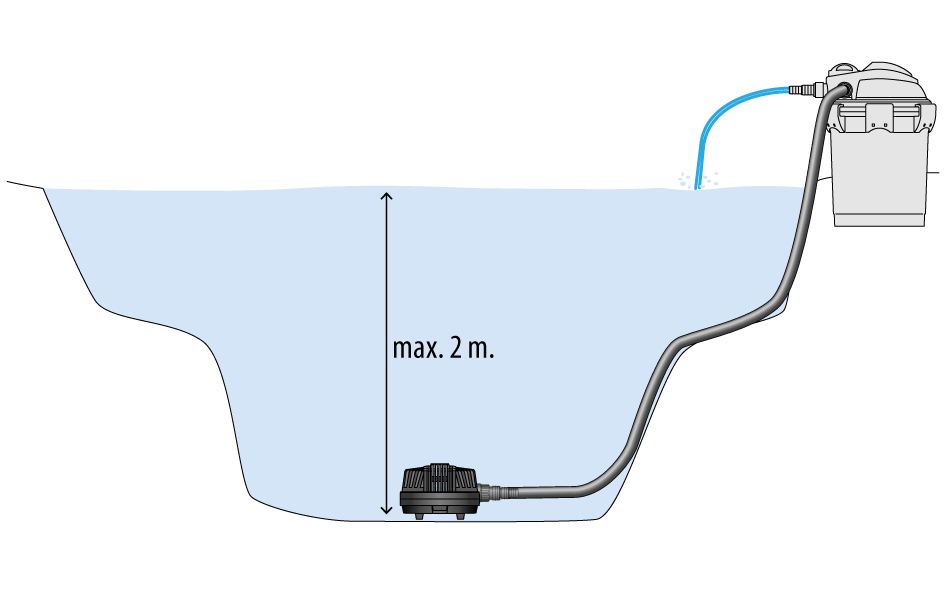
- Install the pump underwater, preferably in the deepest part of the pond (max. 2 metre depth) and at least 20 cm below the water surface.
- Make sure that the pump stands horizontally and firmly on a flat surface so that it cannot fall over.
Plug the pump into the socket and make sure there is a drip loop in the cord.
Make sure that no one can trip over the cord and that the cord cannot be damaged.
Inline installation
- For inline use, the pump section must be taken out of the housing.
- Open the housing by pressing the latch at the front and back, which will release the upper shell.
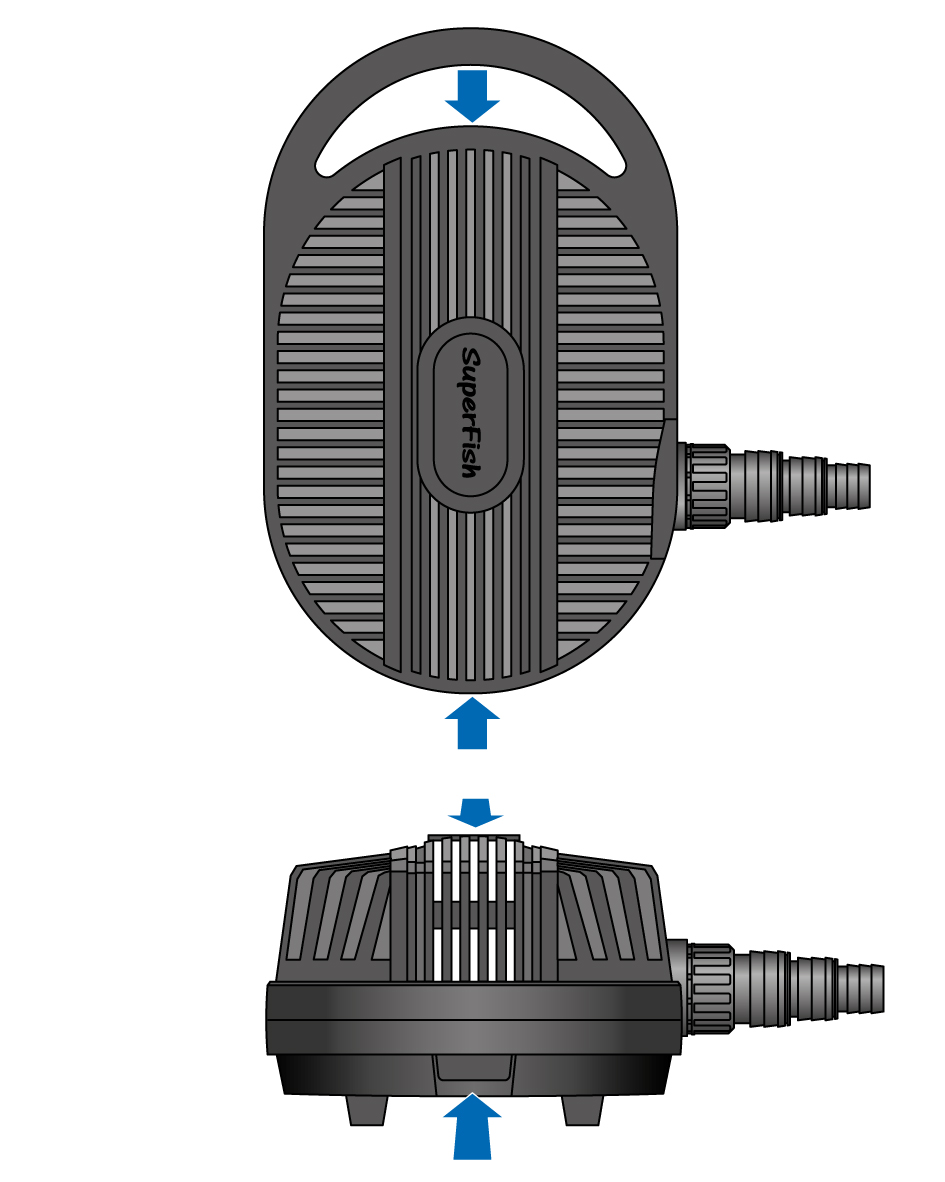
- For inline use, the pump section must be taken out of the housing.
- Open the housing by pressing the latch at the front and back, which will release the upper shell.
- Remove the bracket that runs over the pump by unscrewing the 2 screws and take the pump out of the housing.
- At the front of the pump is the inlet (hose connector not supplied). At the top is the outlet (for the supplied Multi-step hose connector).
- Cut the Multi-step hose connector to the desired diameter and fasten it on the pump.
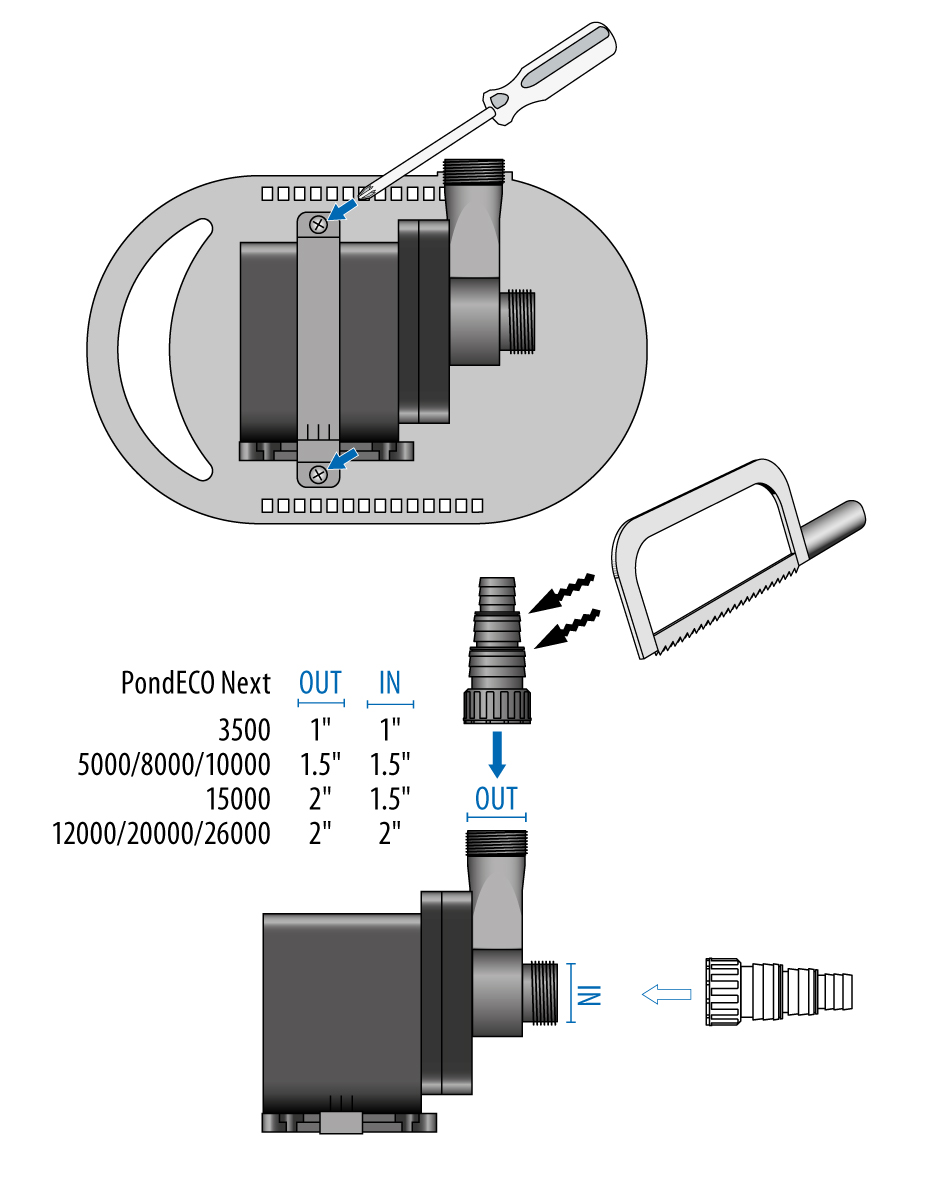
- Remove the bracket that runs over the pump by unscrewing the 2 screws and take the pump out of the housing.
- At the front of the pump is the inlet (hose connector not supplied). At the top is the outlet (for the supplied Multi-step hose connector).
- Cut the Multi-step hose connector to the desired diameter and fasten it on the pump.
- Install the pump horizontally and firmly on a flat surface outside the pond. Make sure that the pump cannot tip over, if necessary you can secure the pump with screws.
- Connect the pump to the filter in the desired manner.
Plug the pump into the socket and make sure there is a drip loop in the cord.
Make sure that no one can trip over the cord and that the cord cannot be damaged.
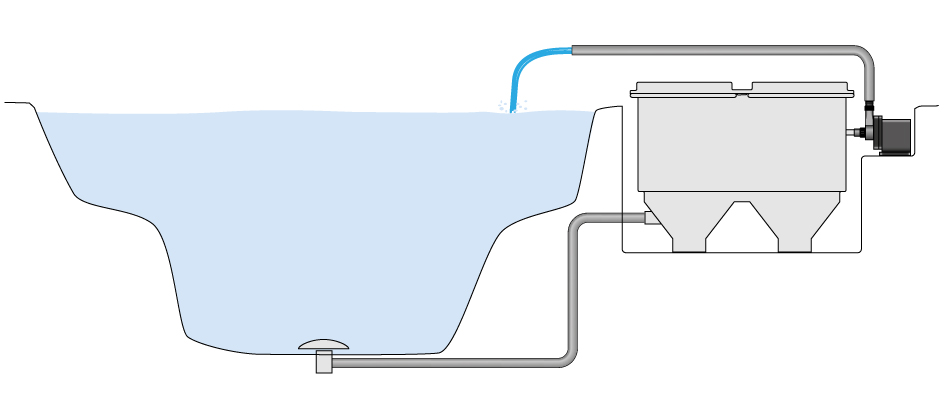
- Install the pump horizontally and firmly on a flat surface outside the pond. Make sure that the pump cannot tip over, if necessary you can secure the pump with screws.
- Connect the pump to the filter in the desired manner.
Plug the pump into the socket and make sure there is a drip loop in the cord.
Make sure that no one can trip over the cord and that the cord cannot be damaged.
Maintenance
The pump should be cleaned regularly (minimum twice a year) to ensure trouble free operation. Scale deposits, in particular, can cause your pump to cease. There is no warranty on failures due to dirty pumps and scale build up inside the pump caused by improper or lack of maintenance.
Remove the plug from the socket before carrying out maintenance!
- Disconnect the pump from the filter and rinse the housing under the tap or garden hose.
- For proper cleaning and descaling, it is best to use SuperFish Pump & UVC Clean (Art. 07070500), which is available from your dealer.
- Mix SuperFish Pump & UVC Clean in a large bucket with clean tap water, according to the instructions on the bottle. Immerse the pump into it and leave it there for 24 hours.
- Take the pump out of the bucket and let it drain before disassembling it.
- Open the housing by pressing the latch at the front and back, which will release the upper shell.
- Open the housing by pressing the latch at the front and back, which will release the upper shell.
- Remove the bracket that runs over the pump by unscrewing the 2 screws and take the pump out of the housing.
- Dismantle the rotor housing by loosening the 4 screws on the front of the pump and remove the rotor.
- Brush and clean all parts and the housing thoroughly. Rinse everything with clean tap water and reassemble the unit.
Depending on the use of the pump, the rotor may become damaged or worn, which is normal. A new rotor is available from your dealer.
SF PondECO Next 3500 Rotor (Art. 07080120)
SF PondECO Next 5000 Rotor (Art. 07080125)
SF PondECO Next 8000 Rotor (Art. 07080130)
SF PondECO Next 10000 Rotor (Art. 07080135)
SF PondECO Next 12000 Rotor (Art. 07080140)
SF PondECO Next 15000 Rotor (Art. 07080145)
SF PondECO Next 20000 Rotor (Art. 07080150)
SF PondECO Next 26000 Rotor (Art. 07080155)

NOTICE! During periods of frost you should remove the pump from the pond. Clean and dry the pump well and store it frost free.
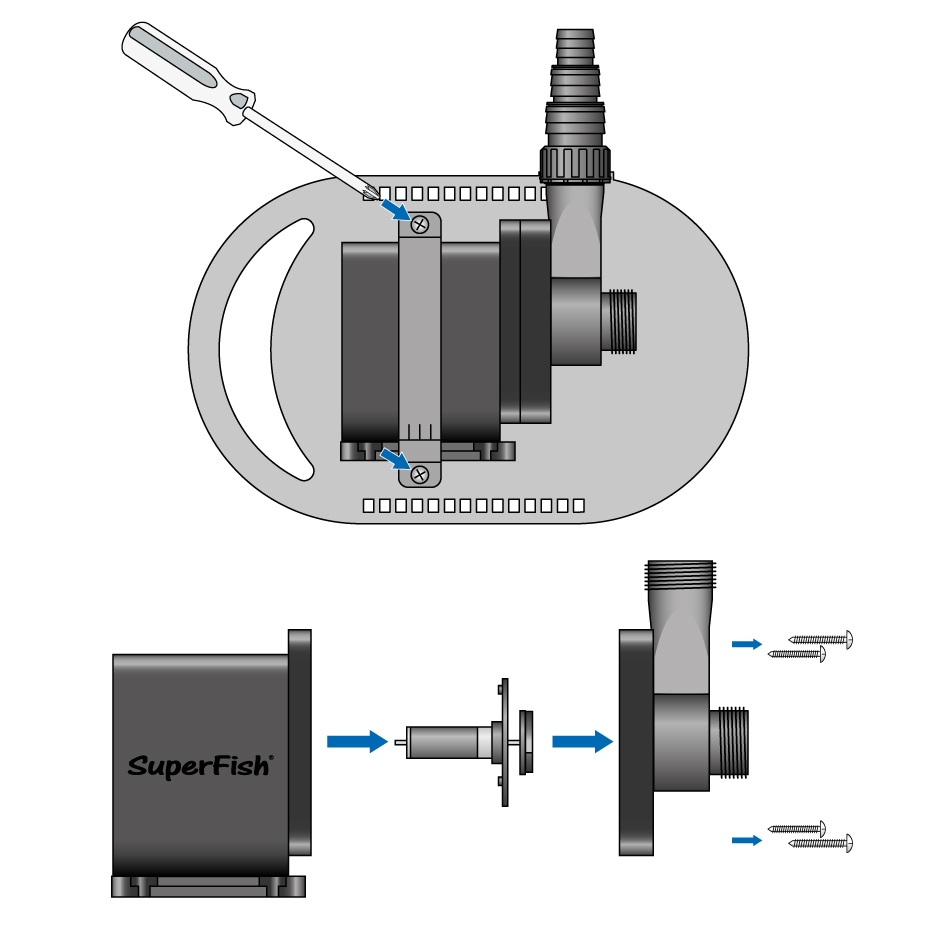
- Remove the bracket that runs over the pump by unscrewing the 2 screws and take the pump out of the housing.
- Dismantle the rotor housing by loosening the 4 screws on the front of the pump and remove the rotor.
- Brush and clean all parts and the housing thoroughly. Rinse everything with clean tap water and reassemble the unit.
Depending on the use of the pump, the rotor may become damaged or worn, which is normal. A new rotor is available from your dealer.
SF PondECO Next 3500 Rotor (Art. 07080120)
SF PondECO Next 5000 Rotor (Art. 07080125)
SF PondECO Next 8000 Rotor (Art. 07080130)
SF PondECO Next 10000 Rotor (Art. 07080135)
SF PondECO Next 12000 Rotor (Art. 07080140)
SF PondECO Next 15000 Rotor (Art. 07080145)
SF PondECO Next 20000 Rotor (Art. 07080150)
SF PondECO Next 26000 Rotor (Art. 07080155)
NOTICE! During periods of frost you should remove the pump from the pond. Clean and dry the pump well and store it frost free.
PondECO Next Controller
With the optional PondECO Next Controller, you can adjust the power of the PondECO Next pump in steps using a remote control.
Pick up & Replace Service!
PondECO Next Controller
With the optional PondECO Next Controller, you can adjust the power of the PondECO Next pump in steps using a remote control.