


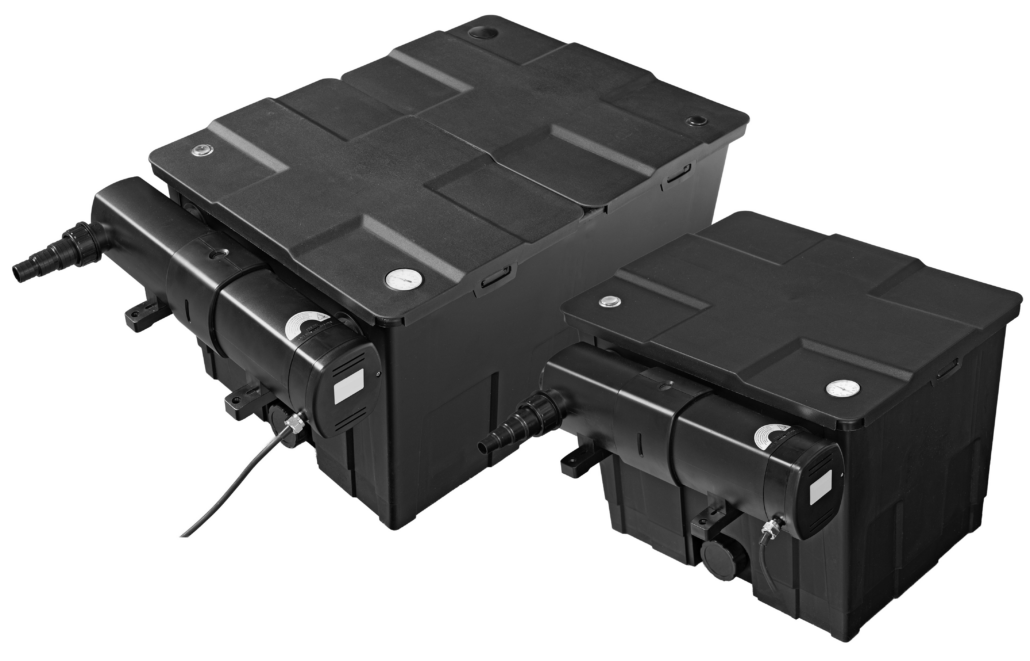
Pond Clear pro 18000 - 36000 Filter
User manual
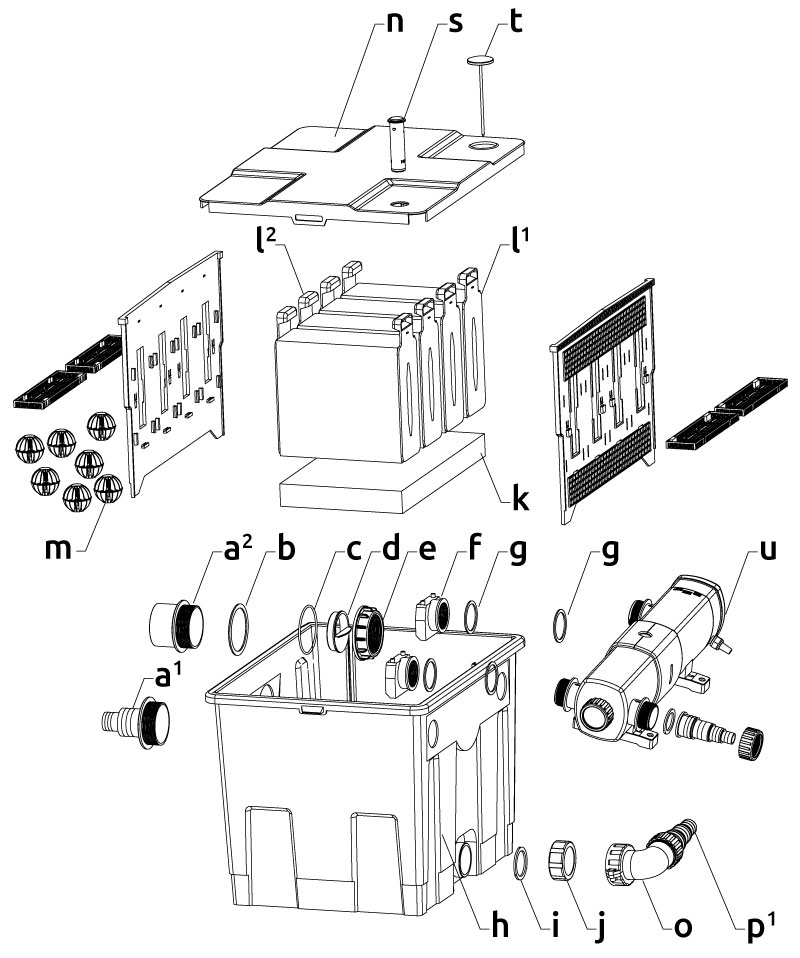
Pond Clear Pro 18000
a1. Outlet Hose ø 38/50 mm
a2. Outlet PVC ø 75 mm
b. Gasket
c. O-ring
d. Adjuster
e. Screw ring
f. Inlet piece
g. Gasket
h. Filter box
i. Gasket
j. Screw cap
k. Japanese mat
l1. Filter foam, coarse
l2. Filter foam, fine
m. Bio-Balls
n. Lid
o. Elbow pipe
p1. Outlet Hose ø 25/32/38 mm
s. Dirt indicator
t. Thermometer
u. UVC
Pond Clear Pro 18000
a1. Outlet Hose ø 38/50 mm
a2. Outlet PVC ø 75 mm
b. Gasket
c. O-ring
d. Adjuster
e. Screw ring
f. Inlet piece
g. Gasket
h. Filter box
i. Gasket
j. Screw cap
k. Japanese mat
l1. Filter foam, coarse
l2. Filter foam, fine
m. Bio-Balls
n. Lid
o. Elbow pipe
p1. Outlet Hose ø 25/32/38 mm
s. Dirt indicator
t. Thermometer
u. UVC
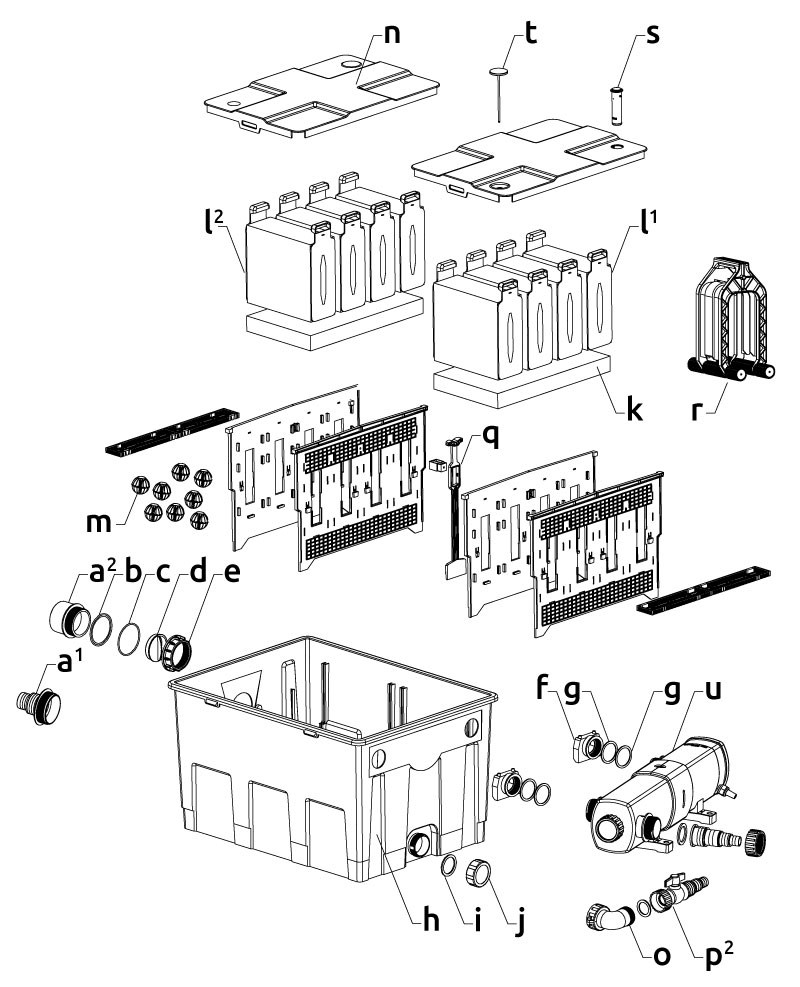
Pond Clear Pro 36000
a1. Outlet Hose ø 38/50 mm
a2. Outlet PVC ø 75 mm
b. Gasket
c. O-ring
d. Adjuster
e. Screw ring
f. Inlet piece
g. Gasket
h. Filter box
i. Gasket
j. Screw cap
k. Japanese mat
l1. Filter foam, coarse
l2. Filter foam, fine
m. Bio-Balls
n. Lid
o. Elbow pipe
p2. Ball valve
q. Sliding tap
r. Cleaning tool
s. Dirt indicator
t. Thermometer
u. UVC
Pond Clear Pro 36000
a1. Outlet Hose ø 38/50 mm
a2. Outlet PVC ø 75 mm
b. Gasket
c. O-ring
d. Adjuster
e. Screw ring
f. Inlet piece
g. Gasket
h. Filter box
i. Gasket
j. Screw cap
k. Japanese mat
l1. Filter foam, coarse
l2. Filter foam, fine
m. Bio-Balls
n. Lid
o. Elbow pipe
p2. Ball valve
q. Sliding tap
r. Cleaning tool
s. Dirt indicator
t. Thermometer
u. UVC
Function
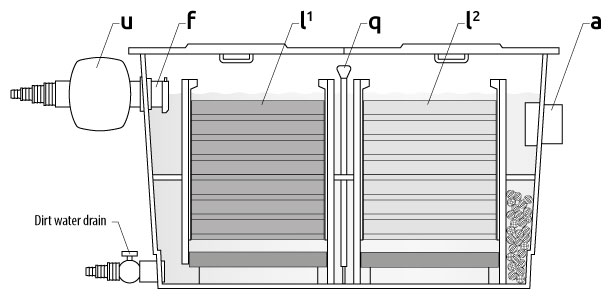
The filter collects dirt from pond water by filtering it both mechanically and biologically, keeping the pond clean, healthy and clear. Using a pond pump, the water is first pumped into the filter through the connected UVC. Then, via the Japanese mat at the bottom of the filter (biological filtration), the water flows through the blue (coarse) and yellow (fine) filter foam. Here, dirt particles are mechanically filtered out of the water. Finally, the water flows through the Bio-Balls (biological filtration) filtering it back into the pond. Beneficial bacteria in the Japanese mat and Bio-Balls convert harmful substances (ammonia and nitrite) from the pond water into non-harmful substances (nitrate). This is known as biological filtration.
Installation
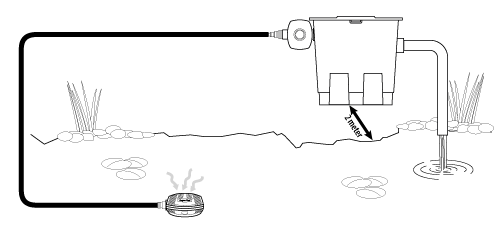
Locate the filter at least 2 m. from the pond, in a sheltered place (not in direct sunlight) allowing sufficient space for maintenance.
Installation
Locate the filter at least 2 m. from the pond, in a sheltered place (not in direct sunlight) allowing sufficient space for maintenance.
- NOTICE! Ensure that the filter is level and above the water level of the pond.
- First rinse the inside of the filter, filter media (filter foam, Japanese mat(s) and Bio-Balls) and all accessories with clean tap water.
- Place the rinsed Bio-Balls (m), Japanese mats (k) and filter foam (l) back properly, with the openwork plastic side of the filter foam on the outlet side and the closed plastic side on the UVC side.
- Mount the UVC on the filter box, with their corresponding gaskets (g) on both the inside and outside of the filter wall, and screw both inlet pieces (f) onto the outlets of the UVC (see UVC operating instructions).
- NOTICE! Make sure the opening of both inlet pieces face downward, thus ensuring the incoming water only flows downwards.
- You can replace the screw cap (j) on the dirty water drain with the elbow pipe (o) and the 25/32/38 mm hose outlet (p1) included with the Pond Clear Pro 18000, or the ball valve (p2) included with the Pond Clear Pro 36000.
- Fit the 38/50 mm hose outlet (a1) (cut to size first if necessary), or the 75 mm PVC outlet (a2), as required, with the gasket (b) on the outside and the O-ring (c) on the inside of the filter wall and tighten the screw ring (e).
- NOTICE! If the outlet opening is too large, you can optionally insert the adjuster (d), taking care that the water level in the filter does not rise too high, which could cause the filter to overflow.
- Connect a pond hose with hose clamp or PVC pipe to the outlet, so that the water flows back into the pond.
- Switch on the pump and check for any leaks.
Maintenance
- Clean the filter regularly. When first installed, or if your pond is heavily soiled, it may be necessary to clean the filter foam daily.
- The orange dirt indicator (s) in the lid indicates when the filter foam should be cleaned. If the filter foam becomes clogged, the water level in the filter will rise, causing the dirt indicator to rise.
- Switch off the pond pump and UVC and unplug both before performing maintenance!
- For maintenance of the UVC, see the corresponding user manual.
- Remove the lid/lids (n) from the filter.
- A cleaning tool (r) is included with the Pond Clear Pro 36000 (also available separately, Art. 06030240), with which you can easily clean the filter foam. The filter foam can simply remain in the filter.
- Push the cleaning tool up and down over the filter foam, wringing it out without getting your hands wet or dirty.
- When the filter foam is well wrung out, open the dirty water drain (see fig. C), allowing the dirty water to drain into the sewer, or use it for watering the garden.
- The Pond Clear Pro 36000 has a built-in sliding valve (q) between the first and second chamber. Drain the primary chamber first before pulling open the sliding valve, allowing the second chamber to drain.
- If necessary, turn on the pump for a while to flush out any remaining waste water at the bottom of the filter box.
- Make sure the pump is off and again close both the slide valve and the dirty water drain.

- A cleaning tool (r) is included with the Pond Clear Pro 36000 (also available separately, Art. 06030240), with which you can easily clean the filter foam. The filter foam can simply remain in the filter.
- Push the cleaning tool up and down over the filter foam, wringing it out without getting your hands wet or dirty.
- When the filter foam is well wrung out, open the dirty water drain (see fig. C), allowing the dirty water to drain into the sewer, or use it for watering the garden.
- The Pond Clear Pro 36000 has a built-in sliding valve (q) between the first and second chamber. Drain the primary chamber first before pulling open the sliding valve, allowing the second chamber to drain.
- If necessary, turn on the pump for a while to flush out any remaining waste water at the bottom of the filter box.
- Make sure the pump is off and again close both the slide valve and the dirty water drain.
- If you do not have the cleaning tool (Pond Clear Pro 18000), remove the filter foam by pulling it out of the filter.
- Put the filter foam in a bucket with (preferably) pond water and push both plastic sides towards each other several times so that the foam is wrung out.
- Let the dirty water drain out of the filter and then slide the filter foam back, with the openwork plastic side of the filter foam on the outlet side and the closed plastic side on the UVC side.
- For the Pond Clear Pro 18000, the blue filter foam should be on the outside in the filter box and the yellow in the centre. On the Pond Clear Pro 36000, the blue filter foam (l1) is in the primary chamber and the yellow filter foam (l2) is in the second chamber.
- Make sure the dirty water outlet is closed before switching on the pump. Do not switch on the UVC until the water circulation is fully restored.
- Japanese matting hardly requires any maintenance, cleaning bacteria develop and attach themselves in the mats and ensure biological filtration. When rinsing clean you remove these useful bacteria which disrupts the biological filtration.
- Clean the Bio-Balls once or twice a year by rinsing them with pond water. Do not use tap water for this purpose.
- Replace the filter foam (Art. 06030225 ) once a year, do not replace all the filter foam at once, but one filter foam per month in each container (depending on the model).
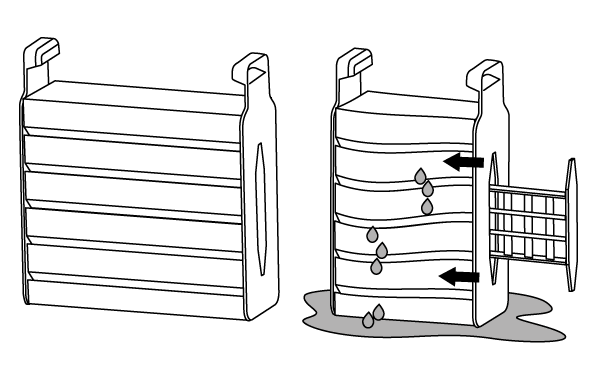
- If you do not have the cleaning tool (Pond Clear Pro 18000), remove the filter foam by pulling it out of the filter.
- Put the filter foam in a bucket with (preferably) pond water and push both plastic sides towards each other several times so that the foam is wrung out.
- Let the dirty water drain out of the filter and then slide the filter foam back, with the openwork plastic side of the filter foam on the outlet side and the closed plastic side on the UVC side.
- For the Pond Clear Pro 18000, the blue filter foam should be on the outside in the filter box and the yellow in the centre. On the Pond Clear Pro 36000, the blue filter foam (l1) is in the primary chamber and the yellow filter foam (l2) is in the second chamber.
- Make sure the dirty water outlet is closed before switching on the pump. Do not switch on the UVC until the water circulation is fully restored.
- Japanese matting hardly requires any maintenance, cleaning bacteria develop and attach themselves in the mats and ensure biological filtration. When rinsing clean you remove these useful bacteria which disrupts the biological filtration.
- Clean the Bio-Balls once or twice a year by rinsing them with pond water. Do not use tap water for this purpose.
- Replace the filter foam (Art. 06030225 ) once a year, do not replace all the filter foam at once, but one filter foam per month in each container (depending on the model).
Pond Clear Pro 18000 & 36000 UVC
User manual
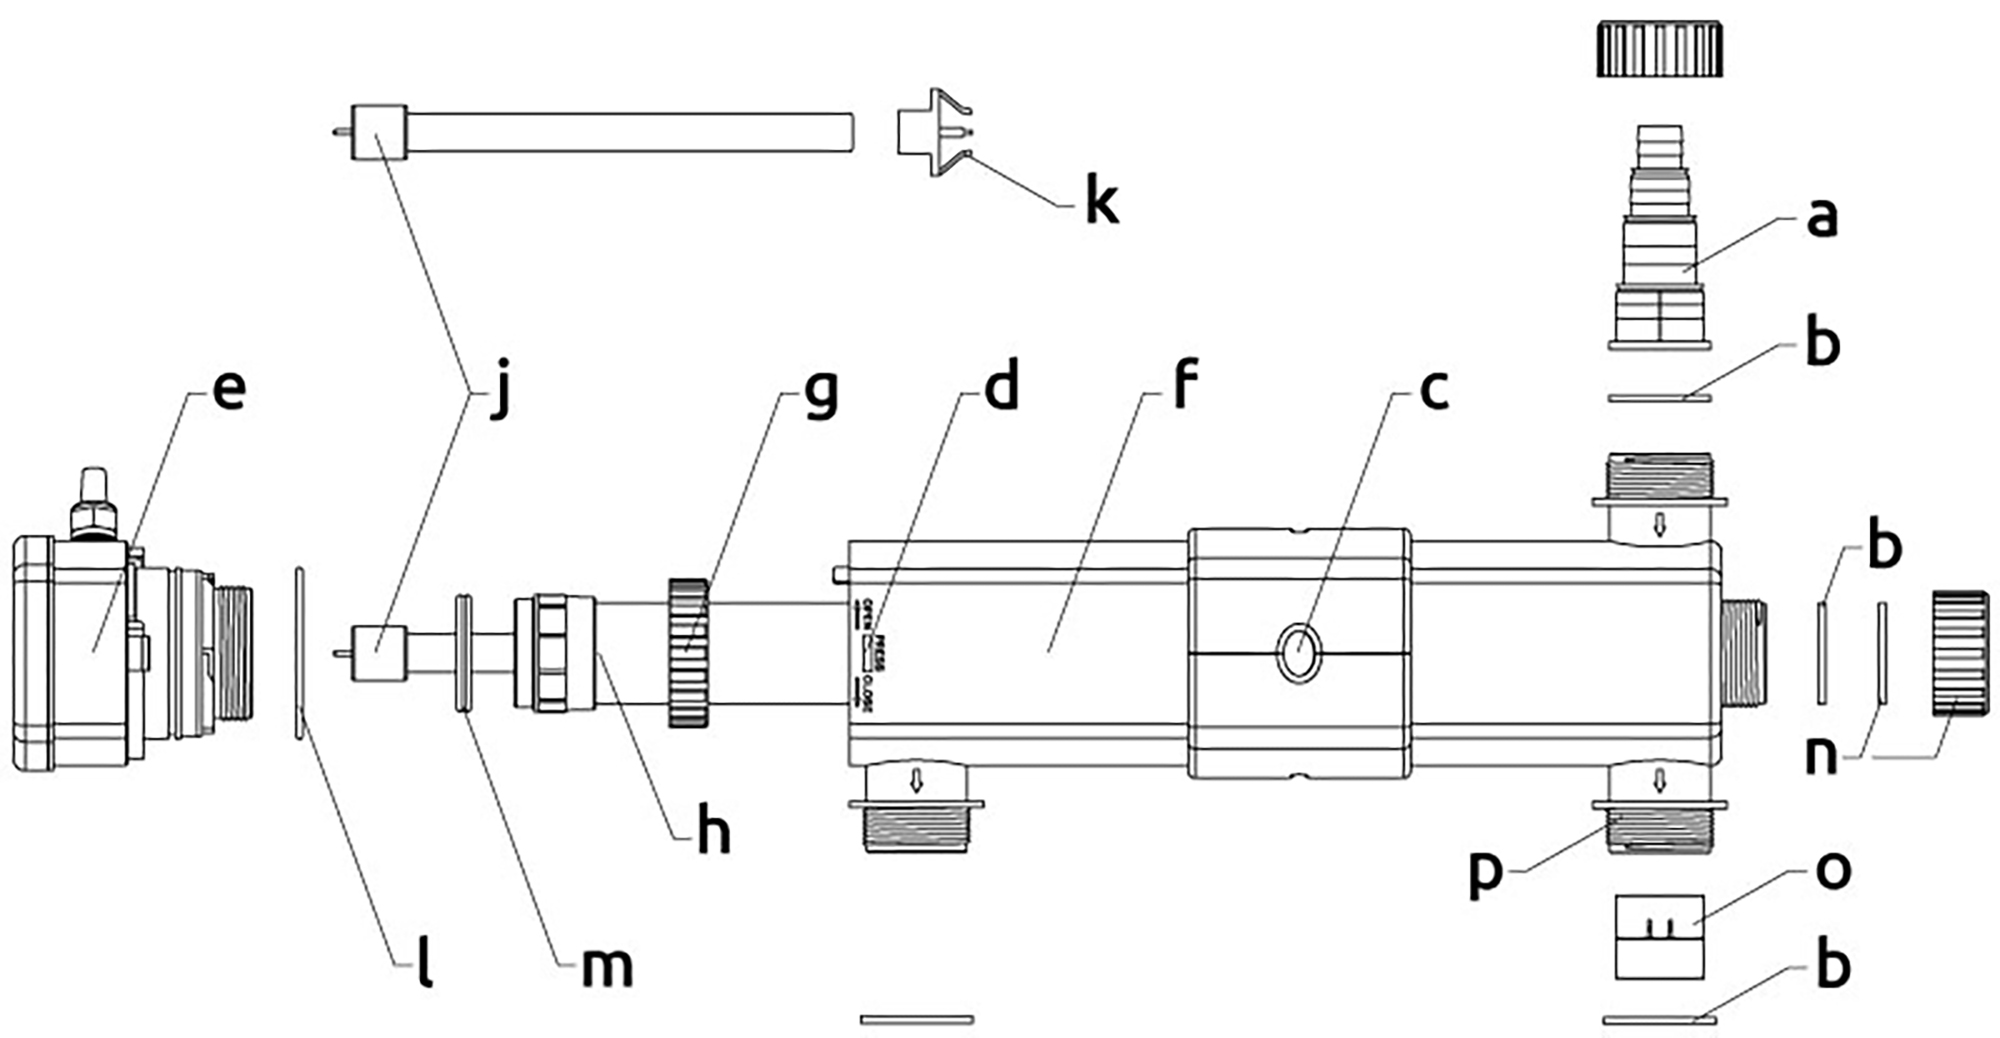
a. Hose connector
b. Rubber gasket
c. Control glass
d. Catch
e. Electrical part/unit head
f. UVC housing
g. Quartz locknut
h. Quartz glass with gasket
j. UV-lamp
k. UV-lamp clip
l. O-ring unit head
m. O-ring quartz glass
n. End cap
o. Flow regulator
p. Outlet
a. Hose connector
b. Rubber gasket
c. Control glass
d. Catch
e. Electrical part/unit head
f. UVC housing
g. Quartz locknut
h. Quartz glass with gasket
j. UV-lamp
k. UV-lamp clip
l. O-ring unit head
m. O-ring quartz glass
n. End cap
o. Flow regulator
p. Outlet
Function
The UVC device ensures a clear pond within 14 days. The UV lamp produces ultraviolet light with a wavelength of exactly 254 nm, at which wave length the disinfecting capacity is optimal. The UV radiation combats floating algae without the use of chemicals and reduces harmful bacteria and germs. The UV-C radiation does not affect the pH value of the pond water and is safe for fish and plants.
Installation
- Install the UVC device on the outside of the filter box (see user manual Pond Clear Pro Filter). A pump transports the water from the pond through the UVC device and then through the filter back into the pond. See technical data for the correct pump capacity. Purification bacteria in the filter do not come into contact with the UV light, therefore the biological filtration is not adversely affected.
- If the pump capacity of your pond pump is less than 5000 L/h, place the flow regulator (o) inside the outlet (p) opposite the inlet, enabling you to shut off the water outflow at this point.
Installation
- Install the UVC device on the outside of the filter box (see user manual Pond Clear Pro Filter). A pump transports the water from the pond through the UVC device and then through the filter back into the pond. See technical data for the correct pump capacity. Purification bacteria in the filter do not come into contact with the UV light, therefore the biological filtration is not adversely affected.
- If the pump capacity of your pond pump is less than 5000 L/h, place the flow regulator (o) inside the outlet (p) opposite the inlet, enabling you to shut off the water outflow at this point.
- Cut the hose connector (a) to the same diameter as the diameter of the hose. Do not screw the hose connector on the UVC device before cutting to avoid damaging the UVC device.
- Screw the hose connector with the rubber gasket (b) onto the UVC device.
- Connect the pump to the hose connector of the UVC device using a pond hose. Secure the hose with a hose clamp.
- Switch on the pump and check for any leaks.
- Then turn on the UVC device by plugging in the power cord.

- Cut the hose connector (a) to the same diameter as the diameter of the hose. Do not screw the hose connector on the UVC device before cutting to avoid damaging the UVC device.
- Screw the hose connector with the rubber gasket (b) onto the UVC device.
- Connect the pump to the hose connector of the UVC device using a pond hose. Secure the hose with a hose clamp.
- Switch on the pump and check for any leaks.
- Then turn on the UVC device by plugging in the power cord.
- To ensure the UV lamp is active use the control glass (c) on top of the housing to view.
- To avoid UVC overheating, switch off the UVC device when no water is flowing past it.
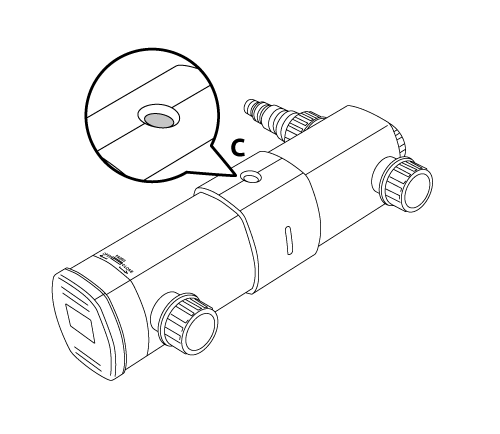
- To ensure the UV lamp is active use the control glass (c) on top of the housing to view.
- To avoid UVC overheating, switch off the UVC device when no water is flowing past it.
Maintenance
- Check monthly if UV lamp is burning via the control glass (c).
- Remove the plug from the socket before carrying out maintenance!
- The UVC device should be cleaned twice a year. As soon as algae growth increases, check the UVC device and UV-lamp and clean the whole or exchange the UV lamp as needed.
- The lamp is hot, wait 10 minutes after switch off before opening the UVC device.
- Ensure that the water is drained out of the UVC device first, before opening the device.
- Press the rectangular catch (d) to unlock the electrical part/unit head (e) and housing.
- Turn the unit head (e) counter-clockwise (in the direction of the arrow OPEN) against the stop and carefully pull it out of the housing.
- Clean the inside of the housing (f) with a clean brush or cloth and rinse with clean tap water (be careful not to damage the helix interior).
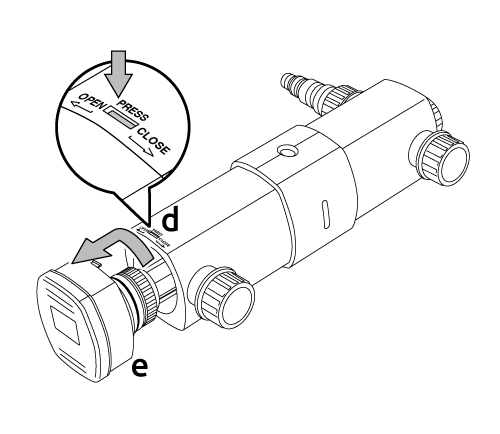
- Press the rectangular catch (d) to unlock the electrical part/unit head (e) and housing.
- Turn the unit head (e) counter-clockwise (in the direction of the arrow OPEN) against the stop and carefully pull it out of the housing.
- Clean the inside of the housing (f) with a clean brush or cloth and rinse with clean tap water (be careful not to damage the helix interior).
- Loosen the locking screw (g) from the unit head. Pull off the quartz glass with gasket (h) by gently moving it from side to side.
- Carefully clean the quartz glass outer face with a soft cloth and SuperFish Pump & UVC Clean. After cleaning, thoroughly rinse the quartz glass with clean tap water and check for damage. Replace the quartz glass if it shows any damage (to prevent glass breakage). Quartz glass replacement kit for Pond Clear Pro 18000 UVC (Art. 06030245) and Pond Clear Pro 36000 UVC (Art. 06030260).
- The UV-lamp should be replaced annually, as the lamp may still show active but no longer emits enough UV radiation (maximum 8000 operating hours). Replacement lamp for Pond Clear Pro 18000 UVC: SF UV PL-lamp 18 W 2G11-225 mm (Art. 06011025) and Pond Clear Pro 36000 UVC: SF UV PL-lamp 36 W 2G11-415 mm (Art. 06011035).
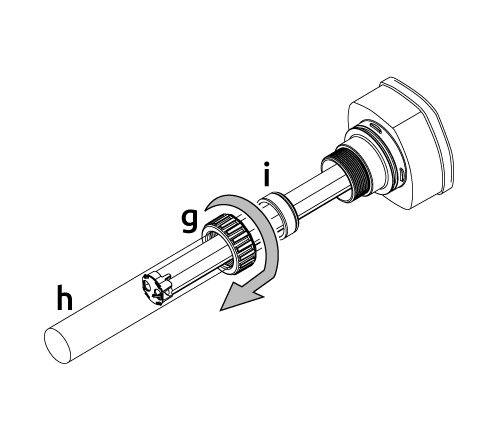
- Loosen the locking screw (g) from the unit head. Pull off the quartz glass with gasket (h) by gently moving it from side to side.
- Carefully clean the quartz glass outer face with a soft cloth and SuperFish Pump & UVC Clean. After cleaning, thoroughly rinse the quartz glass with clean tap water and check for damage. Replace the quartz glass if it shows any damage (to prevent glass breakage). Quartz glass replacement kit for Pond Clear Pro 18000 UVC (Art. 06030245) and Pond Clear Pro 36000 UVC (Art. 06030260).
- The UV-lamp should be replaced annually, as the lamp may still show active but no longer emits enough UV radiation (maximum 8000 operating hours). Replacement lamp for Pond Clear Pro 18000 UVC: SF UV PL-lamp 18 W 2G11-225 mm (Art. 06011025) and Pond Clear Pro 36000 UVC: SF UV PL-lamp 36 W 2G11-415 mm (Art. 06011035).
Remove the old UV-lamp (j) with the lamp clip (k) from the fitting of the unit head.
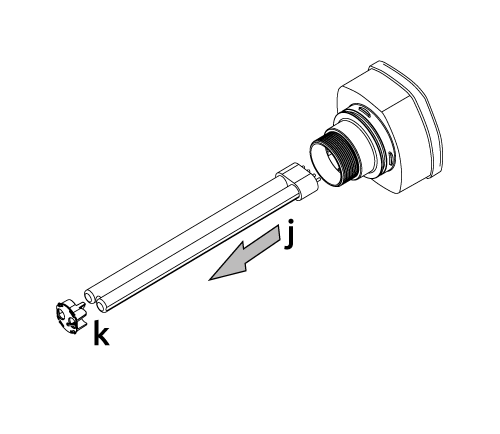
Remove the old UV-lamp (j) with the lamp clip (k) from the fitting of the unit head.
Insert the new UV-lamp (j) in the fitting of the unit head and put the clip (h) on the UV-lamp.
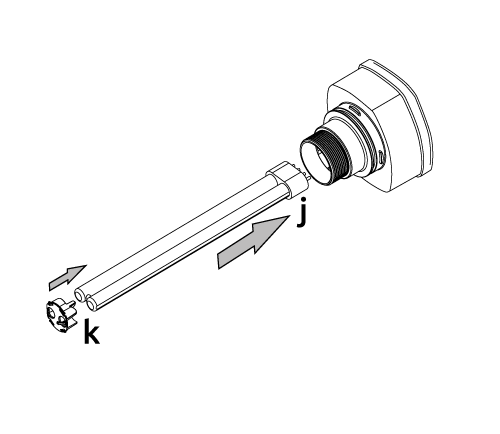
Insert the new UV-lamp (j) in the fitting of the unit head and put the clip (h) on the UV-lamp.
Slide the quartz glass with gasket (h) gently over the UV-lamp into the unit head, check the position of the O-rings (m).
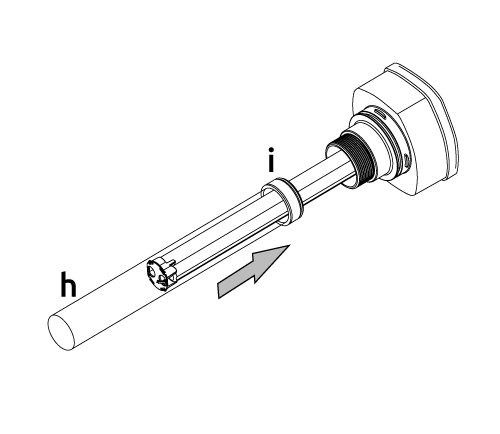
Slide the quartz glass with gasket (h) gently over the UV-lamp into the unit head, check the position of the O-rings (m).
Slide the locknut (g) over the quartz glass and tighten it onto the unit head.
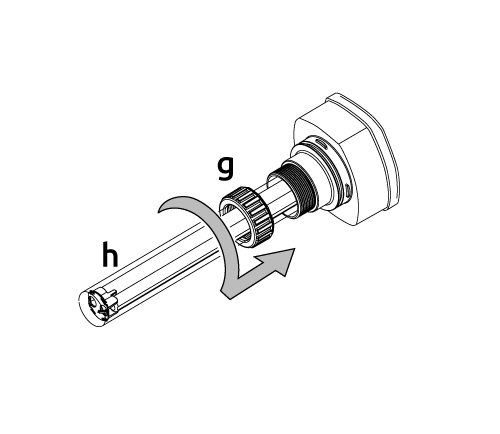
Slide the locknut (g) over the quartz glass and tighten it onto the unit head.
- Place the unit head (e) back into the housing (f) correctly, check the position of the O-ring (l) and turn the unit head clockwise (in the direction of the arrow CLOSE) so that the catch (d) re-engages.
- Check the whole assembly for possible leaks and check if the UV lamp is working.
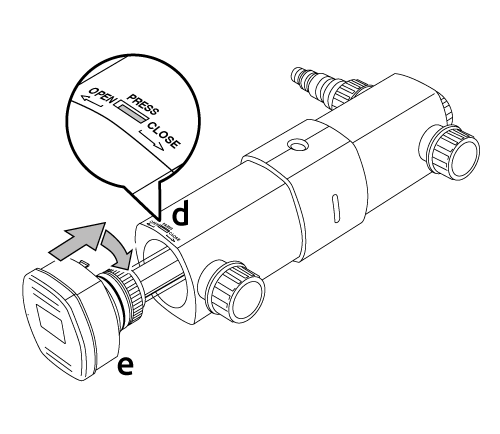
- Place the unit head (e) back into the housing (f) correctly, check the position of the O-ring (l) and turn the unit head clockwise (in the direction of the arrow CLOSE) so that the catch (d) re-engages.
- Check the whole assembly for possible leaks and check if the UV lamp is working.
Specification
| Model | Pond Clear Pro 18000 UVC | Pond Clear Pro 36000 UVC |
|---|---|---|
| UV-lamp | 18 Watt | 36 Watt |
| Max. pump capacaty | 9000 l/h | 12.000 l/h |
| Max. pond content | 18.000 L | 36.000 L |
| Hose connectors | ø 20/25/32/38 mm | ø 20/25/32/38 mm |
| Cable length | 5 metres | 5 metres |