


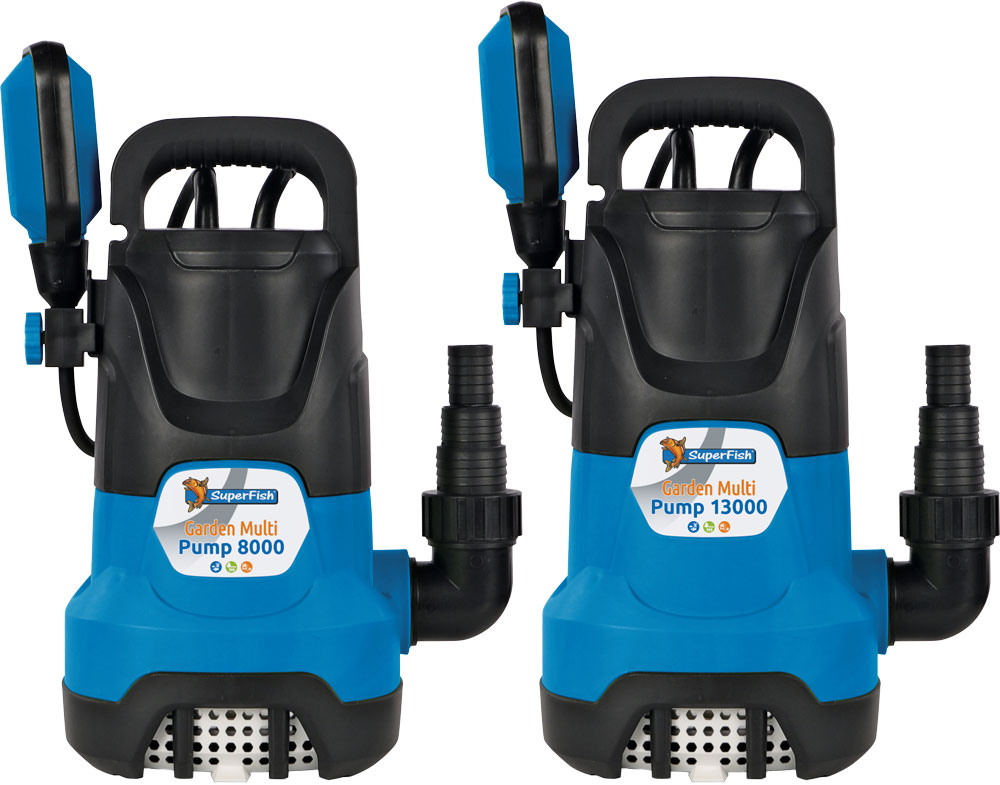
Garden Multi Pump
User manual
Hose connection, Image B
The Garden Multi pump is suitable for various types of pond and garden hoses (1” (25 mm)/G1/1½” (38 mm).
Depending on the diameter of the hose or type of hose, cut the Multi-step connection to the desired diameter. First cut the connection to the desired diameter and then screw the connection into the knee piece on the pump.
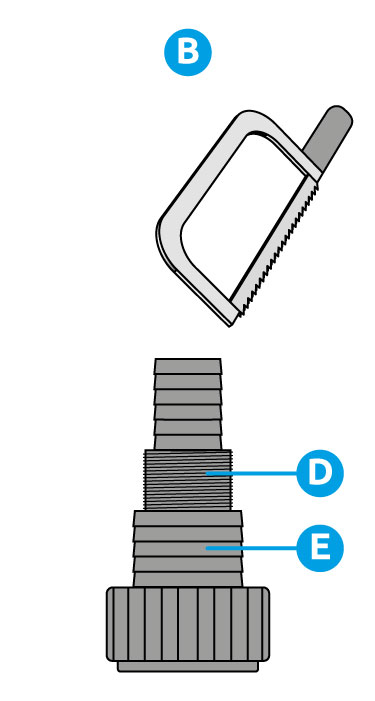
Hose connection, Image B
The Garden Multi pump is suitable for various types of pond and garden hoses (1” (25 mm)/G1/1½” (38 mm).
Depending on the diameter of the hose or type of hose, cut the Multi-step connection to the desired diameter. First cut the connection to the desired diameter and then screw the connection into the knee piece on the pump.
Image C
A 25 mm (pond) hose can be connected directly to the hose connector. Always secure the hose securely with a suitable hose clamp (not supplied).
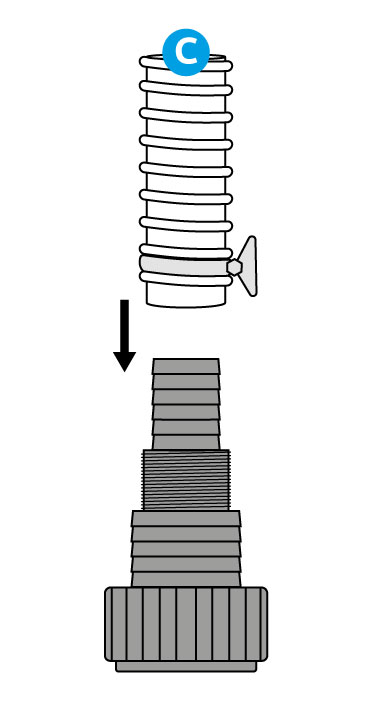
Image C
A 25 mm (pond) hose can be connected directly to the hose connector. Always secure the hose securely with a suitable hose clamp (not supplied).
Image D
A hose with garden hose connector can be connected using a so-called tap fitting (G1/33.3 mm). Cut off the hose connector at position D. Screw the tap piece (not supplied) onto the hose connector, use Teflon tape around the thread to seal it completely. You can now connect the hose directly.
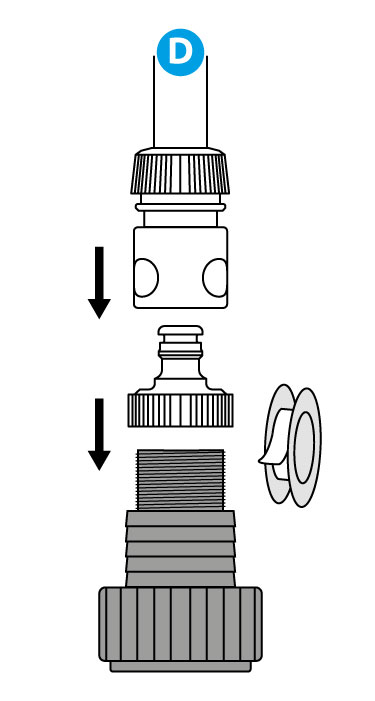
Image D
A hose with garden hose connector can be connected using a so-called tap fitting (G1/33.3 mm). Cut off the hose connector at position D. Screw the tap piece (not supplied) onto the hose connector, use Teflon tape around the thread to seal it completely. You can now connect the hose directly.
Image E
Cut the hose connection at position E when using a 38 mm (pond) hose. Always secure the hose securely with a suitable hose clamp (not supplied).
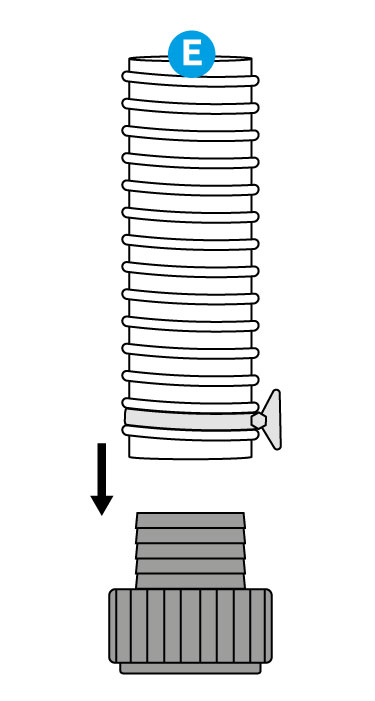
Image E
Cut the hose connection at position E when using a 38 mm (pond) hose. Always secure the hose securely with a suitable hose clamp (not supplied).
Installation, Image F
Use the handle to place the pump in the water.
NOTICE! If this is not possible due to the depth of the water, you can attach a rope to the handle and use it to slowly lower the pump. Use the rope also when you want to take the pump out of the water again. Never lift or move the pump by its cord.
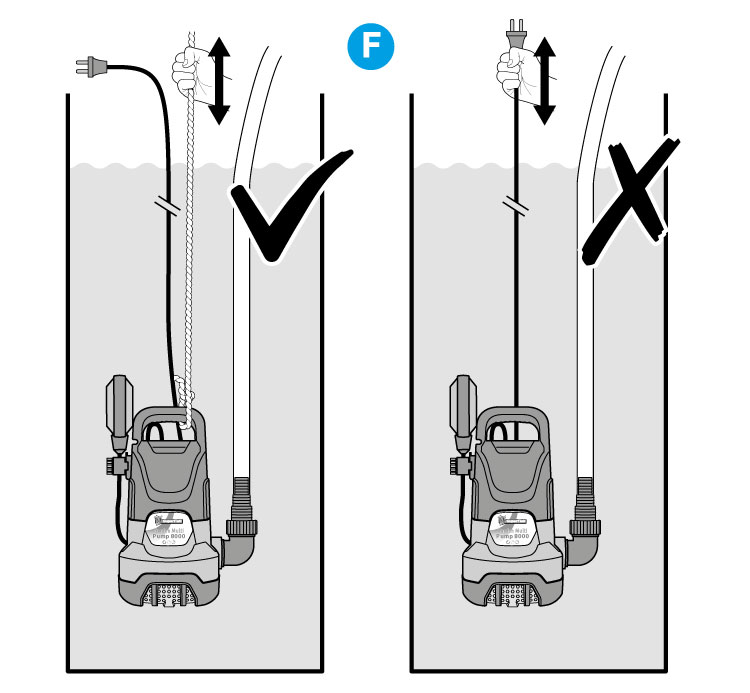
Installation, Image F
Use the handle to place the pump in the water.
NOTICE! If this is not possible due to the depth of the water, you can attach a rope to the handle and use it to slowly lower the pump. Use the rope also when you want to take the pump out of the water again. Never lift or move the pump by its cord.
Image G
Make sure that the pump stands horizontally and firmly on a flat surface so that it cannot fall over.
- Make sure the intake openings of the pump are not blocked.
- Provide enough space around the pump so that the float can always move freely to turn the pump on and off.
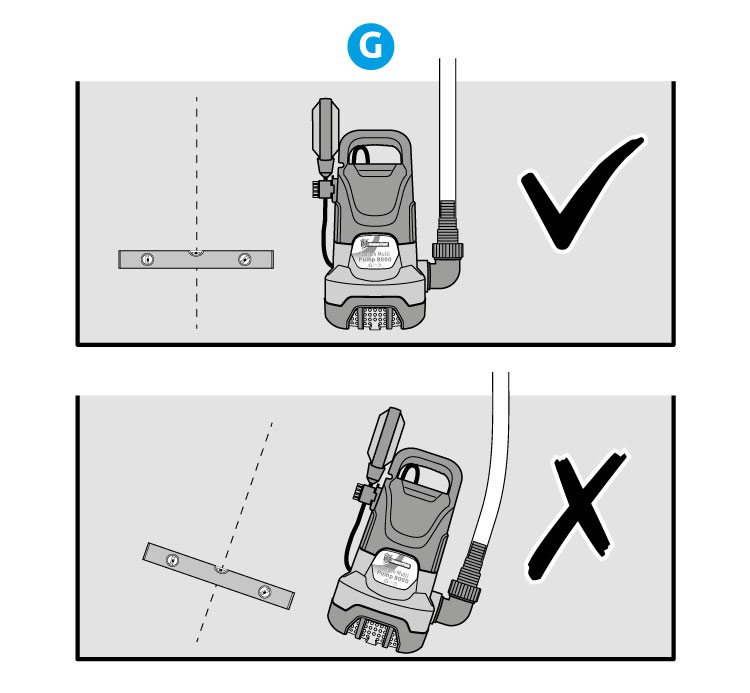
Image G
Make sure that the pump stands horizontally and firmly on a flat surface so that it cannot fall over.
- Make sure the intake openings of the pump are not blocked.
- Provide enough space around the pump so that the float can always move freely to turn the pump on and off.
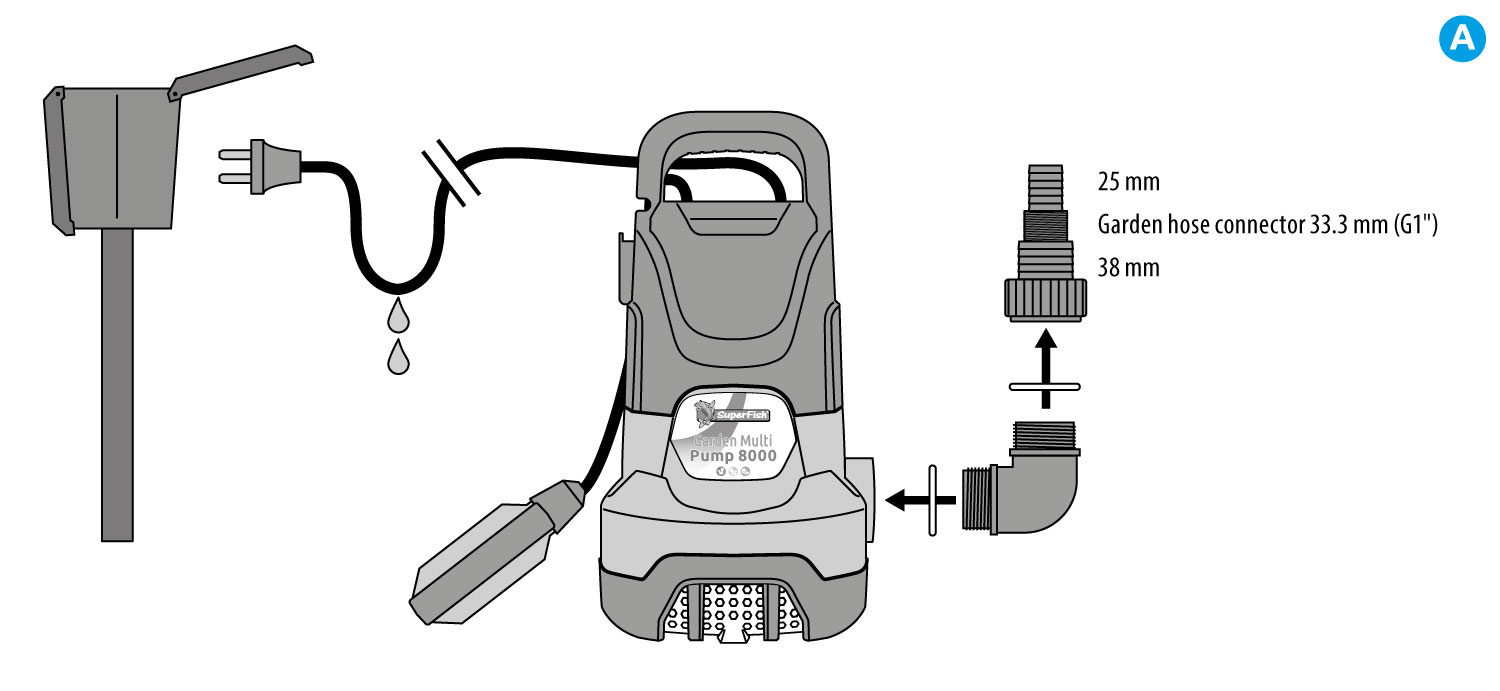
Image A
Plug the pump into the socket and make sure there is a drip loop in the cord.
Make sure that no one can trip over the cord and that the cord cannot be damaged.
Image A
Plug the pump into the socket and make sure there is a drip loop in the cord.
Make sure that no one can trip over the cord and that the cord cannot be damaged.
Operation
The pump is equipped with a float switch that automatically switches the pump on or off at a certain water level. The switch-on and switch-off height of the float can be easily adjusted by adjusting the cable length of the float with the cable guide. The float switch prevents the pump from running dry. The minimum water level for water intake is 6 cm.
Image H
You can attach the float with the cable guide in two ways. With the float facing downwards, the pump will switch on and off at a lower water level.
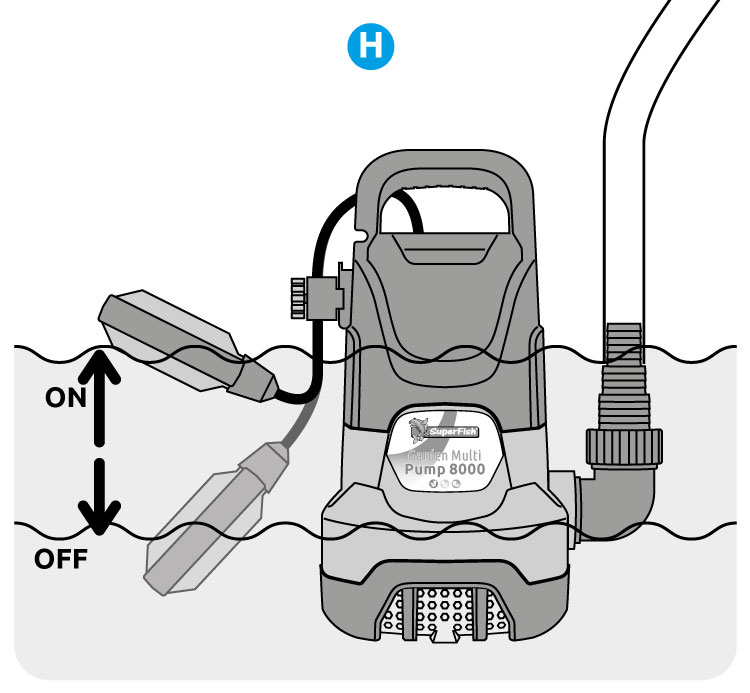
Image H
You can attach the float with the cable guide in two ways. With the float facing downwards, the pump will switch on and off at a lower water level.
Image I
By reversing the cable guide with the float facing up, the pump will switch on and off at a higher water level.
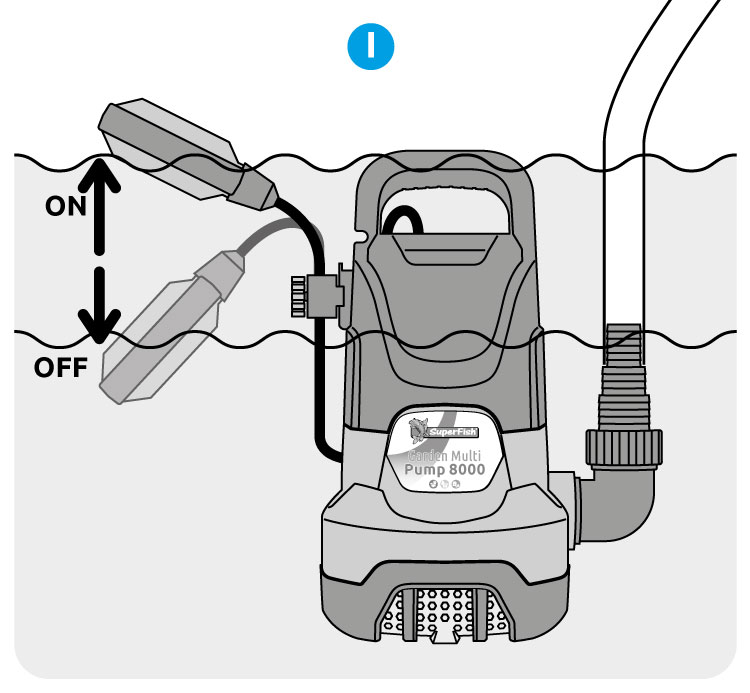
Image I
By reversing the cable guide with the float facing up, the pump will switch on and off at a higher water level.
Image J
The length of the cable section between the cable guide and float determines the height difference between switching on and off. The longer the cable section the greater the difference.
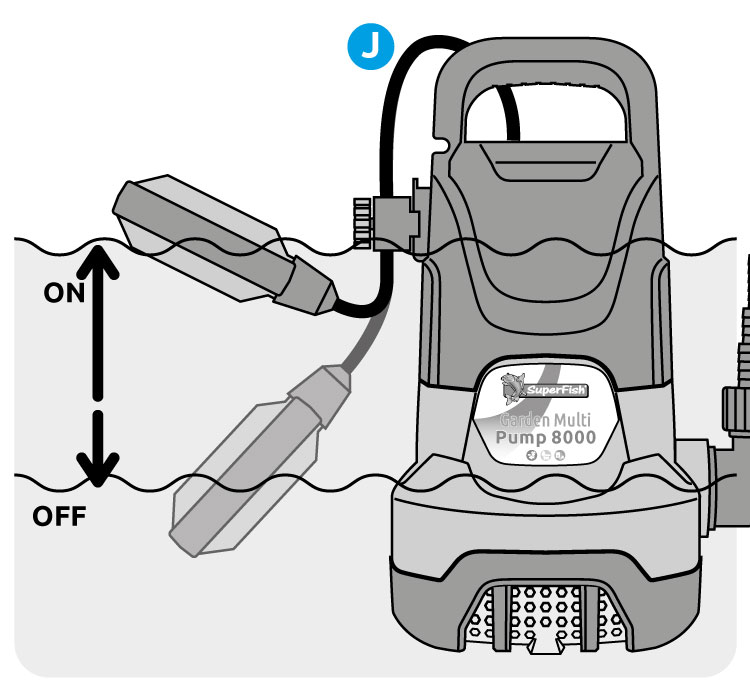
Image J
The length of the cable section between the cable guide and float determines the height difference between switching on and off. The longer the cable section the greater the difference.
Image J
If the cable guide is not attached to the pump, the difference between switch-on and switch-off moment is greatest.
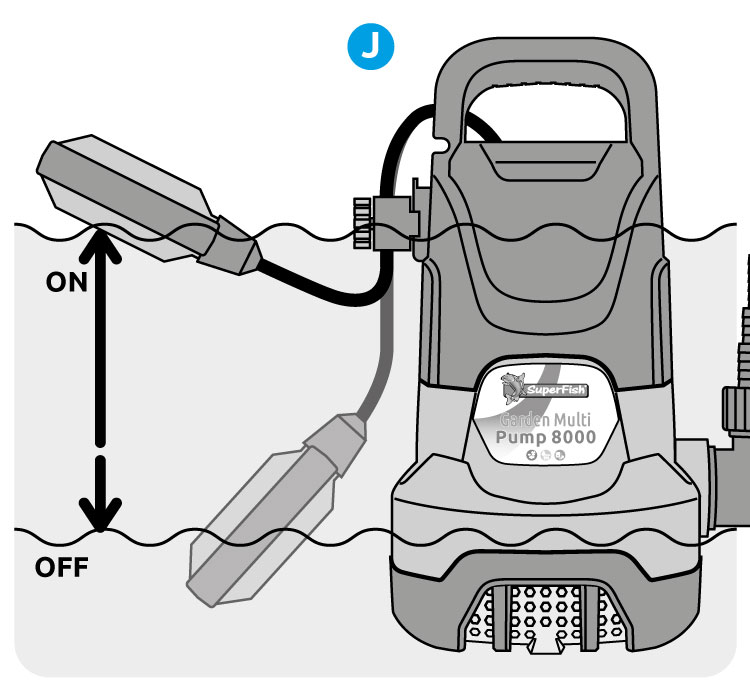
Image J
If the cable guide is not attached to the pump, the difference between switch-on and switch-off moment is greatest.
Image K
If the float is placed upright in the cable guide, the pump will continue to pump regardless of the water level. This should only be used under supervision to prevent damage due to running dry or when the pump is used for water circulation.
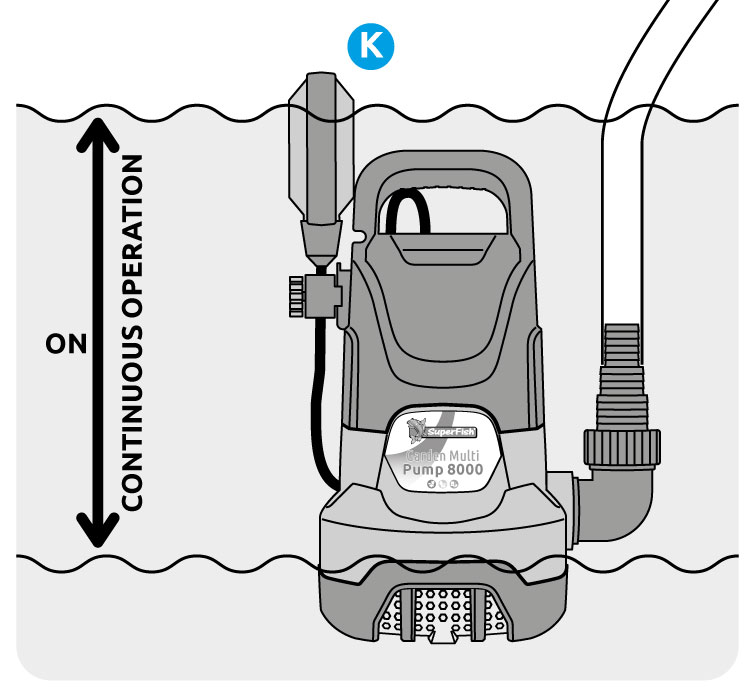
Image K
If the float is placed upright in the cable guide, the pump will continue to pump regardless of the water level. This should only be used under supervision to prevent damage due to running dry or when the pump is used for water circulation.
Image L
You can slide the grid in front of the intake openings to prevent you from sucking up coarser particles or fish ed. If you do want to pump out all particles and dirt (up to 25 mm in diameter), slide the grate upwards.
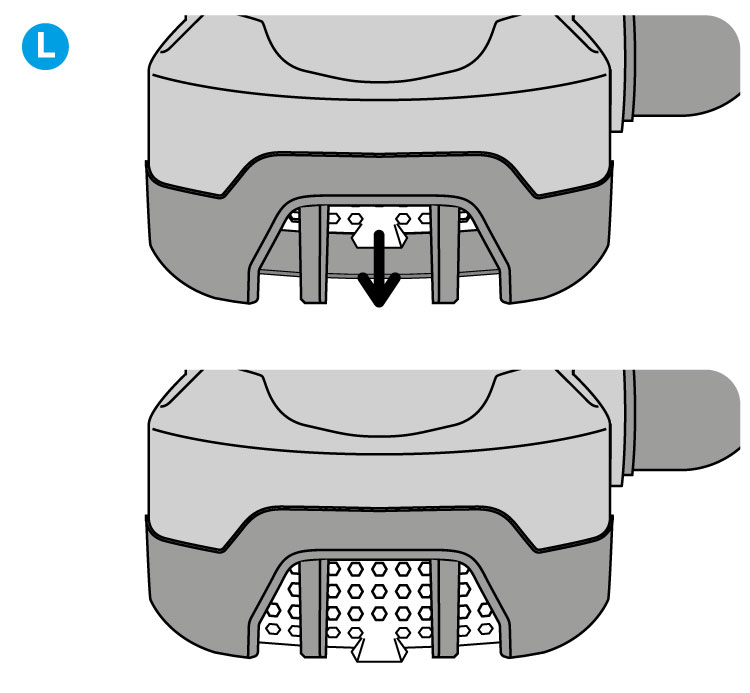
Image L
You can slide the grid in front of the intake openings to prevent you from sucking up coarser particles or fish ed. If you do want to pump out all particles and dirt (up to 25 mm in diameter), slide the grate upwards.
Maintenance
- If the pump has been used in pumping heavily contaminated water, water containing chlorine or detergent, flush the pump. Pump lukewarm water (max. 35°C) possibly with a little mild detergent (dishwashing detergent) until the pumped water is clear again.
- With frequent use, the pump should be cleaned regularly (twice a year) to ensure trouble-free operation. Scale deposits, in particular, can cause your pump to cease. There is no warranty on failures due to dirty pumps and scale build up inside the pump caused by improper or lack of maintenance.
- Remove the plug from the socket before carrying out maintenance!
- Disconnect the pump from the hose and rinse and rinse it under the tap or garden hose.
- For proper cleaning and descaling, it is best to use SuperFish Pump & UVC Clean (Art. 07070500), which is available from your dealer.
- Mix SuperFish Pump & UVC Clean in a large bucket with clean tap water, according to the instructions on the bottle. Immerse the pump into it and leave it there for 24 hours.
- Take the pump out of the bucket. Rinse everything with clean tap water.
- Depending on usage the rotor and cover can get worn out and damaged, this is normal. A new rotor and cover are separately available from your dealer.
- NOTICE! During periods of frost you should remove the pump from the water. Clean and dry the pump well and store it frost free.
Technical specifications
| Model | Power | Maximum pump capacity | Maximum head | miximum water depth | Minimum water depth | Hose connection |
|---|---|---|---|---|---|---|
| Garden Multi Pump 8000 | 400 Watt | 8.000 l/h | 5 metre | 5 metre | 6 cm | 1"(25mm)/G1/1,5" (38 mm) |
| Garden Multi Pump 13000 | 495 Watt | 13.000 l/h | 8 metre | 5 metre | 6 cm | 1"(25mm)/G1/1,5" (38 mm) |